HP Model 712/100 hp 9000 series 700 model 712 service handbook (a2615-90039) - Page 103
Removing the Hard Disk
 |
View all HP Model 712/100 manuals
Add to My Manuals
Save this manual to your list of manuals |
Page 103 highlights
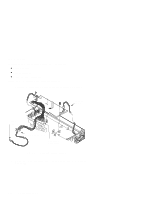
3. Remove the HP PAC from the top of the disk drive, as shown in Figure 5-17. 4. Lift the drive straight up, as shown in Figure 5-17. Figure 6-17. Removing the Hard Disk 5. Check the SCSI ID and any other jumper settings on the replacement drive, as shown in Chapter 3. Field Replaceable Units 5-27
-
 1
1 -
2
-
3
-
4
-
5
-
6
-
7
-
8
-
9
-
10
-
11
-
12
-
13
-
14
-
15
-
16
-
17
-
18
-
19
-
20
-
21
-
22
-
23
-
24
-
25
-
26
-
27
-
28
-
29
-
30
-
31
-
32
-
33
-
34
-
35
-
36
-
37
-
38
-
39
-
40
-
41
-
42
-
43
-
44
-
45
-
46
-
47
-
48
-
49
-
50
-
51
-
52
-
53
-
54
-
55
-
56
-
57
-
58
-
59
-
60
-
61
-
62
-
63
-
64
-
65
-
66
-
67
-
68
-
69
-
70
-
71
-
72
-
73
-
74
-
75
-
76
-
77
-
78
-
79
-
80
-
81
-
82
-
83
-
84
-
85
-
86
-
87
-
88
-
89
-
90
-
91
-
92
-
93
-
94
-
95
-
96
-
97
-
 98
98 -
 99
99 -
 100
100 -
 101
101 -
 102
102 -
 103
103 -
 104
104 -
 105
105 -
 106
106 -
 107
107 -
 108
108 -
109
-
110
-
111
-
112
-
113
-
114
-
115
-
116
-
117
-
118
-
119
-
120
-
121
-
122
-
123
-
124
-
125
-
126
-
127
-
128
-
129
-
130
-
131
-
132
-
133
-
134
-
135
-
136
-
137
-
138
-
139
 |
 |

Field Replaceable Units
5–27
3.
Remove the HP PAC from the top of the disk drive, as shown in Figure 5–17.
4.
Lift the drive straight up, as shown in Figure 5–17.
Figure 6–17.
Removing the Hard Disk
5.
Check the SCSI ID and any other jumper settings on the replacement drive, as
shown in Chapter 3.