HP Model 712/100 hp 9000 series 700 model 712 service handbook (a2615-90039) - Page 57
Setting the Monitor Type at Power
 |
View all HP Model 712/100 manuals
Add to My Manuals
Save this manual to your list of manuals |
Page 57 highlights
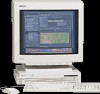
The screen displays your new monitor selection, similar to the following: Type ---- 1 2 3 4 5 6 7 8 9 10 11 12 13 Monitor Choices Resolution ---------- 1280x1024 1024x768 1024x768 1024x768 1280x1024 1024x768 640x480 1280x1024 1024x768 800x600 640x480 1280x1024 1280x1024 Frequency --------- 72Hz 75Hz 70Hz 72Hz 60Hz 60Hz 60Hz 75Hz 75Hz 75Hz 75Hz 72Hz 50Hz Flat Panel VESA VESA VESA VESA Greyscale Current Monitor Type is 1 1280x1024 72Hz BOOT_ADMIN> Setting the Monitor Type at Power On You must set the workstation's graphics parameters for either of the following circumstances: D You have replaced the system's CPU board D You have replaced the workstation's monitor with a different monitor type, and you have not set the workstation's graphics parameters by using the monitor command before doing so. Press Tab after the keyboard's lights flash during the boot process to initiate the automatic monitor selection process. NOTICE: On some PS2 keyboards, the LEDs flash when power is first applied, then flash again when the keyboard is initialized. Press the Tab key after the LEDs flash the second time. The system will query you for the new monitor type, similar to the following: Type ---- 2 Resolution ---------- 1024x768 Frequency --------- 70Hz Press to select this monitor type. When you press Enter , the system queries you to confirm your selection: Type ---- 2 Resolution ---------- 1024x768 Frequency --------- 70Hz Configuration 3-17
-
 1
1 -
2
-
3
-
4
-
5
-
6
-
7
-
8
-
9
-
10
-
11
-
12
-
13
-
14
-
15
-
16
-
17
-
18
-
19
-
20
-
21
-
22
-
23
-
24
-
25
-
26
-
27
-
28
-
29
-
30
-
31
-
32
-
33
-
34
-
35
-
36
-
37
-
38
-
39
-
40
-
41
-
42
-
43
-
44
-
45
-
46
-
47
-
48
-
49
-
50
-
51
-
 52
52 -
 53
53 -
 54
54 -
 55
55 -
 56
56 -
 57
57 -
 58
58 -
 59
59 -
 60
60 -
 61
61 -
 62
62 -
63
-
64
-
65
-
66
-
67
-
68
-
69
-
70
-
71
-
72
-
73
-
74
-
75
-
76
-
77
-
78
-
79
-
80
-
81
-
82
-
83
-
84
-
85
-
86
-
87
-
88
-
89
-
90
-
91
-
92
-
93
-
94
-
95
-
96
-
97
-
98
-
99
-
100
-
101
-
102
-
103
-
104
-
105
-
106
-
107
-
108
-
109
-
110
-
111
-
112
-
113
-
114
-
115
-
116
-
117
-
118
-
119
-
120
-
121
-
122
-
123
-
124
-
125
-
126
-
127
-
128
-
129
-
130
-
131
-
132
-
133
-
134
-
135
-
136
-
137
-
138
-
139
 |
 |
