HP Model 712/100 hp 9000 series 700 model 712 service handbook (a2615-90039) - Page 122
Removing the Cover C2943A CD-ROM
 |
View all HP Model 712/100 manuals
Add to My Manuals
Save this manual to your list of manuals |
Page 122 highlights
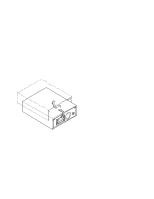
Remove the drive's components in the following order until you've removed the desired FRU. 1. Remove the cover. Push the locking latches toward each other, slide the cover forward about an inch, and lift off (see Figure 5-31). Figure 6-31. Removing the Cover (C2943A CD-ROM) 2. Lift out the top HP PAC. 3. Remove the drive. Lift the rear of the drive slightly and disconnect the power, SCSI, and audio cables. Lift the drive from the chassis. NOTICE: When replacing the drive, make sure the jumpers are set to the correct SCSI ID, as described in Chapter 3. 5-46 Field Replaceable Units
-
 1
1 -
2
-
3
-
4
-
5
-
6
-
7
-
8
-
9
-
10
-
11
-
12
-
13
-
14
-
15
-
16
-
17
-
18
-
19
-
20
-
21
-
22
-
23
-
24
-
25
-
26
-
27
-
28
-
29
-
30
-
31
-
32
-
33
-
34
-
35
-
36
-
37
-
38
-
39
-
40
-
41
-
42
-
43
-
44
-
45
-
46
-
47
-
48
-
49
-
50
-
51
-
52
-
53
-
54
-
55
-
56
-
57
-
58
-
59
-
60
-
61
-
62
-
63
-
64
-
65
-
66
-
67
-
68
-
69
-
70
-
71
-
72
-
73
-
74
-
75
-
76
-
77
-
78
-
79
-
80
-
81
-
82
-
83
-
84
-
85
-
86
-
87
-
88
-
89
-
90
-
91
-
92
-
93
-
94
-
95
-
96
-
97
-
98
-
99
-
100
-
101
-
102
-
103
-
104
-
105
-
106
-
107
-
108
-
109
-
110
-
111
-
112
-
113
-
114
-
115
-
116
-
 117
117 -
 118
118 -
 119
119 -
 120
120 -
 121
121 -
 122
122 -
 123
123 -
 124
124 -
 125
125 -
 126
126 -
 127
127 -
128
-
129
-
130
-
131
-
132
-
133
-
134
-
135
-
136
-
137
-
138
-
139
 |
 |

5–46
Field Replaceable Units
Remove the drive’s components in the following order until you’ve removed the
desired FRU.
1.
Remove the cover.
Push the locking latches toward each other, slide the cover forward about an
inch, and lift off (see Figure 5–31).
Figure 6–31.
Removing the Cover (C2943A CD–ROM)
2.
Lift out the top HP PAC.
3.
Remove the drive.
Lift the rear of the drive slightly and disconnect the power, SCSI, and audio ca-
bles.
Lift the drive from the chassis.
NOTICE:
When replacing the drive, make sure the jumpers are
set to the correct SCSI ID, as described in Chapter 3.