HP OfficeJet Pro 8730 User Guide - Page 137
The Phone Cord Connected to Correct Port on Fax test failed
 |
View all HP OfficeJet Pro 8730 manuals
Add to My Manuals
Save this manual to your list of manuals |
Page 137 highlights
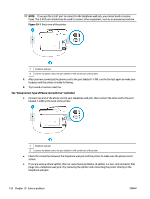
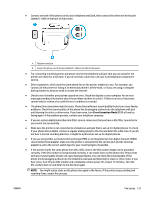
The "Fax Hardware Test" failed ● Turn the printer off by pressing (the Power button) located on the front left side of the printer and then unplug the power cord from the back of the printer. After a few seconds, plug the power cord in again, and then turn the power on. Run the test again. If the test fails again, continue reviewing the troubleshooting information in this section. ● Try to send or receive a test fax. If you can send or receive a fax successfully, there might not be a problem. ● If you are running the test from the Fax Setup Wizard (Windows) or HP Utility (OS X), make sure the printer is not busy completing another task, such as receiving a fax or making a copy. Check the display for a message indicating that the printer is busy. If it is busy, wait until it is finished and in the idle state before running the test. ● If you are using a phone splitter, this can cause faxing problems. (A splitter is a two-cord connector that plugs into a telephone wall jack.) Try removing the splitter and connecting the printer directly to the telephone wall jack. After you resolve any problems found, run the fax test again to make sure it passes and the printer is ready for faxing. If the Fax Hardware Test continues to fail and you experience problems faxing, contact HP support. Go to www.support.hp.com . This website provides information and utilities that can help you correct many common printer problems. If prompted, select your country/region, and then click All HP Contacts for information on calling for technical support. The "Fax Connected to Active Telephone Wall Jack" test failed ● Check the connection between the telephone wall jack and the printer to make sure the phone cord is secure. ● Connect one end of the phone cord to your telephone wall jack, then connect the other end to the port labeled 1-LINE on the back of the printer. ● If you are using a phone splitter, this can cause faxing problems. (A splitter is a two-cord connector that plugs into a telephone wall jack.) Try removing the splitter and connecting the printer directly to the telephone wall jack. ● Try connecting a working phone and phone cord to the telephone wall jack that you are using for the printer and check for a dial tone. If you do not hear a dial tone, contact your telephone company and have them check the line. ● Try to send or receive a test fax. If you can send or receive a fax successfully, there might not be a problem. After you resolve any problems found, run the fax test again to make sure it passes and the printer is ready for faxing. The "Phone Cord Connected to Correct Port on Fax" test failed If you are using a phone splitter, this can cause faxing problems. (A splitter is a two-cord connector that plugs into a telephone wall jack.) Try removing the splitter and connecting the printer directly to the telephone wall jack. Plug the phone cord into the correct port 1. Connect one end of the phone cord to your telephone wall jack, then connect the other end to the port labeled 1-LINE on the back of the printer. ENWW Fax issues 127
-
 1
1 -
2
-
3
-
4
-
5
-
6
-
7
-
8
-
9
-
10
-
11
-
12
-
13
-
14
-
15
-
16
-
17
-
18
-
19
-
20
-
21
-
22
-
23
-
24
-
25
-
26
-
27
-
28
-
29
-
30
-
31
-
32
-
33
-
34
-
35
-
36
-
37
-
38
-
39
-
40
-
41
-
42
-
43
-
44
-
45
-
46
-
47
-
48
-
49
-
50
-
51
-
52
-
53
-
54
-
55
-
56
-
57
-
58
-
59
-
60
-
61
-
62
-
63
-
64
-
65
-
66
-
67
-
68
-
69
-
70
-
71
-
72
-
73
-
74
-
75
-
76
-
77
-
78
-
79
-
80
-
81
-
82
-
83
-
84
-
85
-
86
-
87
-
88
-
89
-
90
-
91
-
92
-
93
-
94
-
95
-
96
-
97
-
98
-
99
-
100
-
101
-
102
-
103
-
104
-
105
-
106
-
107
-
108
-
109
-
110
-
111
-
112
-
113
-
114
-
115
-
116
-
117
-
118
-
119
-
120
-
121
-
122
-
123
-
124
-
125
-
126
-
127
-
128
-
129
-
130
-
131
-
 132
132 -
 133
133 -
 134
134 -
 135
135 -
 136
136 -
 137
137 -
 138
138 -
 139
139 -
 140
140 -
 141
141 -
 142
142 -
143
-
144
-
145
-
146
-
147
-
148
-
149
-
150
-
151
-
152
-
153
-
154
-
155
-
156
-
157
-
158
-
159
-
160
-
161
-
162
-
163
-
164
-
165
-
166
-
167
-
168
-
169
-
170
-
171
-
172
-
173
-
174
-
175
-
176
 |
 |