HP Officejet Pro X451 HP Officejet Pro X451 and X551 - User Guide - Page 154
Clean ink smears, Clean the printhead, Use the printer driver that best meets your printing needs
 |
View all HP Officejet Pro X451 manuals
Add to My Manuals
Save this manual to your list of manuals |
Page 154 highlights
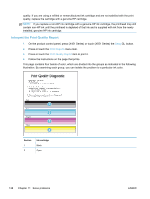
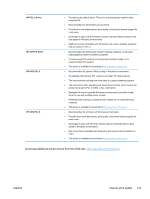
Clean ink smears Print a cleaning page to remove dust and excess ink from the printhead and paper path if you are having any of the following problems: ● Specks of ink are on the printed pages. ● Ink is smearing on the printed pages. ● Repeated marks occur on the printed pages. Use the following procedure to clean ink smears. 1. Load plain letter or A4 paper when you are prompted. 2. From the control panel, press (X451 Series) or touch (X551 Series) the Setup button. 3. Press or touch the Tools menu button. 4. Press or touch the Clean Ink Smear menu button. 5. Press or touch the OK button to begin the cleaning process. A page feeds through the product slowly. Retain this page for further print quality evaluation. Clean the printhead Printhead cleaning can help fix many print quality problems. Use the following procedure to clean the printhead. 1. Load plain letter or A4 paper. 2. From the control panel, press (X451 Series) or touch (X551 Series) the Setup button. 3. Press or touch the Tools menu button. 4. Press or touch the Clean Printhead menu button. 5. Press or touch the OK button to begin the cleaning process. A page feeds through the product slowly. Retain this page for further print quality evaluation. 6. Follow the steps on the steps on the control panel. Use the printer driver that best meets your printing needs You might need to use a different printer driver if the printed page has unexpected lines in graphics, missing text, missing graphics, incorrect formatting, or substituted fonts. 140 Chapter 11 Solve problems ENWW
-
 1
1 -
2
-
3
-
4
-
5
-
6
-
7
-
8
-
9
-
10
-
11
-
12
-
13
-
14
-
15
-
16
-
17
-
18
-
19
-
20
-
21
-
22
-
23
-
24
-
25
-
26
-
27
-
28
-
29
-
30
-
31
-
32
-
33
-
34
-
35
-
36
-
37
-
38
-
39
-
40
-
41
-
42
-
43
-
44
-
45
-
46
-
47
-
48
-
49
-
50
-
51
-
52
-
53
-
54
-
55
-
56
-
57
-
58
-
59
-
60
-
61
-
62
-
63
-
64
-
65
-
66
-
67
-
68
-
69
-
70
-
71
-
72
-
73
-
74
-
75
-
76
-
77
-
78
-
79
-
80
-
81
-
82
-
83
-
84
-
85
-
86
-
87
-
88
-
89
-
90
-
91
-
92
-
93
-
94
-
95
-
96
-
97
-
98
-
99
-
100
-
101
-
102
-
103
-
104
-
105
-
106
-
107
-
108
-
109
-
110
-
111
-
112
-
113
-
114
-
115
-
116
-
117
-
118
-
119
-
120
-
121
-
122
-
123
-
124
-
125
-
126
-
127
-
128
-
129
-
130
-
131
-
132
-
133
-
134
-
135
-
136
-
137
-
138
-
139
-
140
-
141
-
142
-
143
-
144
-
145
-
146
-
147
-
148
-
 149
149 -
 150
150 -
 151
151 -
 152
152 -
 153
153 -
 154
154 -
 155
155 -
 156
156 -
 157
157 -
 158
158 -
 159
159 -
160
-
161
-
162
-
163
-
164
-
165
-
166
-
167
-
168
-
169
-
170
-
171
-
172
-
173
-
174
-
175
-
176
-
177
-
178
-
179
-
180
-
181
-
182
-
183
-
184
-
185
-
186
-
187
-
188
-
189
-
190
-
191
-
192
-
193
-
194
-
195
-
196
-
197
-
198
-
199
-
200
-
201
-
202
-
203
-
204
-
205
-
206
-
207
-
208
 |
 |