HP Officejet Pro X451 HP Officejet Pro X451 and X551 - User Guide - Page 25
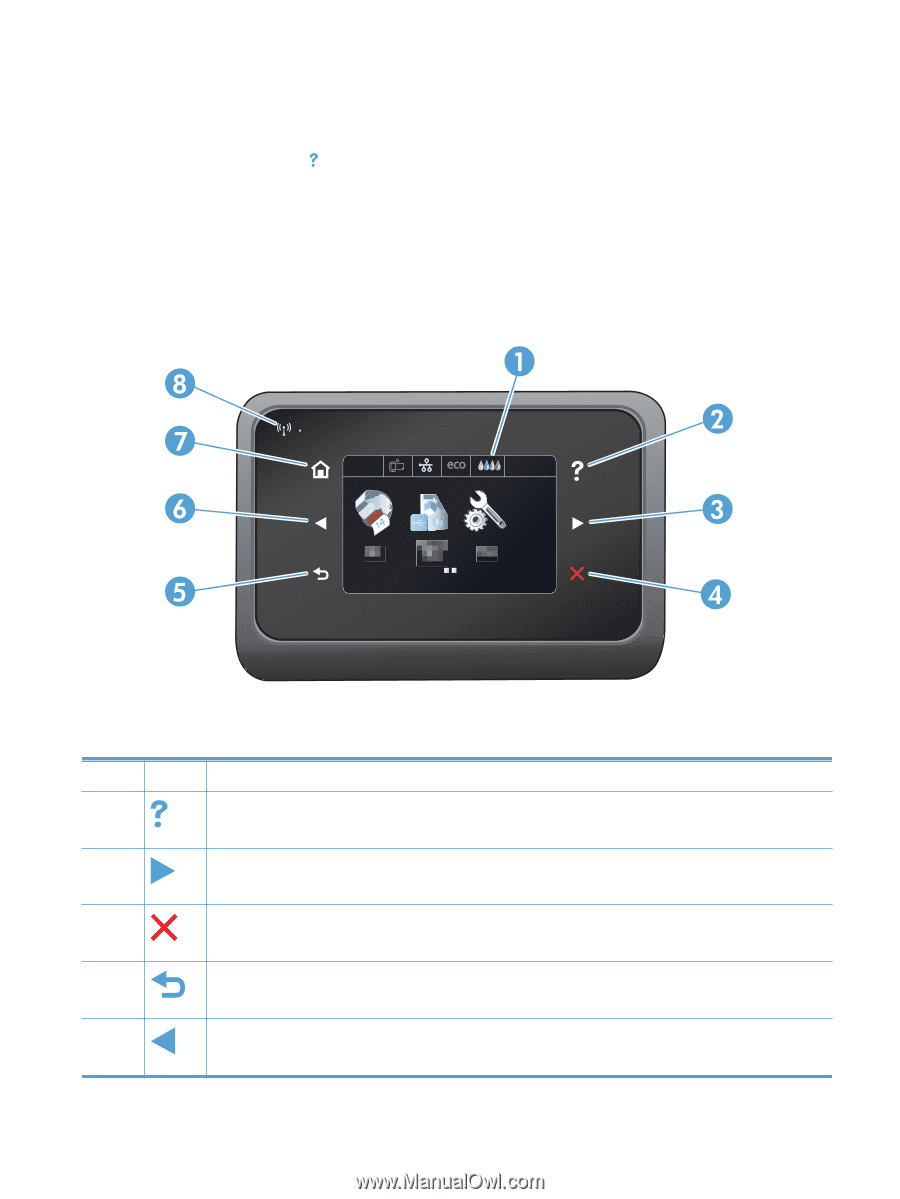
Control panel help system, Control panel layout (X551 Series)
 |
View all HP Officejet Pro X451 manuals
Add to My Manuals
Save this manual to your list of manuals |
Page 25 highlights
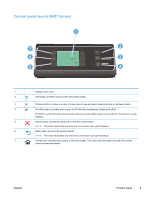
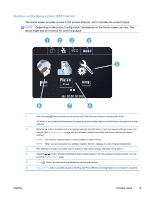
Control panel help system The product has a built-in Help system that explains how to use each screen. To open the Help system, touch the Help button to the right of the control panel (Officejet Pro X451) or the upper-right corner of the control panel (Officejet Pro X551). For screens that contain settings for individual tasks, the Help opens to a topic that explains the options for that task. Control panel layout (X551 Series) Jan 00 00 00:00a 1 2 3 4 5 6 ENWW Display and touch screen area Help button: provides access to the product help system NOTE: This button illuminates only when help is available for the current screen or feature. Right arrow button: moves the cursor to the right or moves the display image to the next screen NOTE: This button illuminates only when the current screen can use this feature. Cancel button: cancels the current job or exits the current screen. NOTE: This button illuminates only when the current screen can use this feature. Back button: returns to the previous screen NOTE: This button illuminates only when the current screen can use this feature. Left arrow button: moves the cursor to the left NOTE: This button illuminates only when the current screen can use this feature. Product views 11
-
 1
1 -
2
-
3
-
4
-
5
-
6
-
7
-
8
-
9
-
10
-
11
-
12
-
13
-
14
-
15
-
16
-
17
-
18
-
19
-
 20
20 -
 21
21 -
 22
22 -
 23
23 -
 24
24 -
 25
25 -
 26
26 -
 27
27 -
 28
28 -
 29
29 -
 30
30 -
31
-
32
-
33
-
34
-
35
-
36
-
37
-
38
-
39
-
40
-
41
-
42
-
43
-
44
-
45
-
46
-
47
-
48
-
49
-
50
-
51
-
52
-
53
-
54
-
55
-
56
-
57
-
58
-
59
-
60
-
61
-
62
-
63
-
64
-
65
-
66
-
67
-
68
-
69
-
70
-
71
-
72
-
73
-
74
-
75
-
76
-
77
-
78
-
79
-
80
-
81
-
82
-
83
-
84
-
85
-
86
-
87
-
88
-
89
-
90
-
91
-
92
-
93
-
94
-
95
-
96
-
97
-
98
-
99
-
100
-
101
-
102
-
103
-
104
-
105
-
106
-
107
-
108
-
109
-
110
-
111
-
112
-
113
-
114
-
115
-
116
-
117
-
118
-
119
-
120
-
121
-
122
-
123
-
124
-
125
-
126
-
127
-
128
-
129
-
130
-
131
-
132
-
133
-
134
-
135
-
136
-
137
-
138
-
139
-
140
-
141
-
142
-
143
-
144
-
145
-
146
-
147
-
148
-
149
-
150
-
151
-
152
-
153
-
154
-
155
-
156
-
157
-
158
-
159
-
160
-
161
-
162
-
163
-
164
-
165
-
166
-
167
-
168
-
169
-
170
-
171
-
172
-
173
-
174
-
175
-
176
-
177
-
178
-
179
-
180
-
181
-
182
-
183
-
184
-
185
-
186
-
187
-
188
-
189
-
190
-
191
-
192
-
193
-
194
-
195
-
196
-
197
-
198
-
199
-
200
-
201
-
202
-
203
-
204
-
205
-
206
-
207
-
208
 |
 |