HP PSC 1350/1340 HP PSC 1300 series All-in-One - (English) Reference Guide - Page 15
Packard:HP Photo and Imaging Software:HP Photo and Imaging Director, HP Photo and Imaging Director
 |
View all HP PSC 1350/1340 manuals
Add to My Manuals
Save this manual to your list of manuals |
Page 15 highlights
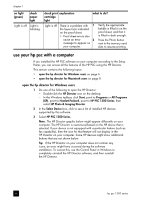
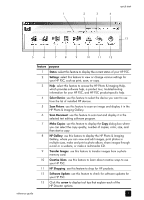
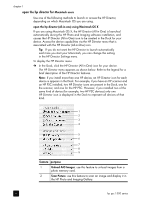
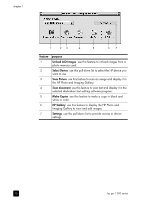
quick start feature purpose 3 Scan document: use this feature to scan text and display it in the selected destination text editing software program. 4 Make Copies: use this feature to make a copy in black and white or color. 5 HP Gallery: use this feature to display the HP Photo and Imaging Gallery to view and edit images. 6 More Applications: use this feature to select other applications on your computer. 7 HP on the Web: use this feature to select an HP website. 8 HP Help: use this feature to select a source for help with your HP PSC. 9 Settings: use this feature to change device settings. open the hp photo and imaging director using Macintosh OS 9 In Macintosh OS 9, the HP Director is launched automatically during the HP Photo and Imaging software installation, and the HP Director appears as an alias on the desktop. Use one of the following methods to launch the HP Director. ! Double-click the HP Photo and Imaging Director alias on the desktop. ! Double-click HP Photo and Imaging Director in the Applications:HewlettPackard:HP Photo and Imaging Software:HP Photo and Imaging Director folder. The HP Photo and Imaging Director displays only the icons that pertain to the selected device. For more information, see the onscreen hp photo and imaging help that came with your software. The following figure shows some of the features available through the HP Director for Macintosh OS 9. Consult the legend for a brief explanation of specific features. Note: The HP Photo and Imaging Director graphic below might appear differently on your computer. The HP Photo and Imaging Director is customized based on the HP device that is selected. If your device is not equipped with a particular feature (such as fax capability), then the icon for that feature will not display in the HP Photo and Imaging Director on your computer. Some HP devices might show additional buttons that are not shown below. reference guide 9
-
 1
1 -
2
-
3
-
4
-
5
-
6
-
7
-
8
-
9
-
 10
10 -
 11
11 -
 12
12 -
 13
13 -
 14
14 -
 15
15 -
 16
16 -
 17
17 -
 18
18 -
 19
19 -
 20
20 -
21
-
22
-
23
-
24
-
25
-
26
-
27
-
28
-
29
-
30
-
31
-
32
-
33
-
34
-
35
-
36
-
37
-
38
-
39
-
40
-
41
-
42
-
43
-
44
-
45
-
46
-
47
-
48
-
49
-
50
-
51
-
52
-
53
-
54
-
55
-
56
-
57
-
58
-
59
-
60
-
61
-
62
-
63
-
64
-
65
-
66
-
67
-
68
-
69
-
70
-
71
-
72
-
73
-
74
-
75
-
76
-
77
-
78
-
79
-
80
-
81
-
82
 |
 |