HP PSC 1350/1340 HP PSC 1300 series All-in-One - (English) Reference Guide - Page 41
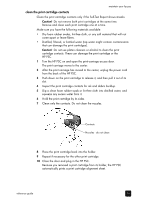
carriage access door for information on installing the print cartridges.
 |
View all HP PSC 1350/1340 manuals
Add to My Manuals
Save this manual to your list of manuals |
Page 41 highlights
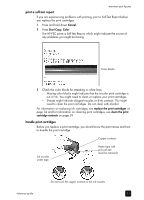
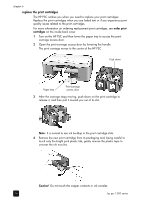
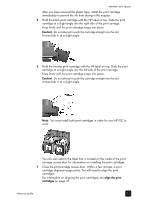
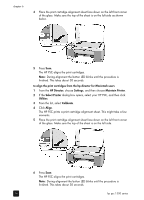
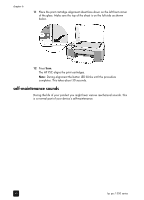
maintain your hp psc After you have removed the plastic tape, install the print cartridge immediately to prevent the ink from drying in the nozzles. 5 Hold the black print cartridge with the HP label on top. Slide the print cartridge at a slight angle into the right side of the print carriage. Press firmly until the print cartridge snaps into place. Caution! Do not attempt to push the cartridge straight into the slot. It must slide in at a slight angle. 6 Hold the tri-color print cartridge with the HP label on top. Slide the print cartridge at a slight angle into the left side of the print carriage. Press firmly until the print cartridge snaps into place. Caution! Do not attempt to push the cartridge straight into the slot. It must slide in at a slight angle. Note: You must install both print cartridges in order for your HP PSC to work. You can also refer to the label that is located on the inside of the printcarriage access door for information on installing the print cartridges. 7 Close the print-carriage access door. Within a few minutes, a print cartridge alignment page prints. You will need to align the print cartridges. For information on aligning the print cartridges, see align the print cartridges on page 37. reference guide 35
-
 1
1 -
2
-
3
-
4
-
5
-
6
-
7
-
8
-
9
-
10
-
11
-
12
-
13
-
14
-
15
-
16
-
17
-
18
-
19
-
20
-
21
-
22
-
23
-
24
-
25
-
26
-
27
-
28
-
29
-
30
-
31
-
32
-
33
-
34
-
35
-
 36
36 -
 37
37 -
 38
38 -
 39
39 -
 40
40 -
 41
41 -
 42
42 -
 43
43 -
 44
44 -
 45
45 -
 46
46 -
47
-
48
-
49
-
50
-
51
-
52
-
53
-
54
-
55
-
56
-
57
-
58
-
59
-
60
-
61
-
62
-
63
-
64
-
65
-
66
-
67
-
68
-
69
-
70
-
71
-
72
-
73
-
74
-
75
-
76
-
77
-
78
-
79
-
80
-
81
-
82
 |
 |
