HP PSC 1350/1340 HP PSC 1300 series All-in-One - (English) Reference Guide - Page 24
insert a memory card and save the files to your computer, Slot 2: Memory Stick
 |
View all HP PSC 1350/1340 manuals
Add to My Manuals
Save this manual to your list of manuals |
Page 24 highlights
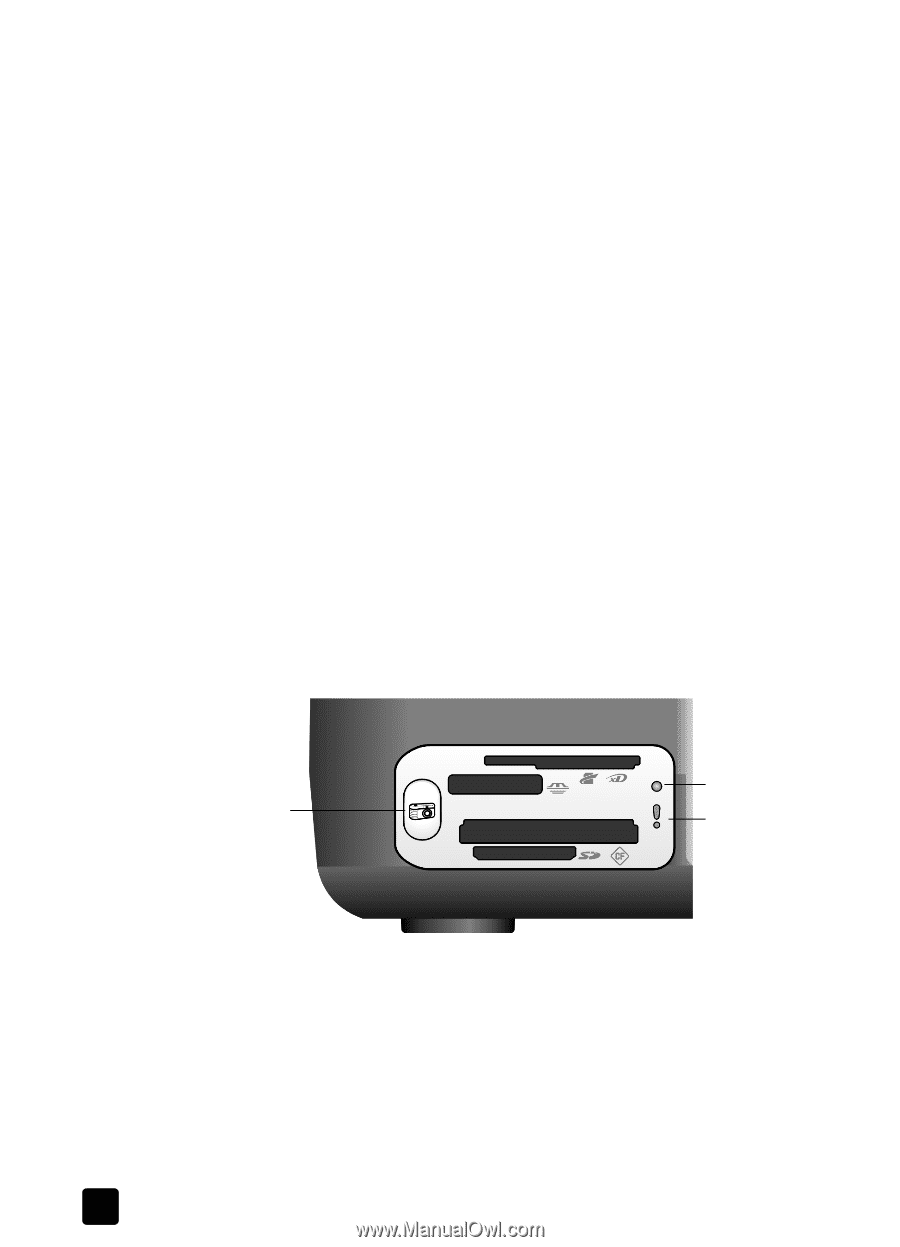
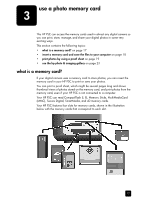
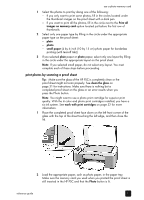
chapter 3 From top to bottom, the slots are configured as follows: • Slot 1: SmartMedia on top of slot (with side shown down), xD on bottom • Slot 2: Memory Stick, Magic Gate Memory Stick, Memory Stick Duo (with user-supplied adapter), Memory Stick Pro • Slot 3: CompactFlash (I, II) • Slot 4: Secure Digital, MultiMediaCard (MMC) Note: By default, Windows XP will format a memory card of 8 MB or less and 64 MB or more with FAT32 format. Digital cameras and other devices use the FAT (FAT16 and FAT12) format and cannot operate with a FAT32 formatted card. Either format your card in your camera or select the FAT format to format your card in a Windows XP PC. For some basic memory card troubleshooting information included in this Reference Guide, see photo memory card troubleshooting on page 70. insert a memory card and save the files to your computer After you take photos with your digital camera, you can print them immediately or save them directly to your computer. 1 Insert the memory card into the appropriate slot on your HP PSC. When the memory card is inserted correctly, the Photo button on the front panel remains on. The Read Status LED next to the card slots blinks green when the card is being accessed. It can take several minutes for the HP PSC to read a memory card that contains many images. If you insert a memory card backwards, the Photo Error LED next to the card slots blinks amber and your computer might display an error message such as Card is not fully inserted. Photo button Read Status LED Photo Error LED Warning! Never attempt to remove a memory card while it is being accessed. Doing so can damage files on the card. You can safely remove a card only when the Read Status LED next to the slot is off. 2 A dialog box on your computer automatically asks you if you want to transfer the memory card's contents to the computer. 3 Press the appropriate button in the dialog box to begin the process. This saves all the photos from the memory card to your computer that have not already been transferred before. 18 hp psc 1300 series
-
 1
1 -
2
-
3
-
4
-
5
-
6
-
7
-
8
-
9
-
10
-
11
-
12
-
13
-
14
-
15
-
16
-
17
-
18
-
 19
19 -
 20
20 -
 21
21 -
 22
22 -
 23
23 -
 24
24 -
 25
25 -
 26
26 -
 27
27 -
 28
28 -
 29
29 -
30
-
31
-
32
-
33
-
34
-
35
-
36
-
37
-
38
-
39
-
40
-
41
-
42
-
43
-
44
-
45
-
46
-
47
-
48
-
49
-
50
-
51
-
52
-
53
-
54
-
55
-
56
-
57
-
58
-
59
-
60
-
61
-
62
-
63
-
64
-
65
-
66
-
67
-
68
-
69
-
70
-
71
-
72
-
73
-
74
-
75
-
76
-
77
-
78
-
79
-
80
-
81
-
82
 |
 |