HP Photosmart 8400 HP Photosmart 8400 series User's Guide - Page 51
Aligning the print cartridges, Printing a sample Tools, Align cartridges - ink levels
 |
View all HP Photosmart 8400 manuals
Add to My Manuals
Save this manual to your list of manuals |
Page 51 highlights
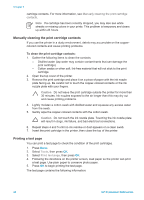
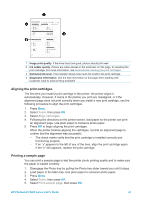
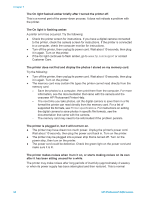
1 Image print quality. If the lined bars look good, photos should print well. 2 Ink nozzle quality. If there are white streaks in the solid bars on this page, try cleaning the print cartridge. For more information, see Automatically cleaning the print cartridges. 3 Estimated ink level. This indicator shows how much ink is left in the print cartridge. 4 Diagnostic information. Use the text information on this page when working with Customer Care to solve printing problems. Aligning the print cartridges The first time you install a print cartridge in the printer, the printer aligns it automatically. However, if colors in the photos you print are misaligned, or if the alignment page does not print correctly when you install a new print cartridge, use the following procedure to align the print cartridges. 1. Press Menu. 2. Select Tools, then press OK. 3. Select Align cartridges. 4. Following the directions on the printer screen, load paper so the printer can print an alignment page. Use plain paper to conserve photo paper. 5. Press OK to begin aligning the print cartridges. When the printer finishes aligning the cartridges, it prints an alignment page to confirm that the alignment was successful. - The check marks verify that the print cartridge is installed correctly and functioning properly. - If an "x" appears to the left of any of the bars, align the print cartridge again. If the "x" still appears, replace the print cartridge. Printing a sample page You can print a sample page to test the printer photo printing quality and to make sure the paper is loaded correctly. 1. Disengage the Photo tray by pulling the Photo tray slider toward you until it stops. 2. Load paper in the Main tray. Use plain paper to conserve photo paper. 3. Press Menu. 4. Select Tools, then press OK. 5. Select Print sample page, then press OK. HP Photosmart 8400 series User's Guide 47
-
 1
1 -
2
-
3
-
4
-
5
-
6
-
7
-
8
-
9
-
10
-
11
-
12
-
13
-
14
-
15
-
16
-
17
-
18
-
19
-
20
-
21
-
22
-
23
-
24
-
25
-
26
-
27
-
28
-
29
-
30
-
31
-
32
-
33
-
34
-
35
-
36
-
37
-
38
-
39
-
40
-
41
-
42
-
43
-
44
-
45
-
 46
46 -
 47
47 -
 48
48 -
 49
49 -
 50
50 -
 51
51 -
 52
52 -
 53
53 -
 54
54 -
 55
55 -
 56
56 -
57
-
58
-
59
-
60
-
61
-
62
-
63
-
64
-
65
-
66
-
67
-
68
-
69
-
70
-
71
-
72
-
73
-
74
-
75
-
76
-
77
-
78
-
79
-
80
-
81
-
82
-
83
-
84
-
85
-
86
-
87
-
88
-
89
 |
 |
