HP Scanjet N9000 User Guide - Page 108
HP Embedded Web Server features, Information tab
 |
View all HP Scanjet N9000 manuals
Add to My Manuals
Save this manual to your list of manuals |
Page 108 highlights
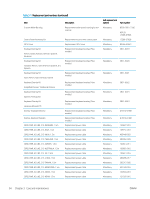
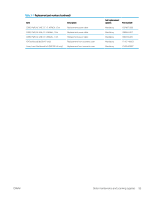
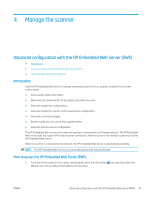
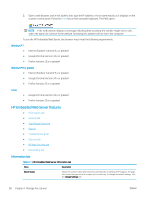
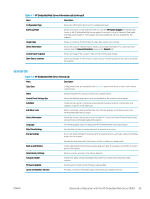
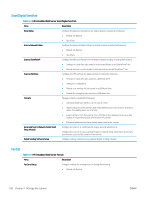
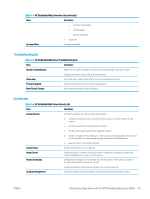
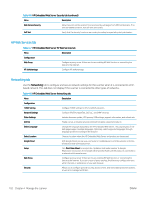
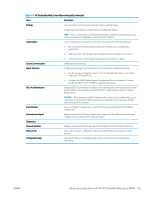
2. Open a web browser, and in the address line, type the IP address or host name exactly as it displays on the scanner control panel. Press the Enter key on the computer keyboard. The EWS opens. NOTE: If the web browser displays a message indicating that accessing the website might not be safe, select the option to continue to the website. Accessing this website will not harm the computer. To use the HP Embedded Web Server, the browser must meet the following requirements: Windows® 7 ● ● ● Internet Explorer (version 8.x or greater) Google Chrome (version 34.x or greater) Firefox (version 20.x or greater) Windows® 8 or greater ● Internet Explorer (version 9.x or greater) ● Google Chrome (version 34.x or greater) ● Firefox (version 20.x or greater) Linux ● Google Chrome (version 34.x or greater) ● Firefox (version 20.x or greater) HP Embedded Web Server features ● Information tab ● General tab ● Scan/Digital Send tab ● Fax tab ● Troubleshooting tab ● Security tab ● HP Web Services tab ● Networking tab Information tab Table 4-1 HP Embedded Web Server Information tab Menu Description Device Status Shows the scanner status and shows the estimated life remaining of HP supplies. The page also shows the type and size of paper set for each tray. To change the default settings, click the Change Settings link. 98 Chapter 4 Manage the scanner ENWW
-
 1
1 -
2
-
3
-
4
-
5
-
6
-
7
-
8
-
9
-
10
-
11
-
12
-
13
-
14
-
15
-
16
-
17
-
18
-
19
-
20
-
21
-
22
-
23
-
24
-
25
-
26
-
27
-
28
-
29
-
30
-
31
-
32
-
33
-
34
-
35
-
36
-
37
-
38
-
39
-
40
-
41
-
42
-
43
-
44
-
45
-
46
-
47
-
48
-
49
-
50
-
51
-
52
-
53
-
54
-
55
-
56
-
57
-
58
-
59
-
60
-
61
-
62
-
63
-
64
-
65
-
66
-
67
-
68
-
69
-
70
-
71
-
72
-
73
-
74
-
75
-
76
-
77
-
78
-
79
-
80
-
81
-
82
-
83
-
84
-
85
-
86
-
87
-
88
-
89
-
90
-
91
-
92
-
93
-
94
-
95
-
96
-
97
-
98
-
99
-
100
-
101
-
102
-
 103
103 -
 104
104 -
 105
105 -
 106
106 -
 107
107 -
 108
108 -
 109
109 -
 110
110 -
 111
111 -
 112
112 -
 113
113 -
114
-
115
-
116
-
117
-
118
-
119
-
120
-
121
-
122
-
123
-
124
-
125
-
126
-
127
-
128
-
129
-
130
-
131
-
132
-
133
-
134
-
135
-
136
-
137
-
138
-
139
-
140
-
141
-
142
-
143
-
144
-
145
-
146
 |
 |
