HP Scanjet N9000 User Guide - Page 138
Check the output-quality settings, Clean the pickup rollers and separation pad in the Automatic
 |
View all HP Scanjet N9000 manuals
Add to My Manuals
Save this manual to your list of manuals |
Page 138 highlights
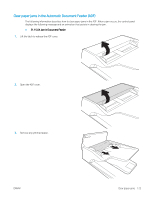
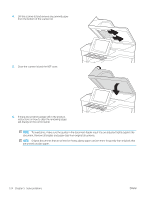
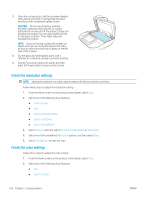
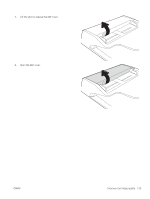
1. From the Home screen on the product control panel, select Scan. 2. Select one of the following Scan features: ● Scan to E-mail ● Fax ● Scan to Network Folder ● Scan to USB Drive ● Scan to SharePoint® 3. Select Options, and then select Optimize Text/Picture. 4. Select one of the predefined options. 5. Select Send or Save to start the scan. NOTE: These settings are temporary. After you have finished the job, the product returns to the default settings. Check the output-quality settings This setting adjusts the level of compression when saving the file. For the highest quality, select the highest setting. 1. From the Home screen on the product control panel, select Scan. 2. Select one of the following Scan features: ● Scan to Email ● Fax ● Scan to Network Folder ● Scan to USB Drive ● Scan to SharePoint® 3. Select Options, and then select File Type and Resolution. 4. Select one of the predefined Quality and File Size options, and then select Done. 5. Select Send or Save to start the scan. Clean the pickup rollers and separation pad in the Automatic Document Feeder (ADF) Follow these steps if the ADF does not pick up pages correctly or produces skewed output. 128 Chapter 5 Solve problems ENWW
-
 1
1 -
2
-
3
-
4
-
5
-
6
-
7
-
8
-
9
-
10
-
11
-
12
-
13
-
14
-
15
-
16
-
17
-
18
-
19
-
20
-
21
-
22
-
23
-
24
-
25
-
26
-
27
-
28
-
29
-
30
-
31
-
32
-
33
-
34
-
35
-
36
-
37
-
38
-
39
-
40
-
41
-
42
-
43
-
44
-
45
-
46
-
47
-
48
-
49
-
50
-
51
-
52
-
53
-
54
-
55
-
56
-
57
-
58
-
59
-
60
-
61
-
62
-
63
-
64
-
65
-
66
-
67
-
68
-
69
-
70
-
71
-
72
-
73
-
74
-
75
-
76
-
77
-
78
-
79
-
80
-
81
-
82
-
83
-
84
-
85
-
86
-
87
-
88
-
89
-
90
-
91
-
92
-
93
-
94
-
95
-
96
-
97
-
98
-
99
-
100
-
101
-
102
-
103
-
104
-
105
-
106
-
107
-
108
-
109
-
110
-
111
-
112
-
113
-
114
-
115
-
116
-
117
-
118
-
119
-
120
-
121
-
122
-
123
-
124
-
125
-
126
-
127
-
128
-
129
-
130
-
131
-
132
-
 133
133 -
 134
134 -
 135
135 -
 136
136 -
 137
137 -
 138
138 -
 139
139 -
 140
140 -
 141
141 -
 142
142 -
 143
143 -
144
-
145
-
146
 |
 |
