HP T5540 Administrator's Guide: Windows CE 6.0 - HP Thin Client t5530 and t554 - Page 76
Terminal Server Client Licenses - white papers
 |
UPC - 884420407706
View all HP T5540 manuals
Add to My Manuals
Save this manual to your list of manuals |
Page 76 highlights
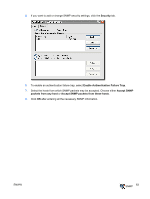
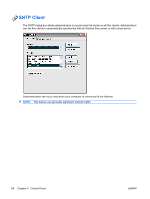
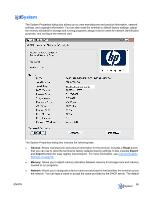
For information about automatically updating your client, see the related white paper at: http://h20000.www2.hp.com/bc/docs/support/SupportManual/c00448549/c00448549.pdf. To update the image using the DHCP server: 1. From the Server type list, select either FTP or Network Share. 2. In the Host box, type the name of the host box. 3. In the Path box, type the path. If you selected FTP from the Server type list, you must also type the port number in the box to the right of the Path box. 4. In the User ID and Password boxes, type the user ID and password required by the FTP file server. 5. If you selected Network Share from the Server type list, in the Domain box, type the network location. 6. Select Check for updates at startup to cause the unit to check the entered FTP site for software updates. 7. Click Connect to connect to the server you configured in the previous steps. The Connect button is not available until you enter valid information for the server. 8. Select Use Values from DHCP Server. 9. In the Server Name/IP box, type the FTP Server Name/IP. 10. In the Path and Filename box, type the path and file name of the image. 11. In the Server Port box, type the FTP server port. 12. In the User ID and Password boxes, type the user ID and password required by the FTP file server. 13. To automatically update the image each time the terminal is restarted, select Automatically check for updates on startup. This feature allows you to place a single, updated image on an FTP site and have clients automatically check that site at boot-up and update with the new image. 14. Click Update to begin the update process. The DHCP Options dialog allows you to set the DHCP tags that identify the FTP location of the update image. To change the FTP option IDs, type over the entry in the Server Port box, and then click OK. The value must match what is set up on the DHCP server. Terminal Server Client Licenses The Terminal Server Client Licenses dialog box allows you to view stored licenses. You can use this window to delete or save licenses. 68 Chapter 4 Control Panel ENWW
-
 1
1 -
2
-
3
-
4
-
5
-
6
-
7
-
8
-
9
-
10
-
11
-
12
-
13
-
14
-
15
-
16
-
17
-
18
-
19
-
20
-
21
-
22
-
23
-
24
-
25
-
26
-
27
-
28
-
29
-
30
-
31
-
32
-
33
-
34
-
35
-
36
-
37
-
38
-
39
-
40
-
41
-
42
-
43
-
44
-
45
-
46
-
47
-
48
-
49
-
50
-
51
-
52
-
53
-
54
-
55
-
56
-
57
-
58
-
59
-
60
-
61
-
62
-
63
-
64
-
65
-
66
-
67
-
68
-
69
-
70
-
 71
71 -
 72
72 -
 73
73 -
 74
74 -
 75
75 -
 76
76 -
 77
77 -
 78
78 -
 79
79 -
 80
80 -
 81
81 -
82
-
83
-
84
-
85
-
86
-
87
-
88
-
89
-
90
-
91
-
92
-
93
-
94
-
95
-
96
 |
 |