Hitachi DZ-MV730A Owners Guide - Page 133
Protecting Disc From Writing Protect Disc, Verifying Remaining Free Space On Disc Or Card Capacity
 |
UPC - 050585223547
View all Hitachi DZ-MV730A manuals
Add to My Manuals
Save this manual to your list of manuals |
Page 133 highlights
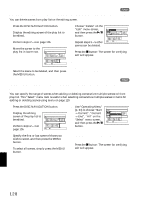
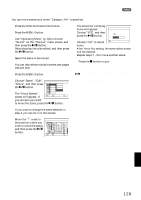
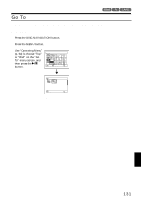
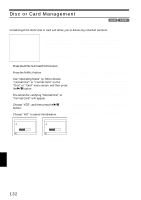
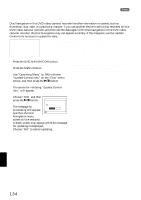
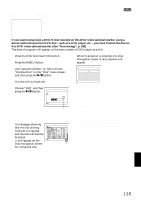
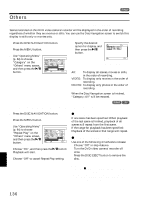
PROTECTING DISC FROM WRITING (PROTECT DISC) 1 You can protect a DVD-RAM disc in order to prevent recorded images from being erased or edited by mistake. Further recording will not be possible on protected disc until the protection is released. 1 Press the DISC NAVIGATION button. 2 Press the MENU button. 3 Use "Operating Menu" (p. 64) to choose "Protect Disc" on the "Disc" menu screen, and then press the A button. Disc Forma t D i s c Pr o tec t D i sc Capac i ty ETC Upd a t e Con t r o l ENTER RETURN I n f o. RAM 4 The screen for verifying protection will appear: Choose "YES", and then press the A button. Protect Disc Write protect disc? YES NO ENTER Choose "NO" to cancel protection. After "YES" or "NO" setting, the Disc Navigation screen will be restored. A l l Pr og r ams 001 / 019 PLAY RAM Disc protect icon Note: • To release disc protection, perform the same procedure as above: The screen for verifying the release of protection will appear. Choose "YES" to release the protection. • If disc protection has been engaged on another device, it may not be releasable on this DVD video camera/recorder: Use the original device that protected the disc to release the protection. 123 VERIFYING REMAINING FREE SPACE ON DISC OR CARD (CAPACITY) You can find out how long you will be able to record on one side of disc or on card. 1 Press the DISC NAVIGATION button. 4 Press the C button to quit. 2 Press the MENU button. The Disc Navigation screen will be restored. 3 Use "Operating Menu" (p. 64) to choose "Capacity" on the "Disc" or "Card" menu screen, and then press the A button. (When using disc) (When using card) Note: With a write-protected disc (see "Terminology", p. 155) or locked card, the remaining space will always be displayed as "0". Capac i t y Approx. V I DEO( XTRA) : 17m i n *1 V I DEO( F I NE) : 26m i n V I DEO( STD) : 54m i n *2 PHOTO :996 Cap a c i t y : 9 0% RETURN Capac i t y Approx. PHOTO( FINE) : 4 6 2 PHOTO( NORM) : 9 2 4 PHOTO( ECO) : 1 8 4 8 Cap a c i t y : 9 6% RETURN *1 With DVD-R disc: The quality mode first used for recording with disc will appear. *2With DVD-R disc: This will not be displayed. English 133
-
 1
1 -
2
-
3
-
4
-
5
-
6
-
7
-
8
-
9
-
10
-
11
-
12
-
13
-
14
-
15
-
16
-
17
-
18
-
19
-
20
-
21
-
22
-
23
-
24
-
25
-
26
-
27
-
28
-
29
-
30
-
31
-
32
-
33
-
34
-
35
-
36
-
37
-
38
-
39
-
40
-
41
-
42
-
43
-
44
-
45
-
46
-
47
-
48
-
49
-
50
-
51
-
52
-
53
-
54
-
55
-
56
-
57
-
58
-
59
-
60
-
61
-
62
-
63
-
64
-
65
-
66
-
67
-
68
-
69
-
70
-
71
-
72
-
73
-
74
-
75
-
76
-
77
-
78
-
79
-
80
-
81
-
82
-
83
-
84
-
85
-
86
-
87
-
88
-
89
-
90
-
91
-
92
-
93
-
94
-
95
-
96
-
97
-
98
-
99
-
100
-
101
-
102
-
103
-
104
-
105
-
106
-
107
-
108
-
109
-
110
-
111
-
112
-
113
-
114
-
115
-
116
-
117
-
118
-
119
-
120
-
121
-
122
-
123
-
124
-
125
-
126
-
127
-
 128
128 -
 129
129 -
 130
130 -
 131
131 -
 132
132 -
 133
133 -
 134
134 -
 135
135 -
 136
136 -
 137
137 -
 138
138 -
139
-
140
-
141
-
142
-
143
-
144
-
145
-
146
-
147
-
148
-
149
-
150
-
151
-
152
-
153
-
154
-
155
-
156
-
157
-
158
-
159
-
160
-
161
-
162
-
163
-
164
-
165
-
166
-
167
-
168
-
169
-
170
-
171
-
172
-
173
-
174
-
175
-
176
-
177
-
178
-
179
-
180
-
181
-
182
-
183
-
184
-
185
-
186
-
187
-
188
-
189
-
190
 |
 |
