Hitachi DZ-MV730A Owners Guide - Page 69
Initial Setup
 |
UPC - 050585223547
View all Hitachi DZ-MV730A manuals
Add to My Manuals
Save this manual to your list of manuals |
Page 69 highlights
●Initial Setup Qu i ck Menu Language : Eng l i sh Demo Mode : Au t o Rese t Menu f o r I n i t i a l se t up. ENTER RETURN Qu i ck Menu Language Eng l i sh Demo Mode Rese t Change t he l anguage d i sp l ay. ENTER RETURN Qu i ck Menu Eng l i sh Language Demo Mode Au t o Rese t Se l ec t demons t r a t i on mode se t t i ng. ENTER RETURN (p. 102) Qu i ck Menu Eng l i sh Language Demo Mode Rese t Menu se t up i s r e t u r ned t o i n i t i a l s t a t e ex cep t da t e. ENTER RETURN (p. 101) Qu i ck Menu Language Demo Mode Rese t Change t he l angu Eng l i sh Françai s Españo l Deu t sch I tal iano ENTER RETURN (p. 154) Qu i ck Menu Eng l i sh Language Au t o Demo Mode Of f Rese t Star t S t a r t demons t r a t i on a f t e r app r ox. 3 mi nu t es. ENTER RETURN Disc Navigation Functions While Disc Navigation screen is being displayed on the LCD monitor, press the QUICK MENU button: The Quick Menu will appear. Only the fundamental menu items will appear in the Quick Menu, and the explanation of the function on which the cursor is positioned will be displayed across the bottom of menu (except during recording). 1 Press the DISC NAVIGATION button. 2 Select a scene, and then press the QUICK MENU button. English 69
-
 1
1 -
2
-
3
-
4
-
5
-
6
-
7
-
8
-
9
-
10
-
11
-
12
-
13
-
14
-
15
-
16
-
17
-
18
-
19
-
20
-
21
-
22
-
23
-
24
-
25
-
26
-
27
-
28
-
29
-
30
-
31
-
32
-
33
-
34
-
35
-
36
-
37
-
38
-
39
-
40
-
41
-
42
-
43
-
44
-
45
-
46
-
47
-
48
-
49
-
50
-
51
-
52
-
53
-
54
-
55
-
56
-
57
-
58
-
59
-
60
-
61
-
62
-
63
-
 64
64 -
 65
65 -
 66
66 -
 67
67 -
 68
68 -
 69
69 -
 70
70 -
 71
71 -
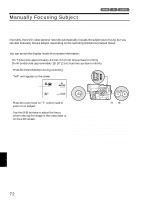 72
72 -
 73
73 -
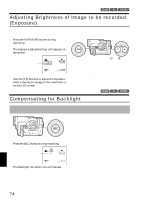 74
74 -
75
-
76
-
77
-
78
-
79
-
80
-
81
-
82
-
83
-
84
-
85
-
86
-
87
-
88
-
89
-
90
-
91
-
92
-
93
-
94
-
95
-
96
-
97
-
98
-
99
-
100
-
101
-
102
-
103
-
104
-
105
-
106
-
107
-
108
-
109
-
110
-
111
-
112
-
113
-
114
-
115
-
116
-
117
-
118
-
119
-
120
-
121
-
122
-
123
-
124
-
125
-
126
-
127
-
128
-
129
-
130
-
131
-
132
-
133
-
134
-
135
-
136
-
137
-
138
-
139
-
140
-
141
-
142
-
143
-
144
-
145
-
146
-
147
-
148
-
149
-
150
-
151
-
152
-
153
-
154
-
155
-
156
-
157
-
158
-
159
-
160
-
161
-
162
-
163
-
164
-
165
-
166
-
167
-
168
-
169
-
170
-
171
-
172
-
173
-
174
-
175
-
176
-
177
-
178
-
179
-
180
-
181
-
182
-
183
-
184
-
185
-
186
-
187
-
188
-
189
-
190
 |
 |
