Hitachi DZ-MV730A Owners Guide - Page 91
Setting Up Record Functions
 |
UPC - 050585223547
View all Hitachi DZ-MV730A manuals
Add to My Manuals
Save this manual to your list of manuals |
Page 91 highlights
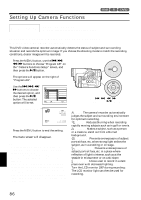
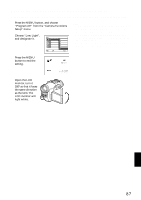
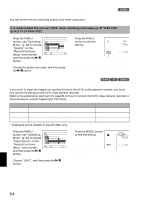
Setting Up Record Functions SWITCHING MOVIE QUALITY (VIDEO MODE) 12 Choose the movie quality from "XTRA", "FINE", "STD". It is recommended that you record critical subjects in the "XTRA" or "FINE" mode. (p. 28) 1 Press the MENU button, use "Operating Menu" (p. 64) to choose "VIDEO Mode" on the "Record Functions Setup" menu screen, and then press the A button. Record Func t i ons Setup V I DEO Mode XTRA 16:9 F I NE I n p u t Sou r ce STD OSD Ou t p u t ENTER RETURN RAM 2 Choose the desired quality mode, and then press the A button. 3 Press the MENU button to end the setting. Note: • The movie quality setting will be stored in memory even when the DVD video camera/recorder is turned off. • The "VIDEO Mode" setting will not change even if the disc is replaced. • When using DVD-R disc, you cannot switch the setting on movie quality or wide-screen mode while recording on the disc: The DVD video camera/ recorder will be automatically set to the movie quality or wide-screen mode first used with the disc for recording. • The movie quality setting is effective only during movie recording: The setting will not be displayed during recording of stills. 0:00:00 REM 3 0 MIN Movie quality FINE 8 : 0 0 AM 9/3 0 /2005 Block-like noise may appear in recorded image, or the outline of subject image is distorted under the recording conditions listed below: Pan the DVD video camera/recorder as slowly as possible. (Block noise is likely to appear in the "STD" mode): • If there is a complicated pattern in background (as in following figure on left) • If the DVD video camera/recorder is moved excessively or quickly • If subject is moving rapidly even when the DVD video camera/recorder is not moving English (Image when block-like noise occurs) (Image without block-like noise) 91
-
 1
1 -
2
-
3
-
4
-
5
-
6
-
7
-
8
-
9
-
10
-
11
-
12
-
13
-
14
-
15
-
16
-
17
-
18
-
19
-
20
-
21
-
22
-
23
-
24
-
25
-
26
-
27
-
28
-
29
-
30
-
31
-
32
-
33
-
34
-
35
-
36
-
37
-
38
-
39
-
40
-
41
-
42
-
43
-
44
-
45
-
46
-
47
-
48
-
49
-
50
-
51
-
52
-
53
-
54
-
55
-
56
-
57
-
58
-
59
-
60
-
61
-
62
-
63
-
64
-
65
-
66
-
67
-
68
-
69
-
70
-
71
-
72
-
73
-
74
-
75
-
76
-
77
-
78
-
79
-
80
-
81
-
82
-
83
-
84
-
85
-
 86
86 -
 87
87 -
 88
88 -
 89
89 -
 90
90 -
 91
91 -
 92
92 -
 93
93 -
 94
94 -
 95
95 -
 96
96 -
97
-
98
-
99
-
100
-
101
-
102
-
103
-
104
-
105
-
106
-
107
-
108
-
109
-
110
-
111
-
112
-
113
-
114
-
115
-
116
-
117
-
118
-
119
-
120
-
121
-
122
-
123
-
124
-
125
-
126
-
127
-
128
-
129
-
130
-
131
-
132
-
133
-
134
-
135
-
136
-
137
-
138
-
139
-
140
-
141
-
142
-
143
-
144
-
145
-
146
-
147
-
148
-
149
-
150
-
151
-
152
-
153
-
154
-
155
-
156
-
157
-
158
-
159
-
160
-
161
-
162
-
163
-
164
-
165
-
166
-
167
-
168
-
169
-
170
-
171
-
172
-
173
-
174
-
175
-
176
-
177
-
178
-
179
-
180
-
181
-
182
-
183
-
184
-
185
-
186
-
187
-
188
-
189
-
190
 |
 |
