IBM 2109 Service Guide - Page 41
Installing GBICs, To prevent a possible electrical shock when installing the device, ensure
 |
UPC - 087944519355
View all IBM 2109 manuals
Add to My Manuals
Save this manual to your list of manuals |
Page 41 highlights
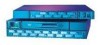
Power supply 2 DANGER To prevent a possible electrical shock when installing the device, ensure that the power cord for that device is unplugged before installing signal cables. (72XXD204) If you do not have the optional second power supply, locate the power cord for the single power supply that is already installed in the machine frame. Insert the power cord into the power receptacle on the front of the machine. Go to "Installing GBICs". If you do have an optional second power supply, remove it from its shipping container. Look at Figure 11. On your machine, the left power supply location is filled with a temporary cover. Grasp the cover and pull it forward while holding the machine firmly. Remove and discard the cover. Power supply 1 Fiber Channel Switch 2109 S16 Figure 11. 2109 model S16 with two power supplies SJ000050 To install the optional second power supply, perform the following steps: 1. Look at the back of the power supply; the power supply is installed with the connector in the down position. 2. Pull out the handle on the front of the power supply by grasping the handle at the top and pulling out and down. 3. Slide the second power supply unit into its slot until it connects into the back panel. 4. Lock the handle into the power supply by pushing the handle back into the upright and locked position. 5. Locate the power cords and insert them into the power receptacles on the front of the machine. Go to "Installing GBICs". Installing GBICs The 2109 Model S16 Switch comes standard with four GBICs as shown in Figure 12 on page 26. Up to 12 additional GBICs are available. GBICs can be inserted in any port in the switch in any order, including skipping ports. Chapter 3. Installing the switch 25
-
 1
1 -
2
-
3
-
4
-
5
-
6
-
7
-
8
-
9
-
10
-
11
-
12
-
13
-
14
-
15
-
16
-
17
-
18
-
19
-
20
-
21
-
22
-
23
-
24
-
25
-
26
-
27
-
28
-
29
-
30
-
31
-
32
-
33
-
34
-
35
-
 36
36 -
 37
37 -
 38
38 -
 39
39 -
 40
40 -
 41
41 -
 42
42 -
 43
43 -
 44
44 -
 45
45 -
 46
46 -
47
-
48
-
49
-
50
-
51
-
52
-
53
-
54
-
55
-
56
-
57
-
58
-
59
-
60
-
61
-
62
-
63
-
64
-
65
-
66
-
67
-
68
-
69
-
70
-
71
-
72
-
73
-
74
-
75
-
76
-
77
-
78
-
79
-
80
-
81
-
82
-
83
-
84
-
85
-
86
-
87
-
88
-
89
-
90
-
91
-
92
-
93
-
94
-
95
-
96
-
97
-
98
-
99
-
100
-
101
-
102
-
103
-
104
-
105
-
106
-
107
-
108
-
109
-
110
-
111
-
112
-
113
-
114
-
115
-
116
-
117
-
118
-
119
-
120
-
121
-
122
-
123
-
124
-
125
-
126
-
127
-
128
-
129
-
130
-
131
-
132
-
133
-
134
-
135
-
136
-
137
-
138
-
139
-
140
-
141
-
142
-
143
-
144
-
145
-
146
-
147
-
148
-
149
-
150
-
151
-
152
-
153
-
154
-
155
-
156
-
157
-
158
-
159
-
160
-
161
-
162
-
163
-
164
-
165
-
166
-
167
-
168
-
169
-
170
-
171
-
172
-
173
-
174
-
175
-
176
-
177
-
178
 |
 |
