IBM 2109 Service Guide - Page 44
Setting the IP address from the front panel, Control buttons
 |
UPC - 087944519355
View all IBM 2109 manuals
Add to My Manuals
Save this manual to your list of manuals |
Page 44 highlights
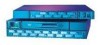
| 9. Fibre-channel IP Address [If none]: press Enter. | 10. Fibre-channel Subnetmask [If none]: press Enter. | 11. Gateway address [The current or new Gateway address or "None"]: | Note: Enter the Gateway address the customer has provided; or, if none is | required, press Enter. | 12. Ipaddress:admin>logout | The logout command ends the Telnet session. You have completed the installation of the 2109 Model S16 Switch. To do a quick check of the fibre-channel ports on the switch before returning the machine to the customer, see "Switch installation verification" on page 31. Setting the IP address from the front panel See Figure 15 for the location and function of each button on the front panel of the 2109 Model S16 Switch. Display Up button Enter button Tab/Esc button Fiber Channel Switch 2109 S16 Down button RJ-45 10BASE-T connection Figure 15. Front panel - operator display and control buttons SJ000055 Control buttons Table 15 lists the primary control button functions. The function of the button changes depending on the menu level. Buttons either control navigating through the menus or increment or decrement numeric values. Table 15. Control buttons Control button Description Down The Down button scrolls down the command list, or, if the user is changing a numeric display, it decrements the displayed value. Up The Up button scrolls up the command list, or, if the user is changing a numeric display, it increments the displayed value. Tab/Esc The Tab/Esc buttons tab through multiple options. When displaying a menu item, pressing the Tab/Esc button reverses through previous commands and, if pressed repeatedly, turns off the front panel display. 28 IBM SAN Fibre Channel Switch: 2109 Model S16 Installation and Service Guide
-
 1
1 -
2
-
3
-
4
-
5
-
6
-
7
-
8
-
9
-
10
-
11
-
12
-
13
-
14
-
15
-
16
-
17
-
18
-
19
-
20
-
21
-
22
-
23
-
24
-
25
-
26
-
27
-
28
-
29
-
30
-
31
-
32
-
33
-
34
-
35
-
36
-
37
-
38
-
 39
39 -
 40
40 -
 41
41 -
 42
42 -
 43
43 -
 44
44 -
 45
45 -
 46
46 -
 47
47 -
 48
48 -
 49
49 -
50
-
51
-
52
-
53
-
54
-
55
-
56
-
57
-
58
-
59
-
60
-
61
-
62
-
63
-
64
-
65
-
66
-
67
-
68
-
69
-
70
-
71
-
72
-
73
-
74
-
75
-
76
-
77
-
78
-
79
-
80
-
81
-
82
-
83
-
84
-
85
-
86
-
87
-
88
-
89
-
90
-
91
-
92
-
93
-
94
-
95
-
96
-
97
-
98
-
99
-
100
-
101
-
102
-
103
-
104
-
105
-
106
-
107
-
108
-
109
-
110
-
111
-
112
-
113
-
114
-
115
-
116
-
117
-
118
-
119
-
120
-
121
-
122
-
123
-
124
-
125
-
126
-
127
-
128
-
129
-
130
-
131
-
132
-
133
-
134
-
135
-
136
-
137
-
138
-
139
-
140
-
141
-
142
-
143
-
144
-
145
-
146
-
147
-
148
-
149
-
150
-
151
-
152
-
153
-
154
-
155
-
156
-
157
-
158
-
159
-
160
-
161
-
162
-
163
-
164
-
165
-
166
-
167
-
168
-
169
-
170
-
171
-
172
-
173
-
174
-
175
-
176
-
177
-
178
 |
 |
