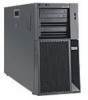
IBM x3400 User Guide - Page 63
Configuration/Setup
 |
View all IBM x3400 manuals
Add to My Manuals
Save this manual to your list of manuals |
Page 63 highlights
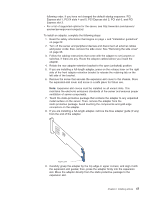
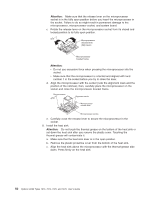
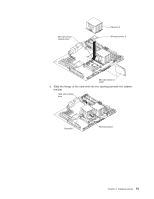
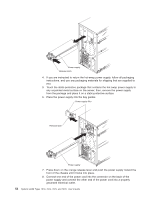
Configuration/Setup Utility program to determine the specific type of microprocessor that is installed on the system board. v The microprocessor speeds are automatically set for this server; therefore, you do not have to set any microprocessor frequency-selection jumpers or switches. v If the thermal-grease protective cover (for example, a plastic cap or tape liner) is removed from the heat sink, do not touch the thermal grease on the bottom of the heat sink or set down the heat sink. v If you have to replace a microprocessor, call for service. v To order additional microprocessor options, contact your IBM marketing representative or authorized reseller. See "System-board option connectors" on page 21 for the location of the microprocessor connectors and the VRM connector. To install an additional microprocessor, complete the following steps: 1. Read the safety information beginning on page v, and "Installation guidelines" on page 22. 2. Turn off the server and disconnect all power cords and external cables (see "Turning off the server" on page 16); then, unlock and remove the server cover (see "Removing the side cover" on page 26). 3. Rotate the power-supply cage assembly out of the chassis: v Hot-swap models: a. Remove the hot-swap power-supply. Press down on the orange release lever and pull the power supply out of the bay, using the handle. b. Lift up the power-supply cage handle and pull the power-supply cage assembly all the way up until the retainer latch locks the cage in place on the chassis. v Non-hot-swap models, lift up the power-supply cage handle and pull the power-supply cage assembly all the way up until the retainer latch locks the cage in place on the chassis. 4. Remove the microprocessor air baffle by grasping the two tabs and squeezing them together slightly and lift the baffle out of the server. 5. Rotate the rear system fan air baffle up out of the way by grasping the tab and pulling the baffle all the way up; then, slide it outward over the rear of the server until it locks in place. 6. Locate the second microprocessor connector on the system board. 7. Install the VRM in the VRM connector: a. Turn the VRM so that the VRM keys align correctly with the slot connector. b. Firmly press the VRM straight down into the connector by applying pressure on both ends of the VRM simultaneously. c. Make sure that the retaining clips are in the locked position when the VRM is firmly seated in the connector. 8. Install the microprocessor: a. Touch the static-protective package that contains the microprocessor to any unpainted metal surface on the server. Then, remove the microprocessor from the package. b. Remove the protective cover, tape, or label from the surface of the microprocessor socket, if any is present. Chapter 2. Installing options 49
-
 1
1 -
2
-
3
-
4
-
5
-
6
-
7
-
8
-
9
-
10
-
11
-
12
-
13
-
14
-
15
-
16
-
17
-
18
-
19
-
20
-
21
-
22
-
23
-
24
-
25
-
26
-
27
-
28
-
29
-
30
-
31
-
32
-
33
-
34
-
35
-
36
-
37
-
38
-
39
-
40
-
41
-
42
-
43
-
44
-
45
-
46
-
47
-
48
-
49
-
50
-
51
-
52
-
53
-
54
-
55
-
56
-
57
-
 58
58 -
 59
59 -
 60
60 -
 61
61 -
 62
62 -
 63
63 -
 64
64 -
 65
65 -
 66
66 -
 67
67 -
 68
68 -
69
-
70
-
71
-
72
-
73
-
74
-
75
-
76
-
77
-
78
-
79
-
80
-
81
-
82
-
83
-
84
-
85
-
86
-
87
-
88
-
89
-
90
-
91
-
92
-
93
-
94
-
95
-
96
-
97
-
98
-
99
-
100
-
101
-
102
-
103
-
104
-
105
-
106
-
107
-
108
-
109
-
110
-
111
-
112
-
113
-
114
-
115
-
116
-
117
-
118
-
119
-
120
-
121
-
122
-
123
-
124
-
125
-
126
-
127
-
128
-
129
-
130
-
131
-
132
-
133
-
134
 |
 |