IBM x3500 Installation Guide
IBM x3500 - System - 7977 Manual
 |
UPC - 883436005760
View all IBM x3500 manuals
Add to My Manuals
Save this manual to your list of manuals |
IBM x3500 manual content summary:
- IBM x3500 | Installation Guide - Page 1
information about your server at http://www.ibm.com/systems/support/ Yes Use ServerGuide to No install the operating system? Go to the Web for instructions: http://www.ibm.com/systems /support/ Yes Install applications, such as IBM systems management software and IBM ServeRAID programs The - IBM x3500 | Installation Guide - Page 2
.com/services/sl/products/ or view support telephone numbers at http://www.ibm.com/planetwide/. View support telephone numbers at http://www.ibm.com/planetwide/. Yes Is the problem solved? No Update the firmware to the latest level. You can download firmware from http://www.ibm.com/systems/ support - IBM x3500 | Installation Guide - Page 3
IBM System x3500 Type 7977 Installation Guide - IBM x3500 | Installation Guide - Page 4
, read the general information in Appendix B, "Notices," on page 97 and the Warranty and Support Information document on the IBM Documentation CD. Sixth Edition (October 2008) © Copyright International Business Machines Corporation 2008. US Government Users Restricted Rights - Use, duplication - IBM x3500 | Installation Guide - Page 5
37 Server power features 39 Turning on the server 39 Turning off the server 40 Chapter 4. Configuring the server 41 Using the ServerGuide Setup and Installation CD 41 Using the Configuration/Setup Utility program 42 Using the Integrated System Management Firmware Update Utility program - IBM x3500 | Installation Guide - Page 6
program 61 Configuring the Broadcom Gigabit Ethernet controller 61 Chapter 5. Solving problems 63 Diagnostic tools overview 63 POST beep code descriptions 63 POST error codes 64 Troubleshooting tables 77 DVD drive problems 77 General problems 78 Hard disk drive problems 78 Intermittent - IBM x3500 | Installation Guide - Page 7
, leggere le Informazioni sulla Sicurezza. Les sikkerhetsinformasjonen (Safety Information) før du installerer dette produktet. Antes de instalar este produto, leia as Informações sobre Segurança. © Copyright IBM Corp. 2008 v - IBM x3500 | Installation Guide - Page 8
danger statement with translated versions of the caution or danger statement in the IBM Safety Information book. For example, if a caution statement is labeled " information that comes with the server or optional device before you install the device. vi IBM System x3500 Type 7977: Installation Guide - IBM x3500 | Installation Guide - Page 9
of fire, water, or structural damage. v Disconnect the attached power cords, telecommunications systems, networks, and modems before you open the device covers, unless instructed otherwise in the installation and configuration procedures. v Connect and disconnect cables as described in the following - IBM x3500 | Installation Guide - Page 10
When replacing the lithium battery, use only IBM Part Number 33F8354 or an equivalent type battery recommended by the manufacturer. If your system has a module containing a lithium battery, the battery as required by local ordinances or regulations. viii IBM System x3500 Type 7977: Installation Guide - IBM x3500 | Installation Guide - Page 11
laser products (such as CD-ROMs, DVD drives, fiber optic devices, or transmitters) are installed, note the following: v Do not remove the covers. Removing the covers of the laser product could result in exposure to hazardous laser radiation. There are no serviceable parts inside the device. v Use of - IBM x3500 | Installation Guide - Page 12
power switch on the power supply do not turn off the electrical current supplied to the device. The device also might have more than one power cord. To remove all electrical current from the device, ensure that all power cords are disconnected from the power source. 2 1 x IBM System x3500 Type 7977 - IBM x3500 | Installation Guide - Page 13
Never remove the cover on a power supply or any part that has the following label attached. Hazardous voltage, current, and energy levels are present inside any component that has this label attached. There are no serviceable parts inside these components. If you suspect a problem with one of these - IBM x3500 | Installation Guide - Page 14
xii IBM System x3500 Type 7977: Installation Guide - IBM x3500 | Installation Guide - Page 15
device drivers for firmware updates, or click Publications lookup for documentation updates. The server comes with an IBM ServerGuide™ Setup and Installation CD to help you configure the hardware, install device drivers, and install the operating system. The server comes with a limited warranty. You - IBM x3500 | Installation Guide - Page 16
System x Documentation CD requires the following minimum hardware and software: v Microsoft® Windows NT® XP, Windows® 2000, or Red Hat Linux v 100 MHz microprocessor v 32 MB of RAM v Adobe Acrobat Reader 3.0 (or later) or xpdf, which comes with Linux operating systems. 2 IBM System x3500 Type 7977 - IBM x3500 | Installation Guide - Page 17
Documentation Browser automatically detects the regional settings in your server and displays the documents in the language for that a Windows operating system, insert the CD into the drive and click Start --> Run. In the Open field, type e:\win32.bat where e is the drive letter of the drive, and - IBM x3500 | Installation Guide - Page 18
inconvenient or problem situations. v Attention: These notices indicate potential damage to programs, devices, or data. An attention notice is placed just before the instruction or potentially lethal or extremely hazardous procedure step or situation. 4 IBM System x3500 Type 7977: Installation Guide - IBM x3500 | Installation Guide - Page 19
Platform Management Interface (IPMI) 2.0 compliant) v Service microprocessor support for Remote Supervisor Adapter II SlimLine v Light path diagnostics v ServeRAID-8k (512 MB with battery backup) and ServeRAID-8s SAS Controllers support RAID levels 0, 1, 1E,,5, 6, 10, 50, and 60 Note: The server - IBM x3500 | Installation Guide - Page 20
Heat sink Control panel assembly Drive bay EMC shield USB cable assembly DVD drive Heat-sink filler SAS backplane Fan assembly Hot-swap fan Processor baffle System board Hard disk drive EMC shield ServeRAID-8k VRM Cover Hard disk drive Bezel 6 IBM System x3500 Type 7977: Installation Guide - IBM x3500 | Installation Guide - Page 21
system starts, if an operating system is installed, or that a 19990305 error code is displayed, indicating that an operating system was not found but the server is otherwise working correctly. If the server is not working correctly, see Chapter 5, "Solving problems," on page 63 for diagnostic - IBM x3500 | Installation Guide - Page 22
which means that if the server and operating system support hot-swap capability, you can remove or install the component while the server is running. (Orange can also indicate touch points on hot-swap components.) See the instructions for removing or installing a specific hot-swap component for any - IBM x3500 | Installation Guide - Page 23
device where others can handle and damage it. v While the device is still in its static-protective package, touch it to an unpainted metal part of the server for at least 2 seconds. This drains static electricity from the package and from your body. v Remove the device from its package and install - IBM x3500 | Installation Guide - Page 24
system starts, if an operating system is installed, or that a 19990305 error code is displayed, indicating that an operating system was not found but the server is otherwise working correctly. If the server is not working correctly, see the Problem Determination and Service Guide for diagnostic - IBM x3500 | Installation Guide - Page 25
dynamic random-access memory (SDRAM) with error correcting code (ECC) DIMMs. These DIMMs must be compatible with the latest 5300 SDRAM Fully Buffered DIMM (FBD) specification. For a list of supported optional devices for the server, go to http://www.ibm.com/servers/ eserver/serverproven/compat - IBM x3500 | Installation Guide - Page 26
online-spare memory. - Memory mirroring replicates and stores data on DIMMs within two branches simultaneously. You must enable memory mirroring through the Configuration/Setup Utility program (for more information, see the section about configuring the server in the User's Guide on the IBM System - IBM x3500 | Installation Guide - Page 27
configuring the server in the User's Guide on the IBM System x Documentation CD. When you use online-spare memory, you must consider the following information: - You cannot enable online-spare memory while the server is operating in mirroring mode. - When using online-spare memory the two memory - IBM x3500 | Installation Guide - Page 28
the server operates in non-mirroring mode (normal mode): - DIMMs must be installed in matched pairs. If you install a second pair of DIMMs in DIMM connector 7 and DIMM connector 10, they do not have to be the same size, speed, type, and technology as the DIMMs in DIMM connector 14 IBM System x3500 - IBM x3500 | Installation Guide - Page 29
8, 11, 3, 6, 9, 12 v You do not have to save new configuration information when you install or remove DIMMs. v See the User's Guide on the IBM System x Documentation CD for more information about memory mirroring and online-spare memory. The following illustration shows how to install DIMMs on the - IBM x3500 | Installation Guide - Page 30
damage from static electricity. For details about handling these devices, see "Handling static-sensitive devices" on page 9. Power supply Release latch Statement 11: CAUTION: The following label indicates sharp edges, corners, or joints nearby. 16 IBM System x3500 Type 7977: Installation Guide - IBM x3500 | Installation Guide - Page 31
of the way. Power-supply cage assembly Power-supply cage handle 5. Lift the power-supply cage handle on the rear of the power supply cage, and rotate the power-supply cage out of the way until it latches in place. Let the power-supply cage rest on the rear power-supply structure support bracket - IBM x3500 | Installation Guide - Page 32
-supply cage is not shown in the illustration for clarity. 8. Install the power supply or power supplies in the power-supply cage. If you have other devices to install or remove, do so now. Otherwise, go to "Completing the installation" on page 30. 18 IBM System x3500 Type 7977: Installation Guide - IBM x3500 | Installation Guide - Page 33
in the loss of data. To avoid this potential problem, always use an electrostatic-discharge wrist strap or other grounding system when you work inside the server with the power on. 2. Turn off the server and peripheral devices, and disconnect the power cords and all external cables. Remove the left - IBM x3500 | Installation Guide - Page 34
of the power-supply cage, and rotate the power-supply cage out of the way until it latches in place. Let the power-supply cage rest on the rear power-supply structure support bracket. 8. Install the transition duct on the edge of the DIMM air baffle. 20 IBM System x3500 Type 7977: Installation Guide - IBM x3500 | Installation Guide - Page 35
secured with screws, remove the screws. b. Push the air duct up toward the rear of the power-supply cage. When the locator pins are free of the power-supply cage, you can remove the air duct from the server. c. Position the transition duct so that the two tabs are directly over the slots on the - IBM x3500 | Installation Guide - Page 36
and fan structure on the chassis: a. Align the clips on the rear fan assembly with the holes in the chassis. b. Slide the assembly toward the power-supply cage until it stops. 22 IBM System x3500 Type 7977: Installation Guide - IBM x3500 | Installation Guide - Page 37
power supply is lit also. 17. Reconnect the external cables. If you have other devices to install or remove, do so now. Otherwise, go to "Completing the installation" on page 30. Installing a hot-swap hard disk drive The following notes describe the types of hard disk drives that the server supports - IBM x3500 | Installation Guide - Page 38
that the hard disk drive is operating correctly. If the amber hard disk drive status LED for a drive is lit continuously, that drive is faulty and must be replaced. If the green hard disk drive activity LED is flashing, the drive is being accessed. 24 IBM System x3500 Type 7977: Installation Guide - IBM x3500 | Installation Guide - Page 39
the server. To download the most current level of BIOS code for the server, go to http://www.ibm.com/systems/support/. v Obtain an SMP-capable operating system. For a list of supported operating systems, see http://www.ibm.com/servers/eserver/serverproven/compat/us/. v You can use the Configuration - IBM x3500 | Installation Guide - Page 40
static-protective package that contains the new microprocessor to any unpainted metal surface on the server; then, remove the microprocessor from the package. b. Release the microprocessor retention latch side down; then, close the release lever. 26 IBM System x3500 Type 7977: Installation Guide - IBM x3500 | Installation Guide - Page 41
on the IBM System x Documentation CD for details about using the Configuration/Setup Utility program. v The server uses a rotational interrupt technique to configure PCI adapters so that you can install PCI adapters that do not support sharing of PCI interrupts. v In models with 12 hard disk drives - IBM x3500 | Installation Guide - Page 42
for any cabling instructions and information about jumper or switch settings. (It might retention clip on the adapter-support bracket. Otherwise, continue with the next step. Adapter guide 7. Press the adapter firmly system board or the adapter. 28 IBM System x3500 Type 7977: Installation Guide - IBM x3500 | Installation Guide - Page 43
cabled to the system board. To install a Remote Supervisor Adapter II SlimLine, complete the following steps: 1. Read the safety information that begins on page vii and "Installation guidelines" on page 7. 2. Turn off the server and peripheral devices, and disconnect the power cords and all external - IBM x3500 | Installation Guide - Page 44
the installation, complete the following steps: 1. Install the bezel: a. Align the tabs on the left-side of the bezel with the slots on the server chassis. b. Insert the tabs into the slots and close the bezel. 2. Install the left-side cover. 30 IBM System x3500 Type 7977: Installation Guide - IBM x3500 | Installation Guide - Page 45
cables and power cords. See "Connecting the cables" for more information. Connecting the cables Notes: 1. Turn off the server before you connect any cables to or disconnect any cables from the server or hot-plug adapter. 2. For additional cabling instructions, see the User's Guide on the IBM System - IBM x3500 | Installation Guide - Page 46
cord AC power LED DC power LED Mouse Keyboard Serial 1 (COM 1) Parallel Video USB 4 Ethernet 10/100/1000 USB 3 Ethernet 10/100/1000 RJ-45 Serial 2 (COM 2) Reattaching the bezel together until they click into place; then, release the hinge assembly. 32 IBM System x3500 Type 7977: Installation Guide - IBM x3500 | Installation Guide - Page 47
upgrade the operating system to support SMP. For more information, see the section about using the ServerGuide Setup and Installation CD in the User's Guide and the operating-system documentation. If the server has an optional RAID adapter and you have installed or removed a hard disk drive, see the - IBM x3500 | Installation Guide - Page 48
34 IBM System x3500 Type 7977: Installation Guide - IBM x3500 | Installation Guide - Page 49
drive activity LED System locator LED System-information LED System-error LED DVD drive activity LED (green) USB 2 USB 1 DVD-eject button Hard disk drive status LED (amber) Hard disk drive activity LED (green) System power LED: When this LED is lit and not flashing, it indicates that the server - IBM x3500 | Installation Guide - Page 50
the server power supplies are nonredundant, or some other noncritical event has occurred. The event is recorded in the error log. Check the light path diagnostic panel for more information (see the Problem Determination and Service Guide on the IBM System x Documentation CD). System-error LED: When - IBM x3500 | Installation Guide - Page 51
connectors and LEDs on the rear of the server. Power cord AC power LED DC power LED Mouse Keyboard Serial 1 (COM 1) Parallel Video USB 4 Ethernet 10/100/1000 USB 3 Ethernet 10/100/1000 RJ-45 Serial 2 (COM 2) Power-cord connector: Connect the power cord to this connector. Mouse connector: Connect - IBM x3500 | Installation Guide - Page 52
to this connector when it is configured for use with the BMC or Remote Supervisor Adapter II SlimLine. Note: When this connector is configured for use with the system management, do not connect any other 9-pin serial devices to this connector. 38 IBM System x3500 Type 7977: Installation Guide - IBM x3500 | Installation Guide - Page 53
is reserved for various system resources and is unavailable to the operating system. The amount of memory that is reserved for system resources depends on the operating system, the configuration of the server, and the configured PCI devices. Chapter 3. Server controls, connectors, LEDs, and power 39 - IBM x3500 | Installation Guide - Page 54
Adapter II SlimLine user interface. v The integrated system management microprocessor can turn off the server as an automatic response to a critical system failure. v You can turn off the server through a request from the service microprocessor. 40 IBM System x3500 Type 7977: Installation Guide - IBM x3500 | Installation Guide - Page 55
v Integrated System Management Firmware Update Utility program v Baseboard management controller utility programs v RAID configuration programs - Use the IBM ServeRAID Configuration Utility program or ServeRAID Manager to configure an array of hot-swap SAS or hot-swap SATA hard disk drives. For - IBM x3500 | Installation Guide - Page 56
1 of this procedure. 4. From the main menu, select Update System Management Firmware and press Enter. 5. Follow the instructions on the screen to complete the update. If there is an error in updating the firmware, try installing the firmware again. 42 IBM System x3500 Type 7977: Installation Guide - IBM x3500 | Installation Guide - Page 57
firmware; and enable the operating system for an SOL connection. BIOS update and configuration Complete the following steps to update and configure the BIOS code to enable SOL: 1. Update the BIOS code: a. Download the latest version of the BIOS code from http://www.ibm.com/ systems/support - IBM x3500 | Installation Guide - Page 58
server, you must configure the Linux® operating system to expose the Linux initialization (booting) process. This enables users to log in to the Linux console through an SOL session and directs Linux output to the serial console. See the documentation for your specific Linux operating-system type - IBM x3500 | Installation Guide - Page 59
install=/boot/boot.b message=/boot/message linear image=/boot/vmlinuz-2.4.9-e.12smp label=linux initrd=/boot/initrd-2.4.9-e.12smp.img read-only root=/dev/hda6 image=/boot/vmlinuz-2.4.9-e.12 label=linux-up initrd=/boot/initrd-2.4.9-e.12.img read-only root=/dev/hda6 Chapter 4. Configuring the server - IBM x3500 | Installation Guide - Page 60
of the boot options that are listed. To load the operating system in interactive mode, type linux-Interact and then press Enter. GRUB configuration: If Interact with the OS boot via SOL title Red Hat Linux (2.4.9-e.12smp) SOL Interactive root (hd0,0) 46 IBM System x3500 Type 7977: Installation Guide - IBM x3500 | Installation Guide - Page 61
line. The following examples show the original content of the /boot/grub/grub.conf file and the content of this file after modification. Original /boot/grub/grub.conf contents #grub.conf generated by anaconda # ro root=/dev/hda6 initrd /initrd-2.4.9-e.12.img Chapter 4. Configuring the server 47 - IBM x3500 | Installation Guide - Page 62
operating system after you complete these procedures for the changes to take effect and to enable SOL. SUSE SLES 8.0 configuration: Note: This procedure is based on a default installation of SUSE Linux Enterprise Server /boot/grub/menu.lst file: 48 IBM System x3500 Type 7977: Installation Guide - IBM x3500 | Installation Guide - Page 63
=tty1 initrd (hd0,1)/boot/initrd # This will allow you to Interact with the OS boot via SOL title linux SOL Interactive kernel (hd0,1)/boot/vmlinuz root=/dev/hda2 acpi=oldboot vga=791 console=tty1 console=ttyS0,19200 initrd (hd0,1)/boot/initrd title floppy Chapter 4. Configuring the server 49 - IBM x3500 | Installation Guide - Page 64
of the Microsoft Windows 2003 operating system. Complete the following steps to configure the Windows 2003 operating system for SOL operation. You must be logged in as a user with administrator access to perform this procedure. 1. Complete the following steps to determine which boot entry ID to - IBM x3500 | Installation Guide - Page 65
the OSA SMBridge management utility program on a server running a Windows operating system: 1. Go to http://www.ibm.com/systems/support/ and download the utility program and create the OSA BMC Management Utility CD. 2. Insert the OSA BMC Management Utility CD into the drive. The InstallShield wizard - IBM x3500 | Installation Guide - Page 66
automatic startup of the utility program. Complete the following steps to install the OSA SMBridge management utility program on a server running a Linux operating system. You must be logged in as a root user to perform these procedures. 1. Go to http://www.ibm.com/systems/support/ and download the - IBM x3500 | Installation Guide - Page 67
sure to update the server baseboard management controller firmware before you update the BIOS code. To update the firmware, if the Linux or Windows operating-system update package is available from the World Wide Web and you have obtained the applicable update package, follow the instructions that - IBM x3500 | Installation Guide - Page 68
. v Use the IBM ServeRAID Configuration Utility program to: - Perform a low-level format on a hard disk drive - View or change IDs for some attached devices - Set protocol parameters on hard disk drives v Use ServeRAID Manager to: - Configure arrays 54 IBM System x3500 Type 7977: Installation Guide - IBM x3500 | Installation Guide - Page 69
information when you use the IBM ServeRAID Configuration Utility program or ServeRAID Manager to configure and manage arrays: v The ServeRAID-8s SAS controller supports RAID levels 0, 1, 1E, 5. 6, 10, 50, and 60. v Servers that come with twelve 2.5-inch hot-swap SAS drives also come with two - IBM x3500 | Installation Guide - Page 70
arrays. 5. Click Apply; when you are asked whether you want to apply the new configuration, click Yes. The configuration is saved in the controller and in the physical drives. 6. Exit from ServeRAID Manager and remove the CD from the CD-RW/DVD drive. 56 IBM System x3500 Type 7977: Installation Guide - IBM x3500 | Installation Guide - Page 71
remove the CD from the CD-RW/DVD drive. 11. Restart the server. Viewing the configuration You can use ServeRAID Manager to view information about RAID controllers and the RAID subsystem (such as arrays, logical drives, hot-spare drives, and physical drives). When you click an object in the ServeRAID - IBM x3500 | Installation Guide - Page 72
You can set up a mirror after the operating system is installed on the primary drive. You must make sure that the primary drive has the lower ID (for example, 0). v To update the firmware and BIOS code for the ServeRAID-8k SAS Controller, you must use the IBM ServeRAID Support CD that comes with the - IBM x3500 | Installation Guide - Page 73
Manager, which is on the IBM ServeRAID Support CD, to: v Configure a redundant array of independent disks (RAID) array v Restore a SAS hard disk drive to the factory-default settings, erasing all data from the disk v View the RAID configuration and associated devices v Monitor the operation - IBM x3500 | Installation Guide - Page 74
, hot-spare drives, and physical drives). When you click an object in the ServeRAID Manager tree, information about that object is displayed in the right pane. To display a list of available actions for an object, click the object and click Actions. 60 IBM System x3500 Type 7977: Installation Guide - IBM x3500 | Installation Guide - Page 75
slightly from what is described in this document. 1. Go to http://www.ibm.com/systems/support/. 2. Under Product support, click System x. 3. Under Popular links, click Publications lookup . 4. From the Product family menu, select System 7977 and click Continue. Chapter 4. Configuring the server 61 - IBM x3500 | Installation Guide - Page 76
62 IBM System x3500 Type 7977: Installation Guide - IBM x3500 | Installation Guide - Page 77
to troubleshoot problems in the server. See the Problem Determination and Service Guide on the IBM System x Documentation CD for more information about the diagnostic programs and error messages. v Light path diagnostics Use light path diagnostics to diagnose system errors quickly. See "Light path - IBM x3500 | Installation Guide - Page 78
only by a trained service technician. Error code Description Action 062 Three consecutive boot failures using the 1. Flash the system firmware to the latest level (see default configuration. the Problem Determination and Service Guide on the IBM System x Documentation CD). 2. (Trained - IBM x3500 | Installation Guide - Page 79
163 Real-time clock error. 1. Run the Configuration/Setup Utility program, select Load Default Settings, make sure that the date and time are correct, and save the settings. 2. Clear CMOS memory. See the Problem Determination and Service Guide on the IBM System x Documentation CD for information - IBM x3500 | Installation Guide - Page 80
Supervisor Adapter II SlimLine. 184 Power-on password damaged. 1. Run the Configuration/Setup Utility program, select Load Default Settings, and save the settings. 2. Clear CMOS memory. See the Problem Determination and Service Guide on the IBM System x Documentation CD for information about - IBM x3500 | Installation Guide - Page 81
1. Run the Configuration/Setup Utility program, select Load Default Settings, and save the settings. 2. Update the BIOS code and BMC firmware (see the Problem Determination and Service Guide on the IBM System x Documentation CD. 3. (Trained service technician only) Replace the system board. Chapter - IBM x3500 | Installation Guide - Page 82
service technician only) System board 1800 Unavailable PCI hardware interrupt. 1. Run the Configuration/Setup Utility program and adjust the adapter settings. 2. Remove each adapter one at a time, restarting the server each time, until the problem is isolated. 68 IBM System x3500 Type 7977 - IBM x3500 | Installation Guide - Page 83
server each time: a. SAS drive b. SAS hard disk drive backplane c. (Trained service technician only) System board 5962 IDE DVD drive configuration error. 1. Run the Configuration/Setup Utility program and load the default settings (see the Problem Determination and Service Guide on the IBM System - IBM x3500 | Installation Guide - Page 84
column until the problem is solved. v See the Problem Determination and Service Guide on the IBM System x Documentation CD server each time: a. (Trained service technician only) Microprocessor 1 b. (Trained service technician only) System board 70 IBM System x3500 Type 7977: Installation Guide - IBM x3500 | Installation Guide - Page 85
the suggested actions in the order in which they are listed in the Action column until the problem is solved. v See the Problem Determination and Service Guide on the IBM System x Documentation CD to determine which components are customer replaceable units (CRU) and which components are field - IBM x3500 | Installation Guide - Page 86
PCI or PCI-X slot or device, remove that device. 3. Reseat each adapter 4. Replace the following components one at a time, in the order shown, restarting the server each time: a. Each adapter b. (Trained service technician only) PCI-X board 72 IBM System x3500 Type 7977: Installation Guide - IBM x3500 | Installation Guide - Page 87
the server each time: a. Each adapter b. (Trained service technician only) PCI-X board 1807, 1808 General PCI error. 1. Make sure that no devices have been disabled in the Configuration/Setup Utility program. 2. Reseat the failing adapter. Note: If an error LED is lit for a specific adapter - IBM x3500 | Installation Guide - Page 88
CD). 2. Update the BIOS code again (see the Problem Determination and Service Guide on the IBM System x Documentation CD). 3. (Trained service technician only) Reseat microprocessor 2. 4. (Trained service technician only) Replace microprocessor 2. 74 IBM System x3500 Type 7977: Installation Guide - IBM x3500 | Installation Guide - Page 89
service technician. Error code Description Action 01298101 Bad update data for processor 1. 1. Make sure that all microprocessors have the same cache size (see the Problem Determination and Service Guide on the IBM System x Documentation CD). 2. Update the BIOS code. 3. (Trained service - IBM x3500 | Installation Guide - Page 90
b. SAS hard disk drive backplane and cables c. DVD drive and cables d. (Trained service technician only) System board I9990650 AC power has been restored. 1. Check the power cables. 2. Check for interruption of the power supply (see the Problem Determination and Service Guide on the IBM System - IBM x3500 | Installation Guide - Page 91
Problem Determination and Service Guide on the IBM System x Documentation CD for information about testing the server. If you have just added new software or a new optional device and the server is not working, complete the following steps before using the troubleshooting tables: 1. Check the light - IBM x3500 | Installation Guide - Page 92
hard disk drive diagnostic test runs successfully, replace the drive that you removed with a new one. A hard disk drive was not detected while the operating system was being started. Reseat all hard disk drives and cables; then, run the hard disk drive diagnostic tests again. 78 IBM System x3500 - IBM x3500 | Installation Guide - Page 93
, but the problem remains. Run the diagnostic SCSI Fixed Disk Test (see Problem Determination and Service Guide on the IBM System x Documentation CD). Note: This test is not available on servers that have RAID arrays or servers that have SATA hard disk drives. Intermittent problems v Follow the - IBM x3500 | Installation Guide - Page 94
on. 2. See http://www.ibm.com/servers/eserver/serverproven/compat/us/ for keyboard compatibility. 3. If you are using a USB keyboard, run the Configuration/Setup Utility program and enable keyboardless operation to prevent the 301 POST error message from being displayed during startup. 4. If you are - IBM x3500 | Installation Guide - Page 95
memory bank when it detected a problem, or a memory bank might have been manually disabled. 2. Check the POST error log for error message 289: v If a DIMM was disabled by a system-management interrupt (SMI), replace the DIMM. v If a DIMM was disabled by the user or by POST, run the Configuration - IBM x3500 | Installation Guide - Page 96
only by a trained service technician. Symptom Action The server emits a continuous beep during POST, indicating that the startup (boot) microprocessor is not working correctly. 1. Correct any errors that are indicated by the light path diagnostics LEDs (see "Light path diagnostics LEDs" on page - IBM x3500 | Installation Guide - Page 97
times to reset the configuration settings to the default configuration (the memory connector or bank of connectors enabled). 3. Make sure that the correct server is controlling the monitor, if applicable. 4. See the Problem Determination and Service Guide on the IBM System x Documentation CD. The - IBM x3500 | Installation Guide - Page 98
Wrong characters appear on the 1. If the wrong language is displayed, update the BIOS code with the correct screen. language (see the Problem Determination and Service Guide on the IBM System x Documentation CD). 2. Reseat the following components: a. Failing serial device b. Serial cable - IBM x3500 | Installation Guide - Page 99
the suggested actions in the order in which they are listed in the Action column until the problem is solved. v See the Problem Determination and Service Guide on the IBM System x Documentation CD to determine which components are customer replaceable units (CRU) and which components are field - IBM x3500 | Installation Guide - Page 100
more devices than the power supply supports. 6. See the Problem Determination and Service Guide on the IBM System x Documentation CD. The server does not turn off. 1. Determine whether you are using an Advanced Configuration and Power Interface (ACPI) or a non-ACPI operating system. If you are - IBM x3500 | Installation Guide - Page 101
only by a trained service technician. Symptom Action The server unexpectedly shuts down, and the LEDs on the operator information panel are not lit. See the Problem Determination and Service Guide on the IBM System x Documentation CD. Serial port problems v Follow the suggested actions - IBM x3500 | Installation Guide - Page 102
server supports the operating system. If it does, either no installed; the option is not logical drive is defined (SCSI RAID servers), or the ServerGuide System Partition available. is not present. Run the ServerGuide program and make sure that setup is complete. 88 IBM System x3500 Type 7977 - IBM x3500 | Installation Guide - Page 103
work. 1. Run USB diagnostics (see Problem Determination and Service Guide on the IBM System x Documentation CD). 2. Make sure that: v The correct USB device driver is installed. v The operating system supports USB devices. v A standard PS/2 keyboard or mouse is not connected to the server. If it is - IBM x3500 | Installation Guide - Page 104
server under the left-side cover, and the error LEDs are also visible through the left-side cover. 1 POWER SUPPLY 2 CONFIG TEMP REMIND MEMORY DASD/ RAID FAN CPU S_ERR VRM PCI BUS SP BUS NMI SEE INSIDE COVER FOR MORE SERVICE INFORMATION Press the remind button on the light path diagnostics - IBM x3500 | Installation Guide - Page 105
only by a trained service technician. Lit light path diagnostics LED with the system-error or information LED also lit Description Action All LEDs are off (the power LED is lit; the information LED might be lit). No action is necessary. POWER SUPPLY 1 Power supply 1 has failed or - IBM x3500 | Installation Guide - Page 106
technician. Lit light path diagnostics LED with the system-error or information LED also lit Description Action TEMP A system temperature or component 1. See the BMC log or the system-error log (see the has exceeded specifications. Problem Determination and Service Guide on the Note - IBM x3500 | Installation Guide - Page 107
the Problem Determination and Service Guide on the IBM System x Documentation CD). 3. Replace the Remote Supervisor Adapter II SlimLine. MEMORY Memory failure. Note: The error LED on the DIMM is also lit. 1. Remove the DIMM that has the lit error LED; then, press the light path diagnostics button - IBM x3500 | Installation Guide - Page 108
a trained service technician. Lit light path diagnostics LED with the system-error or information LED also lit Description Action PCI BUS A PCI adapter has failed. 1. See the BMC log or the system-error log (see the Problem Determination and Service Guide on the IBM System x Documentation - IBM x3500 | Installation Guide - Page 109
v Use the troubleshooting information in your system documentation, and use the diagnostic tools that come with your system. Information about diagnostic tools is in the Problem Determination and Service Guide on the IBM Documentation CD that comes with your system. v Go to the IBM support Web site - IBM x3500 | Installation Guide - Page 110
find service information for IBM systems and optional devices at http://www.ibm.com/systems/support/. Software service and support Through IBM Support Line, you can get telephone assistance, for a fee, with usage, configuration, and software problems with System x and xSeries servers, BladeCenter - IBM x3500 | Installation Guide - Page 111
to evaluate and verify the operation of any non-IBM product, program, or service. IBM may have patents or pending IBM Director of Licensing IBM Corporation North Castle Drive Armonk, NY 10504-1785 U.S.A. INTERNATIONAL BUSINESS MACHINES CORPORATION PROVIDES THIS PUBLICATION "AS IS" WITHOUT WARRANTY - IBM x3500 | Installation Guide - Page 112
vary depending on operating environments. Maximum internal hard disk drive capacities assume the replacement of any standard hard disk drives and population of all hard disk drive bays with the largest currently supported drives available from IBM. 98 IBM System x3500 Type 7977: Installation Guide - IBM x3500 | Installation Guide - Page 113
may require replacement of the standard memory with an optional memory module. IBM makes no representation or warranties regarding non-IBM products and services that are ServerProven®, including but not limited to the implied warranties of merchantability and fitness for a particular purpose. These - IBM x3500 | Installation Guide - Page 114
from IBM equipment. For information on proper disposal of these batteries, contact IBM at 1-800-426-4333. Have the IBM part number listed on the battery available prior to your call. For Taiwan: Please recycle batteries. For the European Union: 100 IBM System x3500 Type 7977: Installation Guide - IBM x3500 | Installation Guide - Page 115
collection and treatment, contact your local IBM representative. This notice is provided in accordance with Royal Decree 106/2008 of Spain: The retail price of batteries, accumulators, and power cells includes the cost of the environmental management of their waste. For California: Perchlorate - IBM x3500 | Installation Guide - Page 116
with the protection requirements of EU Council Directive 89/336/EEC on the approximation of the laws of the Member States relating to electromagnetic compatibility. IBM cannot accept responsibility for any 102 IBM System x3500 Type 7977: Installation Guide - IBM x3500 | Installation Guide - Page 117
to satisfy the protection requirements resulting from a nonrecommended modification of the product, including the fitting of non-IBM option cards. This product has been tested and found to comply with the limits for Class A Information Technology Equipment according to CISPR 22/European Standard EN - IBM x3500 | Installation Guide - Page 118
104 IBM System x3500 Type 7977: Installation Guide - IBM x3500 | Installation Guide - Page 119
11 CPU LED 92 custom configuration, ServeRAID Manager 57 © Copyright IBM Corp. 2008 D danger statements 4 DASD LED 93 data rate, Ethernet 61 dimensions 5 display problems 82 documentation CD 2 drive, installing hot-swap 24 drives 5 DVD drive activity LED 36 drive problems 77 eject button 36 - IBM x3500 | Installation Guide - Page 120
5 system management microprocessor firmware, updating 42 intermittent problems 79 ISMP firmware, updating 42 K keyboard connector 37 problems 80 keys 2 L LEDs front of server 35 rear of server 37 LEDs, light path CPU 92 DASD 93 FAN 93 MEM 93 NMI 94 106 IBM System x3500 Type 7977: Installation Guide - IBM x3500 | Installation Guide - Page 121
96 solving problems 63 SP LED 93 specifications 5 starting the server 39 statements and notices 4 support, web site 95 system error LED 36 information LED 36 locator LED 35 T telephone numbers 96 TEMP LED 92 temperature 5 tests, hard disk drive diagnostic 79 trademarks 97 troubleshooting tables 77 - IBM x3500 | Installation Guide - Page 122
108 IBM System x3500 Type 7977: Installation Guide - IBM x3500 | Installation Guide - Page 123
- IBM x3500 | Installation Guide - Page 124
Part Number: 44R5218 Printed in USA (1P) P/N: 44R5218
-
 1
1 -
 2
2 -
 3
3 -
 4
4 -
 5
5 -
 6
6 -
 7
7 -
8
-
9
-
10
-
11
-
12
-
13
-
14
-
15
-
16
-
17
-
18
-
19
-
20
-
21
-
22
-
23
-
24
-
25
-
26
-
27
-
28
-
29
-
30
-
31
-
32
-
33
-
34
-
35
-
36
-
37
-
38
-
39
-
40
-
41
-
42
-
43
-
44
-
45
-
46
-
47
-
48
-
49
-
50
-
51
-
52
-
53
-
54
-
55
-
56
-
57
-
58
-
59
-
60
-
61
-
62
-
63
-
64
-
65
-
66
-
67
-
68
-
69
-
70
-
71
-
72
-
73
-
74
-
75
-
76
-
77
-
78
-
79
-
80
-
81
-
82
-
83
-
84
-
85
-
86
-
87
-
88
-
89
-
90
-
91
-
92
-
93
-
94
-
95
-
96
-
97
-
98
-
99
-
100
-
101
-
102
-
103
-
104
-
105
-
106
-
107
-
108
-
109
-
110
-
111
-
112
-
113
-
114
-
115
-
116
-
117
-
118
-
119
-
120
-
121
-
122
-
123
-
124
 |
 |
Welcome.
Thank you for buying an
IBM server.
This server
contains information for setting
up and configuring your server.
For detailed information about
your server, view the documentation
on the IBM System
You can also find the most
current information about
your server at
Your server
is based on the X-Architecture
technology, and it features
superior performance, availability,
and affordability.
CD.
Installation Guide
Documentation
Installation Guide
System x3500
Type 7977
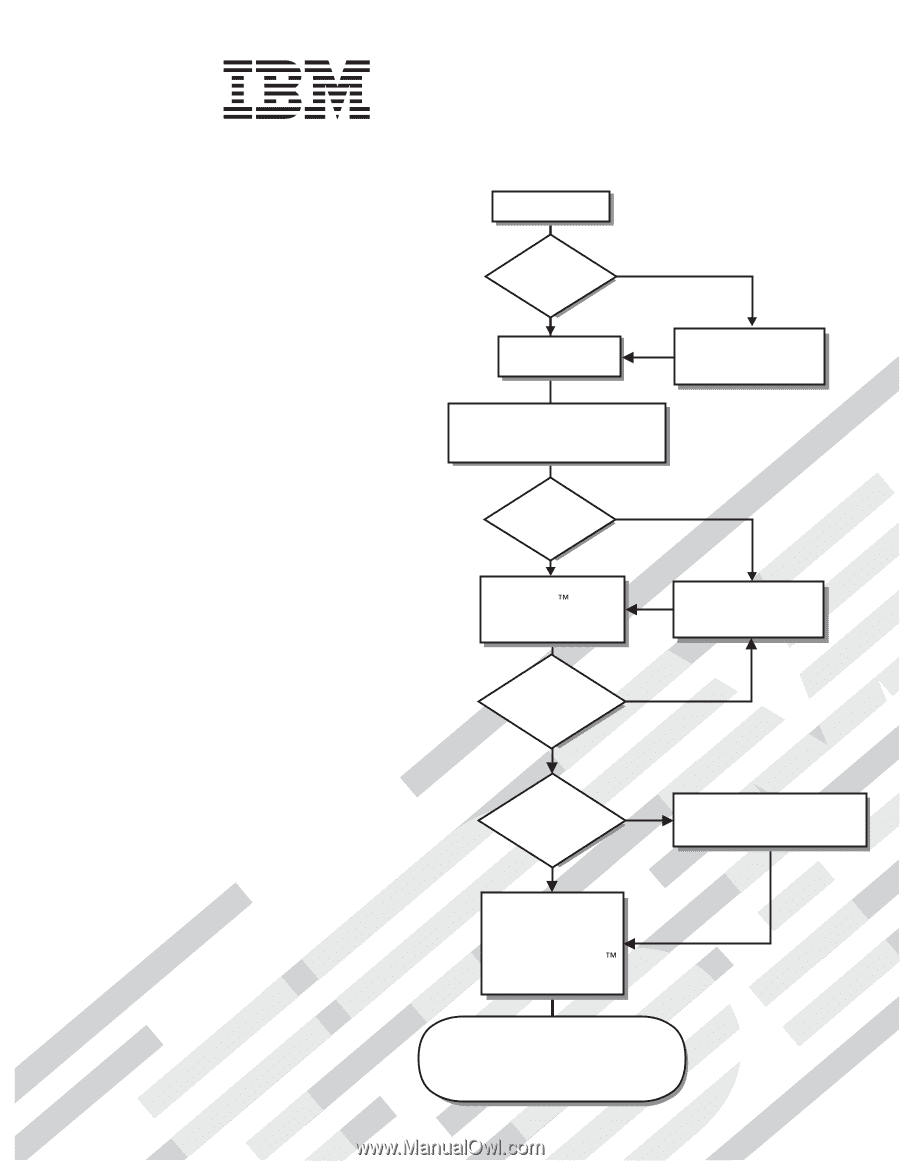
Turn off the server
and install options.
Did the server
start correctly?
Yes
No
Go to the Server Support
flow chart on the reverse
side of this page.
Start the server.
Did the server
start correctly?
Yes
No
Cable the server and options;
then, restart the server.
Was the
server setup
completed?
Use
ServerGuide to
install the operating
system?
The server is ready to use.
Go to
to register the server.
Go to the Web for instructions:
/support/
No
Yes
Yes
No
Use the IBM
ServerGuide
program
to set up and
configure hardware.
Go to the Server Support
flow chart on the reverse
side of this page.
Install applications,
such as IBM systems
management software
and IBM ServeRAID
programs