IBM x3500 Installation Guide - Page 39
Installing, additional, microprocessor - bios update
 |
UPC - 883436005760
View all IBM x3500 manuals
Add to My Manuals
Save this manual to your list of manuals |
Page 39 highlights
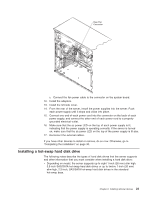
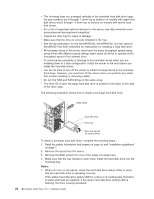
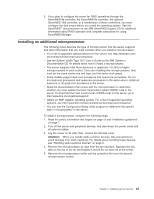
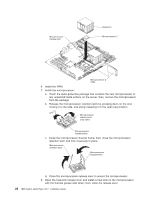
2. If you plan to configure the server for RAID operations through the ServeRAID-8k controller, the ServeRAID-8s controller, the optional ServeRAID-10is controller, or a combination of these controllers, you must configure the disk arrays before you install the operating system. See the ServeRAID™ documentation on the IBM ServeRAID Support CD for additional information about RAID operation and complete instructions for using ServeRAID Manager. Installing an additional microprocessor The following notes describe the type of microprocessor that the server supports and other information that you must consider when you install a microprocessor: v For a list of supported optional devices for the server, see http://www.ibm.com/ servers/eserver/serverproven/compat/us/. v See the System x3500 Type 7977 User's Guide on the IBM System x Documentation CD for details about how to install a microprocessor. v The server supports Intel Xeon dual-core or quad-core 1.6 GHz or higher microprocessors in each socket. If you are installing two microprocessors, they must be the same cache size and type, and the same clock speed. v Some models support dual-core processors and quad-core processors. Do not mix dual-core processors and quad-core processors in the same server. Install all dual-core or all quad-core processors in the server. v Read the documentation that comes with the microprocessor to determine whether you must update the basic input/output system (BIOS) code in the server. To download the most current level of BIOS code for the server, go to http://www.ibm.com/systems/support/. v Obtain an SMP-capable operating system. For a list of supported operating systems, see http://www.ibm.com/servers/eserver/serverproven/compat/us/. v You can use the Configuration/Setup Utility program to determine the specific type of microprocessor in the server. To install a microprocessor, complete the following steps: 1. Read the safety information that begins on page vii and "Installation guidelines" on page 7. 2. Turn off the server and peripheral devices, and disconnect the power cords and all external cables. 3. Lay the server on its side; then, remove the left-side cover. Attention: When you handle static-sensitive devices, take precautions to avoid damage from static electricity. For details about handling these devices, see "Handling static-sensitive devices" on page 9. 4. Remove the microprocessor air duct from the fan structure. Squeeze the two tabs on the top of the air duct together and lift the air duct out of the server. 5. Remove the microprocessor baffle and the protective film from the second microprocessor socket. Chapter 2. Installing optional devices 25
-
 1
1 -
2
-
3
-
4
-
5
-
6
-
7
-
8
-
9
-
10
-
11
-
12
-
13
-
14
-
15
-
16
-
17
-
18
-
19
-
20
-
21
-
22
-
23
-
24
-
25
-
26
-
27
-
28
-
29
-
30
-
31
-
32
-
33
-
 34
34 -
 35
35 -
 36
36 -
 37
37 -
 38
38 -
 39
39 -
 40
40 -
 41
41 -
 42
42 -
 43
43 -
 44
44 -
45
-
46
-
47
-
48
-
49
-
50
-
51
-
52
-
53
-
54
-
55
-
56
-
57
-
58
-
59
-
60
-
61
-
62
-
63
-
64
-
65
-
66
-
67
-
68
-
69
-
70
-
71
-
72
-
73
-
74
-
75
-
76
-
77
-
78
-
79
-
80
-
81
-
82
-
83
-
84
-
85
-
86
-
87
-
88
-
89
-
90
-
91
-
92
-
93
-
94
-
95
-
96
-
97
-
98
-
99
-
100
-
101
-
102
-
103
-
104
-
105
-
106
-
107
-
108
-
109
-
110
-
111
-
112
-
113
-
114
-
115
-
116
-
117
-
118
-
119
-
120
-
121
-
122
-
123
-
124
 |
 |