IBM x3500 Installation Guide - Page 37
Installing, hot-swap, drive - hard drive
 |
UPC - 883436005760
View all IBM x3500 manuals
Add to My Manuals
Save this manual to your list of manuals |
Page 37 highlights
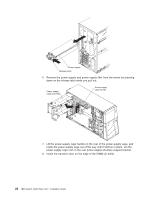
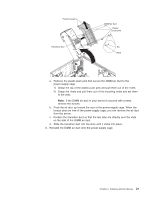
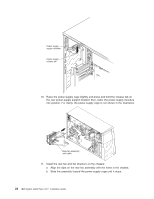
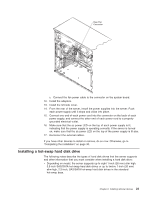
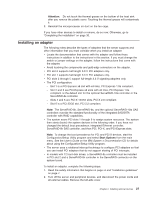
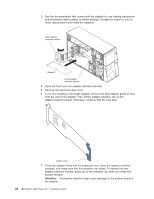
Rear Fan Connector c. Connect the fan power cable to the connector on the system board. 12. Install the adapters. 13. Install the left-side cover. 14. From the rear of the server, install the power supplies into the server. Push each power supply until it stops and clicks into place. 15. Connect one end of each power cord into the connector on the back of each power supply, and connect the other end of each power cord to a properly grounded electrical outlet. 16. Make sure that the ac power LED on the top of each power supply is lit, indicating that the power supply is operating correctly. If the server is turned on, make sure that the dc power LED on the top of the power supply is lit also. 17. Reconnect the external cables. If you have other devices to install or remove, do so now. Otherwise, go to "Completing the installation" on page 30. Installing a hot-swap hard disk drive The following notes describe the types of hard disk drives that the server supports and other information that you must consider when installing a hard disk drive: v Depending on model, the server supports up to eight 1-inch (26 mm) slim high, 3.5-inch SAS/SATA hot-swap hard disk drives or up to twelve 1-inch (26 mm) slim-high, 2.5-inch, SAS/SATA hot-swap hard disk drives in the standard hot-swap bays. Chapter 2. Installing optional devices 23
-
 1
1 -
2
-
3
-
4
-
5
-
6
-
7
-
8
-
9
-
10
-
11
-
12
-
13
-
14
-
15
-
16
-
17
-
18
-
19
-
20
-
21
-
22
-
23
-
24
-
25
-
26
-
27
-
28
-
29
-
30
-
31
-
 32
32 -
 33
33 -
 34
34 -
 35
35 -
 36
36 -
 37
37 -
 38
38 -
 39
39 -
 40
40 -
 41
41 -
 42
42 -
43
-
44
-
45
-
46
-
47
-
48
-
49
-
50
-
51
-
52
-
53
-
54
-
55
-
56
-
57
-
58
-
59
-
60
-
61
-
62
-
63
-
64
-
65
-
66
-
67
-
68
-
69
-
70
-
71
-
72
-
73
-
74
-
75
-
76
-
77
-
78
-
79
-
80
-
81
-
82
-
83
-
84
-
85
-
86
-
87
-
88
-
89
-
90
-
91
-
92
-
93
-
94
-
95
-
96
-
97
-
98
-
99
-
100
-
101
-
102
-
103
-
104
-
105
-
106
-
107
-
108
-
109
-
110
-
111
-
112
-
113
-
114
-
115
-
116
-
117
-
118
-
119
-
120
-
121
-
122
-
123
-
124
 |
 |
