Intermec PC43d PC23 and PC43 Desktop Printer User Manual - Page 36
Mount the Printer on a Wall
 |
View all Intermec PC43d manuals
Add to My Manuals
Save this manual to your list of manuals |
Page 36 highlights
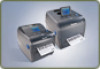
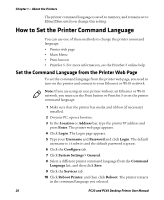
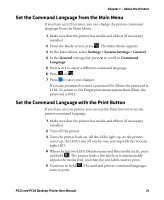
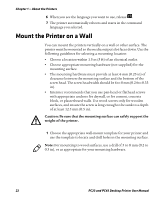
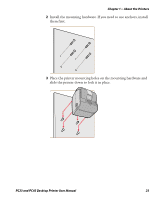
Chapter 1 - About the Printers 6 When you see the language you want to use, release . 7 The printer automatically reboots and starts in the command language you selected. Mount the Printer on a Wall You can mount the printers vertically on a wall or other surface. The printer must be mounted so the media output slot faces down. Use the following guidelines for selecting a mounting location: • Choose a location within 1.5 m (5 ft) of an electrical outlet. • Choose appropriate mounting hardware (not supplied) for the mounting surface. • The mounting hardware must provide at least 6 mm (0.25 in) of clearance between the mounting surface and the bottom of the screw head. The screw head width should be 6 to 8 mm (0.24 to 0.33 in). • Intermec recommends that you use pan-head or flathead screws with appropriate anchors for drywall, or for cement, concrete block, or plasterboard walls. Use wood screws only for wooden surfaces, and ensure the screw is long enough to be sunk to a depth of at least 12.5 mm (0.5 in). Caution: Be sure that the mounting surface can safely support the weight of the printer. 1 Choose the appropriate wall-mount template for your printer and use the template to locate and drill holes in the mounting surface. Note: For mounting to wood surfaces, use a drill of 5 to 8 mm (0.2 to 0.3 in), or as appropriate for your mounting hardware. 22 PC23 and PC43 Desktop Printer User Manual
-
 1
1 -
2
-
3
-
4
-
5
-
6
-
7
-
8
-
9
-
10
-
11
-
12
-
13
-
14
-
15
-
16
-
17
-
18
-
19
-
20
-
21
-
22
-
23
-
24
-
25
-
26
-
27
-
28
-
29
-
30
-
 31
31 -
 32
32 -
 33
33 -
 34
34 -
 35
35 -
 36
36 -
 37
37 -
 38
38 -
 39
39 -
 40
40 -
 41
41 -
42
-
43
-
44
-
45
-
46
-
47
-
48
-
49
-
50
-
51
-
52
-
53
-
54
-
55
-
56
-
57
-
58
-
59
-
60
-
61
-
62
-
63
-
64
-
65
-
66
-
67
-
68
-
69
-
70
-
71
-
72
-
73
-
74
-
75
-
76
-
77
-
78
-
79
-
80
-
81
-
82
-
83
-
84
-
85
-
86
-
87
-
88
-
89
-
90
-
91
-
92
-
93
-
94
-
95
-
96
-
97
-
98
-
99
-
100
-
101
-
102
-
103
-
104
-
105
-
106
-
107
-
108
-
109
-
110
-
111
-
112
-
113
-
114
-
115
-
116
-
117
-
118
-
119
-
120
-
121
-
122
-
123
-
124
-
125
-
126
-
127
-
128
-
129
-
130
-
131
-
132
-
133
-
134
-
135
-
136
-
137
-
138
-
139
-
140
-
141
-
142
-
143
-
144
-
145
-
146
-
147
-
148
-
149
-
150
-
151
-
152
-
153
-
154
-
155
-
156
-
157
-
158
-
159
-
160
-
161
-
162
-
163
-
164
-
165
-
166
-
167
-
168
-
169
-
170
-
171
-
172
-
173
-
174
-
175
-
176
-
177
-
178
-
179
-
180
-
181
-
182
-
183
-
184
 |
 |
