Intermec PC43d PC23 and PC43 Desktop Printer User Manual - Page 56
About Cut-Off Printing, adhesive, or other soft material, that may stick to the cutting parts
 |
View all Intermec PC43d manuals
Add to My Manuals
Save this manual to your list of manuals |
Page 56 highlights
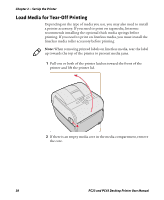
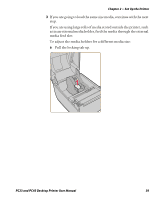
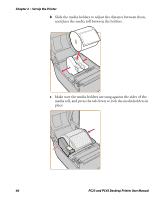
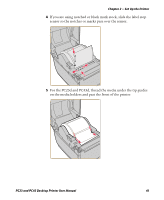
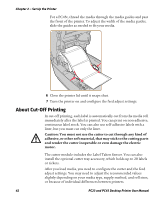
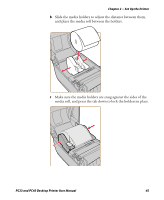
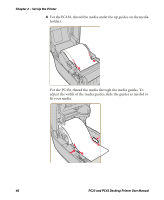
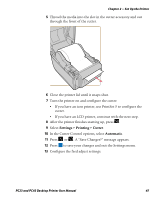
Chapter 2 - Set Up the Printer For a PC43t, thread the media through the media guides and past the front of the printer. To adjust the width of the media guides, slide the guides as needed to fit your media. 6 Close the printer lid until it snaps shut. 7 Turn the printer on and configure the feed adjust settings. About Cut-Off Printing In cut-off printing, each label is automatically cut from the media roll immediately after the label is printed. You can print on non-adhesive, continuous label stock. You can also use self-adhesive labels with a liner, but you must cut only the liner. Caution: You must not use the cutter to cut through any kind of adhesive, or other soft material, that may stick to the cutting parts and render the cutter inoperable or even damage the electric motor. The cutter module includes the Label Taken Sensor. You can also install the optional cutter tray accessory, which holds up to 20 labels or tickets. After you load media, you need to configure the cutter and the feed adjust settings. You may need to adjust the recommended values slightly depending on your media type, supply method, and roll sizes, or because of individual differences between printers. 42 PC23 and PC43 Desktop Printer User Manual
-
 1
1 -
2
-
3
-
4
-
5
-
6
-
7
-
8
-
9
-
10
-
11
-
12
-
13
-
14
-
15
-
16
-
17
-
18
-
19
-
20
-
21
-
22
-
23
-
24
-
25
-
26
-
27
-
28
-
29
-
30
-
31
-
32
-
33
-
34
-
35
-
36
-
37
-
38
-
39
-
40
-
41
-
42
-
43
-
44
-
45
-
46
-
47
-
48
-
49
-
50
-
 51
51 -
 52
52 -
 53
53 -
 54
54 -
 55
55 -
 56
56 -
 57
57 -
 58
58 -
 59
59 -
 60
60 -
 61
61 -
62
-
63
-
64
-
65
-
66
-
67
-
68
-
69
-
70
-
71
-
72
-
73
-
74
-
75
-
76
-
77
-
78
-
79
-
80
-
81
-
82
-
83
-
84
-
85
-
86
-
87
-
88
-
89
-
90
-
91
-
92
-
93
-
94
-
95
-
96
-
97
-
98
-
99
-
100
-
101
-
102
-
103
-
104
-
105
-
106
-
107
-
108
-
109
-
110
-
111
-
112
-
113
-
114
-
115
-
116
-
117
-
118
-
119
-
120
-
121
-
122
-
123
-
124
-
125
-
126
-
127
-
128
-
129
-
130
-
131
-
132
-
133
-
134
-
135
-
136
-
137
-
138
-
139
-
140
-
141
-
142
-
143
-
144
-
145
-
146
-
147
-
148
-
149
-
150
-
151
-
152
-
153
-
154
-
155
-
156
-
157
-
158
-
159
-
160
-
161
-
162
-
163
-
164
-
165
-
166
-
167
-
168
-
169
-
170
-
171
-
172
-
173
-
174
-
175
-
176
-
177
-
178
-
179
-
180
-
181
-
182
-
183
-
184
 |
 |
