Intermec PD41 PD41 and PD42 Commercial Printer User's Manual - Page 67
Configuring Wireless LAN Settings, Submit Avalanche settings, Network Admin, Wireless LAN
 |
View all Intermec PD41 manuals
Add to My Manuals
Save this manual to your list of manuals |
Page 67 highlights
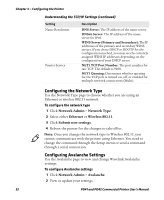
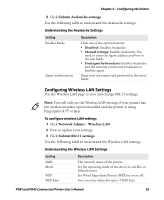
Chapter 3 - Configuring the Printer 3 Click Submit Avalanche settings. Use the following table to understand the Avalanche settings. Understanding the Avalanche Settings Setting Enabler Mode Agent authorization Description Click one of the option buttons: • Disabled: Disables Avalanche. • Manual settings: Enables Avalanche. You need to enter the Agent address and Port in the text fields. • Find agent by broadcast: Enables Avalanche and the network connection broadcasts to find the agent. Enter your user name and password in the entry fields. Configuring Wireless LAN Settings Use the Wireless LAN page to view and change 802.11 settings. Note: You will only see the Wireless LAN settings if your printer has the wireless interface option installed and the printer is using Fingerprint 8.77 or later. To configure wireless LAN settings 1 Click Network Admin > Wireless LAN. 2 View or update your settings. 3 Click Submit 802.11 settings. Use the following table to understand the Wireless LAN settings. Understanding the Wireless LAN Settings Setting SSID Mode WEP WEP Keys Description The network name of the printer. Set the operating mode of the device to Ad-Hoc or Infrastructure. Set Wired Equivalent Privacy (WEP) to on or off. You can enter values for up to 4 WEP keys. PD41 and PD42 Commercial Printer User's Manual 53
-
 1
1 -
2
-
3
-
4
-
5
-
6
-
7
-
8
-
9
-
10
-
11
-
12
-
13
-
14
-
15
-
16
-
17
-
18
-
19
-
20
-
21
-
22
-
23
-
24
-
25
-
26
-
27
-
28
-
29
-
30
-
31
-
32
-
33
-
34
-
35
-
36
-
37
-
38
-
39
-
40
-
41
-
42
-
43
-
44
-
45
-
46
-
47
-
48
-
49
-
50
-
51
-
52
-
53
-
54
-
55
-
56
-
57
-
58
-
59
-
60
-
61
-
 62
62 -
 63
63 -
 64
64 -
 65
65 -
 66
66 -
 67
67 -
 68
68 -
 69
69 -
 70
70 -
 71
71 -
 72
72 -
73
-
74
-
75
-
76
-
77
-
78
-
79
-
80
-
81
-
82
-
83
-
84
-
85
-
86
-
87
-
88
-
89
-
90
-
91
-
92
-
93
-
94
-
95
-
96
-
97
-
98
-
99
-
100
-
101
-
102
-
103
-
104
-
105
-
106
-
107
-
108
-
109
-
110
-
111
-
112
-
113
-
114
-
115
-
116
-
117
-
118
-
119
-
120
-
121
-
122
-
123
-
124
-
125
-
126
-
127
-
128
-
129
-
130
-
131
-
132
-
133
-
134
-
135
-
136
-
137
-
138
-
139
-
140
-
141
-
142
-
143
-
144
-
145
-
146
-
147
-
148
-
149
-
150
-
151
-
152
-
153
-
154
-
155
-
156
-
157
-
158
-
159
-
160
-
161
-
162
 |
 |
