JVC DLA-X550R Instruction Manual - Page 16
Precautions during Mounting, Securing mounting the projector, Securing the projector ceiling mount
 |
View all JVC DLA-X550R manuals
Add to My Manuals
Save this manual to your list of manuals |
Page 16 highlights
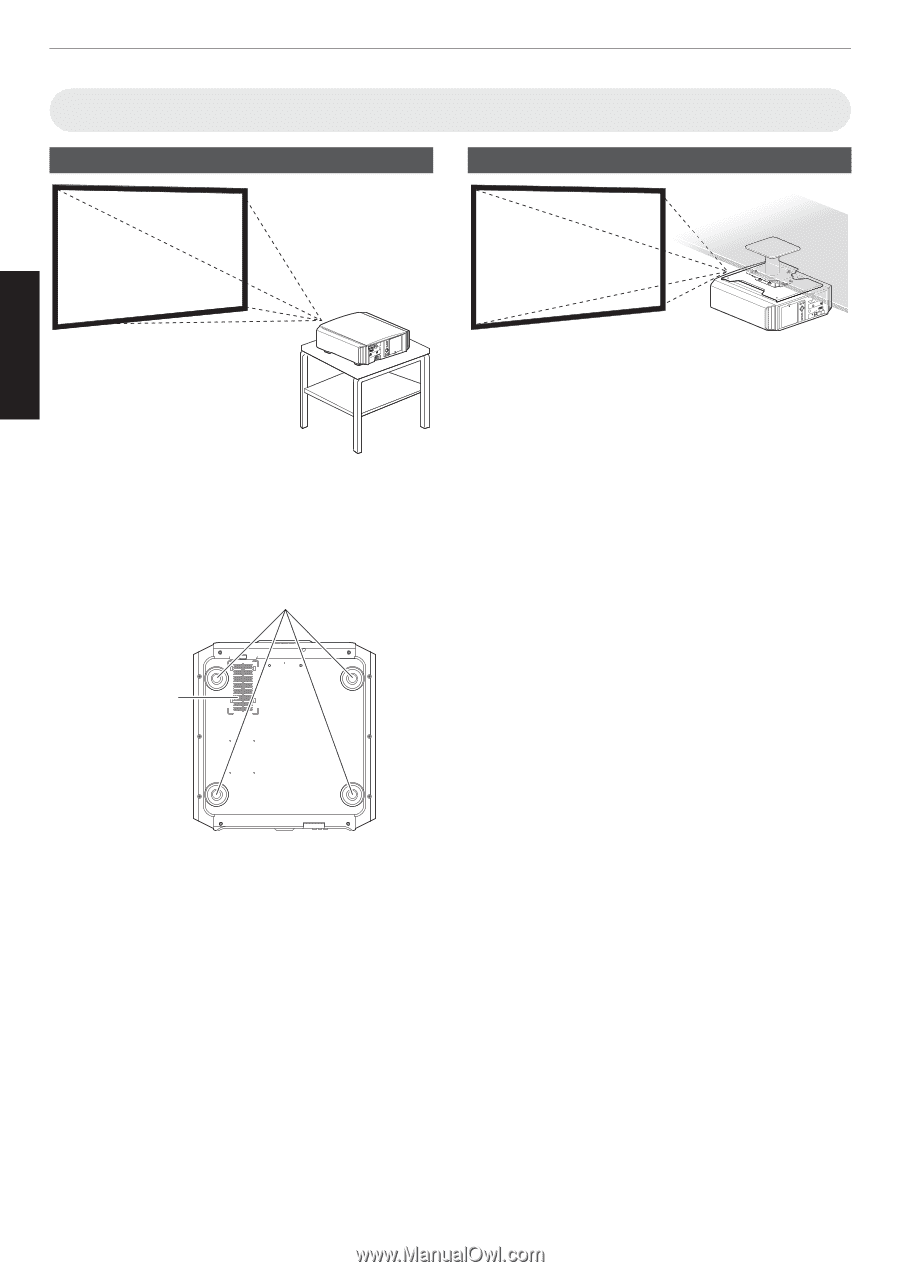
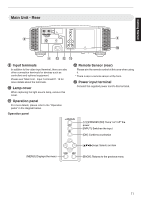
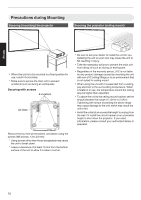
Set up Precautions during Mounting Securing (mounting) the projector Securing the projector (ceiling mount) . 0 When this unit is to be mounted to a fixed position for use, install it horizontally. 0 Make sure to secure the main unit to prevent accidents such as during an earthquake. Securing with screws 4 Locations Air Inlets . Remove the four feet at the bottom, and fasten using the screws (M5 screws, 13 to 23 mm). * Using screws other than those designated may cause the unit to break down. * Leave a clearance of at least 10 mm from the bottom surface of the unit to allow it to take in cool air. . 0 Be sure to ask your dealer to install the unit for you. Installing the unit on your own may cause the unit to fall resulting in injury. 0 Take the necessary actions to prevent the main unit from falling off such as during an earthquake. 0 Regardless of the warranty period, JVC is not liable for any product damage caused by mounting the unit with non-JVC ceiling fittings or to an environment that is not suited for ceiling mount. 0 When using the unit with it suspended from a ceiling, pay attention to the surrounding temperature. When a heater is in use, the temperature around the ceiling may be higher than expected. 0 To attach the unit to the ceiling mount bracket, set the torque between the range of 1.5N m to 2.0N m. Tightening with torque exceeding the above range may cause damage to the unit, which may result the unit to fall. 0 Install the outlet at an accessible height to unplug from the wall. Or install the circuit breaker at an accessible height to shut down the projector. If you need information, please consult your authorized dealer or specialist. 16
-
 1
1 -
2
-
3
-
4
-
5
-
6
-
7
-
8
-
9
-
10
-
 11
11 -
 12
12 -
 13
13 -
 14
14 -
 15
15 -
 16
16 -
 17
17 -
 18
18 -
 19
19 -
 20
20 -
 21
21 -
22
-
23
-
24
-
25
-
26
-
27
-
28
-
29
-
30
-
31
-
32
-
33
-
34
-
35
-
36
-
37
-
38
-
39
-
40
-
41
-
42
-
43
-
44
-
45
-
46
-
47
-
48
-
49
-
50
-
51
-
52
-
53
-
54
-
55
-
56
-
57
-
58
-
59
-
60
-
61
-
62
-
63
-
64
-
65
-
66
-
67
-
68
-
69
-
70
-
71
-
72
-
73
-
74
-
75
-
76
-
77
-
78
-
79
-
80
 |
 |