JVC DLA-X550R Instruction Manual - Page 21
Operate, Viewing Videos
 |
View all JVC DLA-X550R manuals
Add to My Manuals
Save this manual to your list of manuals |
Page 21 highlights
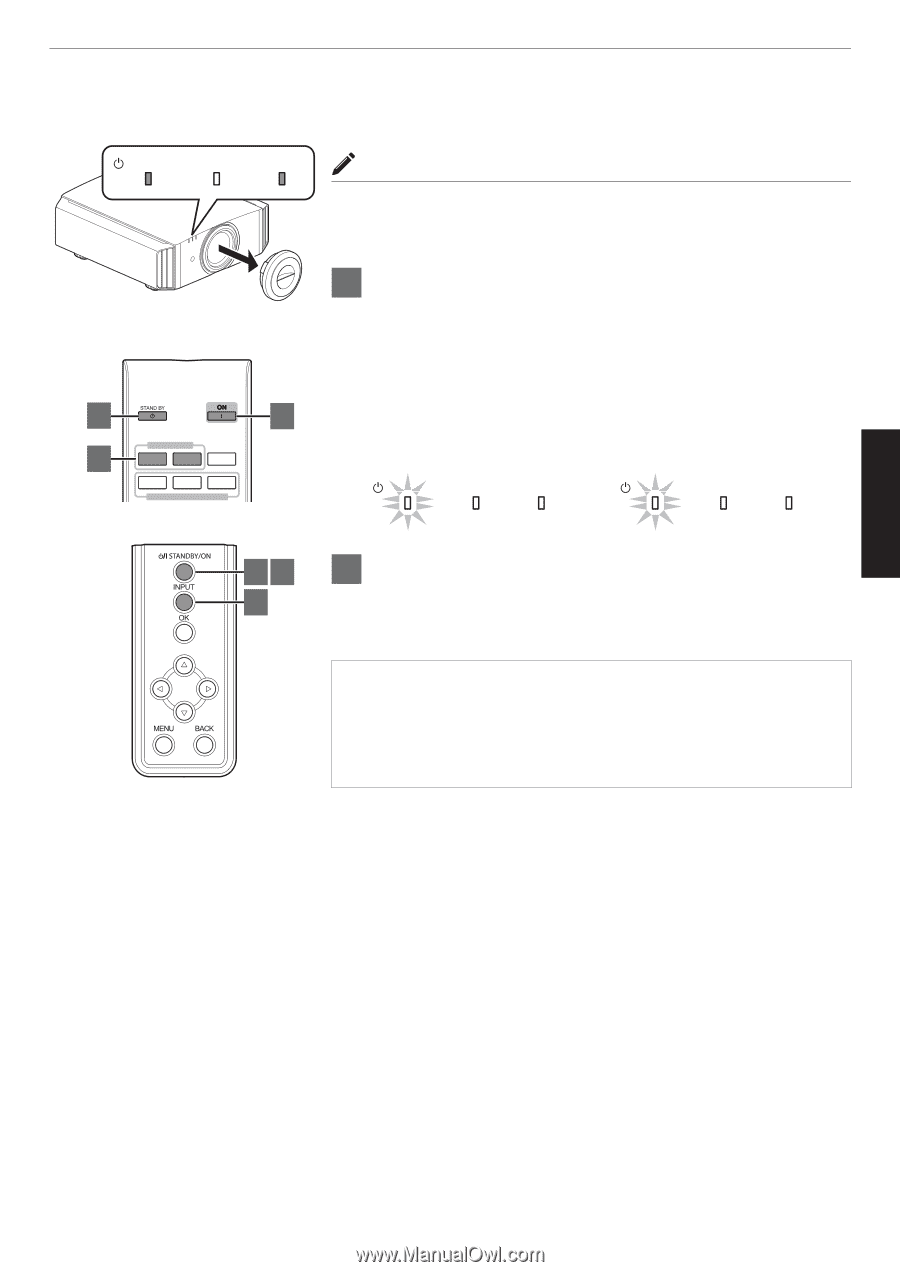
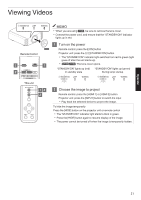
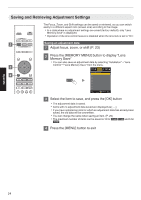
Viewing Videos STANDBY/ON LAMP WARNING MEMO 0 When you are using 6, be sure to remove the lens cover. 0 Connect the power cord, and ensure that the "STANDBY/ON" indicator lights up in red. Remote Control 3 INPUT 2 HDMI 1 HDMI 2 INFO. MEMORY MENU MEMORY1 MEMORY2 LENS MEMORY This unit 6 1 1 Turn on the power Remote control: press the C [ON] button Projector unit: press the A [STANDBY/ON] button 0 The "STANDBY/ON" indicator light switches from red to green (light goes off after the unit starts up). 0 (4 5) The lens cover opens. "STANDBY/ON" lights up (red) In standby state "STANDBY/ON" lights up (green) During lamp startup STANDBY/ON LAMP WARNING STANDBY/ON LAMP WARNING . 13 2 2 Choose the image to project Remote control: press the [HDMI 1] or [HDMI 2] button Projector unit: press the [INPUT] button to switch the input 0 Play back the selected device to project the image. To hide the image temporarily Press the [HIDE] button on the projector unit or remote control 0 The "STANDBY/ON" indicator light starts to blink in green. 0 Press the [HIDE] button again to resume display of the image. 0 The power cannot be turned off when the image is temporarily hidden. Operate 21
-
 1
1 -
2
-
3
-
4
-
5
-
6
-
7
-
8
-
9
-
10
-
11
-
12
-
13
-
14
-
15
-
 16
16 -
 17
17 -
 18
18 -
 19
19 -
 20
20 -
 21
21 -
 22
22 -
 23
23 -
 24
24 -
 25
25 -
 26
26 -
27
-
28
-
29
-
30
-
31
-
32
-
33
-
34
-
35
-
36
-
37
-
38
-
39
-
40
-
41
-
42
-
43
-
44
-
45
-
46
-
47
-
48
-
49
-
50
-
51
-
52
-
53
-
54
-
55
-
56
-
57
-
58
-
59
-
60
-
61
-
62
-
63
-
64
-
65
-
66
-
67
-
68
-
69
-
70
-
71
-
72
-
73
-
74
-
75
-
76
-
77
-
78
-
79
-
80
 |
 |