JVC DLA-X550R Instruction Manual - Page 25
Retrieving an adjustment data, Operate
 |
View all JVC DLA-X550R manuals
Add to My Manuals
Save this manual to your list of manuals |
Page 25 highlights
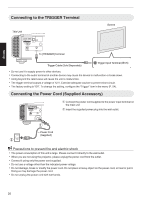
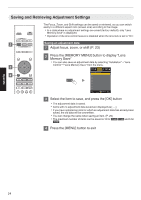
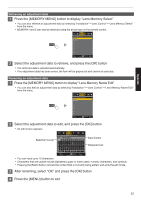
Operate Retrieving an adjustment data 1 Press the [MEMORY MENU] button to display "Lens Memory Select" 0 You can also retrieve an adjustment data by selecting "Installation"""Lens Control"""Lens Memory Select" from the menu. 0 MEMORY1 and 2 can also be retrieved using the direct keys on the remote control. MEMORY MENU . Installation >> Lens Memory Select MEMORY1 MEMORY2 Exit MENU Select Operate Back BACK 2 Select the adjustment data to retrieve, and press the [OK] button 0 The retrieved data is adjusted automatically. 0 If no adjustment data has been saved, the item will be grayed out and cannot be selected. Renaming an adjustment data 1 Press the [MEMORY MENU] button to display "Lens Memory Name Edit" 0 You can also edit an adjustment data by selecting "Installation"""Lens Control"""Lens Memory Name Edit" from the menu. MEMORY MENU . Installation >> Lens Memory Name Edit MEMORY1 MEMORY2 Exit MENU Select Operate Back BACK 2 Select the adjustment data to edit, and press the [OK] button 0 An edit screen appears. Installation Selection Cursor >> Lens Memory Name Edit Name MEMORY1 ABCDE FGH I J K LM NOPQR S T U VWX Y Z abcde f gh i j k lm nopq r s t y vwx y z 1234567890 SPACE Clear All Clear OK Input Cursor Character List . 0 You can input up to 10 characters. Exit MENU Select Operate Back BACK 0 Characters that are usable include alphabets (upper or lower case), numeric characters, and symbols. 0 Pressing the [Back] button cancels the content that is currently being edited, and exits the edit mode. 3 After renaming, select "OK" and press the [OK] button 4 Press the [MENU] button to exit 25
-
 1
1 -
2
-
3
-
4
-
5
-
6
-
7
-
8
-
9
-
10
-
11
-
12
-
13
-
14
-
15
-
16
-
17
-
18
-
19
-
 20
20 -
 21
21 -
 22
22 -
 23
23 -
 24
24 -
 25
25 -
 26
26 -
 27
27 -
 28
28 -
 29
29 -
 30
30 -
31
-
32
-
33
-
34
-
35
-
36
-
37
-
38
-
39
-
40
-
41
-
42
-
43
-
44
-
45
-
46
-
47
-
48
-
49
-
50
-
51
-
52
-
53
-
54
-
55
-
56
-
57
-
58
-
59
-
60
-
61
-
62
-
63
-
64
-
65
-
66
-
67
-
68
-
69
-
70
-
71
-
72
-
73
-
74
-
75
-
76
-
77
-
78
-
79
-
80
 |
 |
