JVC DLA-X550R Instruction Manual - Page 38
Adjust/Set, Adjust to the preferred setting, Selecting the Default Value for Making Adjustments
 |
View all JVC DLA-X550R manuals
Add to My Manuals
Save this manual to your list of manuals |
Page 38 highlights
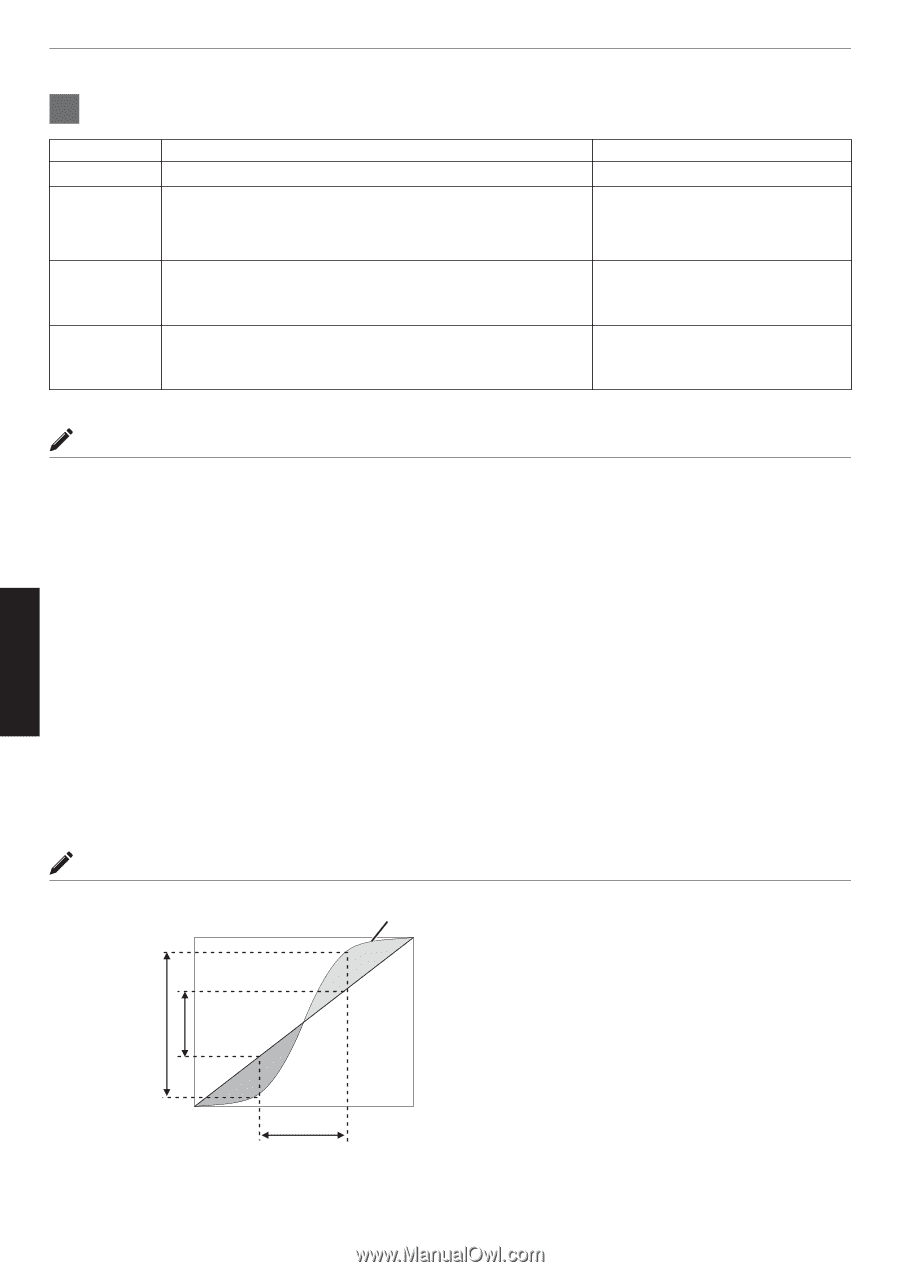
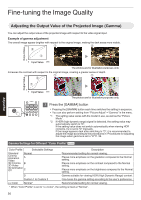
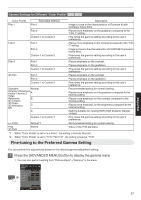
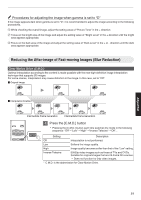
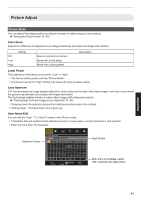
Adjust/Set 2 Adjust to the preferred setting Item Description Setting Color Selection Select "Color Selection", and select the color to adjust White/Red/Green/Blue Picture Tone Adjusts the overall brightness automatically for a well-balanced -16 (darkens image for an result without compromising the gradation of the image. underexposed effect) to +16 (brightens image for an overexposed effect) Dark Level Adjusts the dark areas of the input image. (Each of White/Red/ -7 (darkens the shadows) to +7 Green/Blue can be adjusted.) (brightens the shadows) 0 To do so, use the H I keys to move the cursor. Bright Level Adjusts the bright areas of the input image. (Each of White/Red/ -7 (darkens the highlights) to +7 Green/Blue can be adjusted.) (brightens the highlights) 0 To do so, use the H I keys to move the cursor. * Adjustment cannot be made when "Color Profile" is set to "x.v.Color". Selecting the Default Value for Making Adjustments 0 When one of "Custom 1" to "Custom 3" is selected in "Gamma", you can select a "Correction Value". 0 Select "Correction Value", and press the H I keys to select a correction value (setting value) as a base value for adjustment. 0 For details on the correction value (setting value), please refer to P. 36 and P. 37. 6 Normal, A, B, C, D, 1.8, 1.9, 2.0, 2.1, 2.2, 2.3, 2.4, 2.5, 2.6, Import 4 5 When "Picture Mode" is set to "Film": Film 1, Film 2, Import When "Picture Mode" is set to a value other than "Film": Normal, A, B, C, D, 1.8, 1.9, 2.0, 2.1, 2.2, 2.3, 2.4, 2.5, 2.6, Import 0 The smaller the value, the brighter the dark areas of the image will become. At the same time, the bright areas will appear blown out. 0 Selecting "Import" enables you to select the gamma data created externally. The factory setting for "Import" is the same as the "Normal" setting. 0 You can use the projector calibration software to customize the gamma data adjustment, and import the created gamma data. For more details, please refer to our website. http://www3.jvckenwood.com/english/download/index.html About gamma adjustment Bright 255 Gamma Curve A Output Value D" D B Dark 0 0 Dark C Input Value 255 Bright 0 When the gamma curve is a straight line: The brightness and contrast of the video input will be the same as that of the video output. 0 Area for which the gamma curve is above the straight line (A): Video output appears brighter than the input. 0 Area for which the gamma curve is below the straight line (B): Video output appears darker than the input. 0 Area for which the slope of the gamma curve is steep (midtone) (C): The grayscale range of the video output becomes wider, and the contrast increases (D"D'). 38
-
 1
1 -
2
-
3
-
4
-
5
-
6
-
7
-
8
-
9
-
10
-
11
-
12
-
13
-
14
-
15
-
16
-
17
-
18
-
19
-
20
-
21
-
22
-
23
-
24
-
25
-
26
-
27
-
28
-
29
-
30
-
31
-
32
-
 33
33 -
 34
34 -
 35
35 -
 36
36 -
 37
37 -
 38
38 -
 39
39 -
 40
40 -
 41
41 -
 42
42 -
 43
43 -
44
-
45
-
46
-
47
-
48
-
49
-
50
-
51
-
52
-
53
-
54
-
55
-
56
-
57
-
58
-
59
-
60
-
61
-
62
-
63
-
64
-
65
-
66
-
67
-
68
-
69
-
70
-
71
-
72
-
73
-
74
-
75
-
76
-
77
-
78
-
79
-
80
 |
 |