JVC DLA-X550R Instruction Manual - Page 63
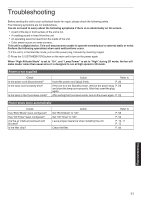
Video image looks unnatural, Troubleshooting, Colors are unnatural, Video image is fuzzy
 |
View all JVC DLA-X550R manuals
Add to My Manuals
Save this manual to your list of manuals |
Page 63 highlights
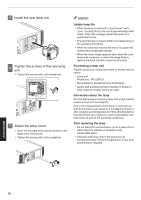
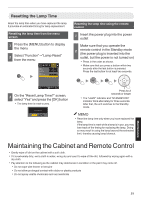
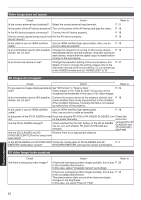
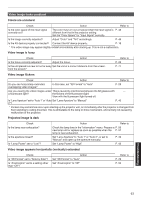
Video image looks unnatural Colors are unnatural Check Action Refer to Is the color space of the input signal correctly set? The color may turn out unnatural when the input signal is P. 46 different from that in the projector setting. Set the "Color Space" for "Input Signal" correctly. Is the image correctly adjusted? Adjust "Color" and "Tint" accordingly. P. 46 Is the AV device properly connected? Connect the AV device properly. P. 18 * The video image may appear slightly reddish immediately after starting up. This is not a malfunction. Video image is fuzzy Check Action Is the focus correctly adjusted? Adjust the focus. Is the unit placed too near or too far away Set the unit at a correct distance from the screen. from the screen? Refer to P. 23 P. 71 Video image flickers Check Action Refer to Do you see horizontally-extended, overlapping video images? In this case, set "3D Format" to "Auto" P. 29 Are you viewing the video images under This is caused by interference between the 3D glasses with - a fluorescent light? the flickers of the fluorescent light. View with the fluorescent light turned off. Is "Lens Aperture" set to "Auto 1" or "Auto Set "Lens Aperture" to "Manual" 2"? P. 40 * Flickers may sometimes occur upon starting up the projector unit, or immediately after the projector is changed from floor-standing to ceiling mounted. This is attributable to the lamp or drive mechanism, and is likely not caused by malfunction of the projector. Projected image is dark Check Is the lamp near exhaustion? Is the aperture closed? Is "Lamp Power" set to "Low"? Action Refer to Check the lamp time in the "Information" menu. Prepare a P. 56 new lamp unit or replace as soon as possible when the P. 57 lamp is near exhaustion. Set "Lens Aperture" to "Auto 1" or "Auto 2", or set to "Manual" and open up the aperture manually. P. 40 Set "Lamp Power" to "High" P. 43 Video image appears horizontally (vertically) extended Check Is "3D Format" set to "Side by Side"? Is "Anamorphic" set to a setting other than "Off"? Action Set "3D Format" to "Auto" Set "Anamorphic" to "Off" Refer to P. 29 P. 50 Troubleshooting 63
-
 1
1 -
2
-
3
-
4
-
5
-
6
-
7
-
8
-
9
-
10
-
11
-
12
-
13
-
14
-
15
-
16
-
17
-
18
-
19
-
20
-
21
-
22
-
23
-
24
-
25
-
26
-
27
-
28
-
29
-
30
-
31
-
32
-
33
-
34
-
35
-
36
-
37
-
38
-
39
-
40
-
41
-
42
-
43
-
44
-
45
-
46
-
47
-
48
-
49
-
50
-
51
-
52
-
53
-
54
-
55
-
56
-
57
-
 58
58 -
 59
59 -
 60
60 -
 61
61 -
 62
62 -
 63
63 -
 64
64 -
 65
65 -
 66
66 -
 67
67 -
 68
68 -
69
-
70
-
71
-
72
-
73
-
74
-
75
-
76
-
77
-
78
-
79
-
80
 |
 |