JVC DLA-X550R Instruction Manual - Page 62
Video image does not appear, 3D video image looks unnatural, Troubleshooting
 |
View all JVC DLA-X550R manuals
Add to My Manuals
Save this manual to your list of manuals |
Page 62 highlights
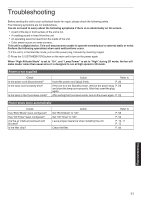
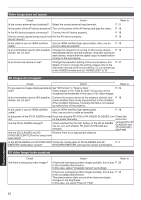
Video image does not appear Check Action Refer to Is the correct external input selected? Select the correct external input terminal. P. 21 Is the power of the AV device turned on? Turn on the power of the AV device and play the video. P. 18 Is the AV device properly connected? Connect the AV device properly. P. 18 Are the correct signals being output from Set the AV device properly. the AV device? P. 18 Is the cable in use an HDMI-certified cable? Use an HDMI-certified high-speed cable. Also, use as short a cable as possible. P. 18 Is an intermediate device (AV amplifier, Change the sequence of turning on the source device, P. 18 divider, etc.) in use? intermediate device and the projector. And after turning on each device, ensure that the signal output is stable before turning on the next device. Is an old source device in use? Change the resolution setting of the source device. For P. 47 details on how to change the setting, please refer to the instruction manual of the source device. Or, try connecting to the HDMI2 terminal and set "HDMI2 EDID" to "B". 3D images do not appear Check Action Refer to Do you see two images displayed side by Set "3D Format" to "Side by Side" P. 29 side? Video images in the "Side by Side" format may not be recognized automatically in the case of 3D video images. Is an intermediate device (AV amplifier, Connect the source device to the projector directly, and P. 18 divider, etc.) in use? check whether there is any improvement in the condition. If the condition improves, it is likely that this is not caused by malfunction of the projector. Is the cable in use an HDMI-certified Use an HDMI-certified high-speed cable. cable? Also, use as short a cable as possible. P. 18 Is the power of the 3D GLASSES turned If you are using the PK-AG2 or PK-AG33D GLASSES, turn Check the on? on the power manually. instruction Are the 3D GLASSES charged? Check whether the PK-AG1 battery of the 3D GLASSES has run out, and whether PK-AG2 and PK-AG3 are charged. manual of the 3D GLASSES and 3D SYNCHRO EMITTER. Are the 3D GLASSES and 3D Position them at an appropriate distance. SYNCHRO EMITTER too far away from each other? Is the 3D GLASSES and 3D SYNCHRO Check the model name of 3D GLASSES and 3D P. 9 EMITTER combination correct? SYNCHRO EMITTER, and use the correct combination. 3D video image looks unnatural Check Are there overlapping video images? Action Refer to If there are overlapping video images partially, this is due P. 29 to the crosstalk phenomenon. In this case, adjust "Crosstalk Cancel" accordingly. If there are overlapping video images partially, this is due P. 43 to the crosstalk phenomenon. This phenomenon often occurs when there are drastic changes in the brightness. In this case, set Lamp Power to "High" Troubleshooting 62
-
 1
1 -
2
-
3
-
4
-
5
-
6
-
7
-
8
-
9
-
10
-
11
-
12
-
13
-
14
-
15
-
16
-
17
-
18
-
19
-
20
-
21
-
22
-
23
-
24
-
25
-
26
-
27
-
28
-
29
-
30
-
31
-
32
-
33
-
34
-
35
-
36
-
37
-
38
-
39
-
40
-
41
-
42
-
43
-
44
-
45
-
46
-
47
-
48
-
49
-
50
-
51
-
52
-
53
-
54
-
55
-
56
-
 57
57 -
 58
58 -
 59
59 -
 60
60 -
 61
61 -
 62
62 -
 63
63 -
 64
64 -
 65
65 -
 66
66 -
 67
67 -
68
-
69
-
70
-
71
-
72
-
73
-
74
-
75
-
76
-
77
-
78
-
79
-
80
 |
 |
