Konica Minolta bizhub C654 bizhub C654/C754 Web Management Tool User Guide - Page 114
For NetWare 5.x/6 Novell Distributed Print Service (NDPS)
 |
View all Konica Minolta bizhub C654 manuals
Add to My Manuals
Save this manual to your list of manuals |
Page 114 highlights
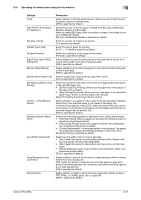
8.8 Configuring the NetWare printing environment 8 Settings [Print Server Name] [Print Server Password] [Polling Interval] [Bindery/NDS Setting] [NDS Context Name] [NDS Tree Name] Description Enter a print server name to enable Pserver (using up to 63 characters, excluding and .). Enter the print server name registered in the NWadmin. If necessary, enter a print server password (using up to 63 characters). Set a job inquiry interval. [1] sec. is specified by default. [NDS] should be selected. [NDS] is specified by default. Enter an NDS context name for print server connection (using up to 191 characters, excluding and .). Enter an NDS tree name for print server connection (using up to 63 characters, excluding and .). For NetWare 5.x/6 Novell Distributed Print Service (NDPS) 0 Before starting the NDPS setting, make sure that an NDPS broker and NDPS manager have already been created and loaded. 0 Check that TCP/IP protocol is configured in the NetWare server. 0 Check that this machine starts and an IP address is assigned. 1 From the client, log in the NetWare file system with administrator authority. 2 Start NWAdmin. 3 Right-click the [Organization] and [Organization unit] containers for printer agent creation, and select [NDPS Printer] from Create. 4 Enter a [NDPS Printer Name] in the [Printer Name] field. 5 Select [Create a New Printer Agent] in the [Printer Agent Source] field, and click [Create]. 6 Confirm the printer agent name, and browse and register the NDPS manager in the [NDPS Manager Name] field. 7 Set the [Gateway Types] to [Novell Printer Gateway], and register it. 8 In the [Configure Novell NDPS for Printer Agent] screen, set the Printer to [(None)] and the port hander to [Novell Port Handler], and register the settings. 9 Set [Connection type] to [Remote (LPR on IP)], and register the setting. 10 For the host address, enter the IP address of this machine you have configured. Enter [Print] for the printer name, then press [Finish]. Display the registration window of the printer driver. 11 On the registration window for the printer driver, select [(None)] for both OS and finish registration. bizhub C754/C654 8-23
-
 1
1 -
2
-
3
-
4
-
5
-
6
-
7
-
8
-
9
-
10
-
11
-
12
-
13
-
14
-
15
-
16
-
17
-
18
-
19
-
20
-
21
-
22
-
23
-
24
-
25
-
26
-
27
-
28
-
29
-
30
-
31
-
32
-
33
-
34
-
35
-
36
-
37
-
38
-
39
-
40
-
41
-
42
-
43
-
44
-
45
-
46
-
47
-
48
-
49
-
50
-
51
-
52
-
53
-
54
-
55
-
56
-
57
-
58
-
59
-
60
-
61
-
62
-
63
-
64
-
65
-
66
-
67
-
68
-
69
-
70
-
71
-
72
-
73
-
74
-
75
-
76
-
77
-
78
-
79
-
80
-
81
-
82
-
83
-
84
-
85
-
86
-
87
-
88
-
89
-
90
-
91
-
92
-
93
-
94
-
95
-
96
-
97
-
98
-
99
-
100
-
101
-
102
-
103
-
104
-
105
-
106
-
107
-
108
-
 109
109 -
 110
110 -
 111
111 -
 112
112 -
 113
113 -
 114
114 -
 115
115 -
 116
116 -
 117
117 -
 118
118 -
 119
119 -
120
-
121
-
122
-
123
-
124
-
125
-
126
-
127
-
128
-
129
-
130
-
131
-
132
-
133
-
134
-
135
-
136
-
137
-
138
-
139
-
140
-
141
-
142
-
143
-
144
-
145
-
146
-
147
-
148
-
149
-
150
-
151
-
152
-
153
-
154
-
155
-
156
-
157
-
158
-
159
-
160
-
161
-
162
-
163
-
164
-
165
-
166
-
167
-
168
-
169
-
170
-
171
-
172
-
173
-
174
-
175
-
176
-
177
-
178
-
179
-
180
-
181
-
182
-
183
-
184
-
185
-
186
-
187
-
188
-
189
-
190
-
191
-
192
-
193
-
194
-
195
-
196
-
197
-
198
-
199
-
200
-
201
-
202
-
203
-
204
-
205
-
206
-
207
-
208
-
209
-
210
-
211
-
212
-
213
-
214
-
215
-
216
-
217
-
218
-
219
-
220
-
221
-
222
-
223
-
224
-
225
-
226
-
227
-
228
-
229
-
230
-
231
-
232
-
233
-
234
-
235
-
236
-
237
-
238
-
239
-
240
-
241
-
242
-
243
-
244
-
245
-
246
-
247
-
248
-
249
-
250
-
251
-
252
-
253
-
254
-
255
-
256
-
257
-
258
-
259
-
260
-
261
-
262
-
263
-
264
-
265
-
266
-
267
-
268
-
269
-
270
-
271
-
272
-
273
-
274
-
275
-
276
-
277
-
278
-
279
-
280
-
281
-
282
-
283
-
284
-
285
-
286
-
287
-
288
-
289
-
290
-
291
-
292
-
293
-
294
-
295
-
296
-
297
-
298
-
299
-
300
-
301
-
302
-
303
-
304
-
305
-
306
-
307
-
308
-
309
-
310
-
311
-
312
-
313
-
314
-
315
-
316
-
317
-
318
-
319
-
320
-
321
-
322
-
323
-
324
-
325
-
326
-
327
-
328
-
329
-
330
-
331
-
332
-
333
-
334
-
335
-
336
-
337
-
338
-
339
-
340
-
341
-
342
-
343
-
344
-
345
-
346
-
347
-
348
-
349
-
350
-
351
-
352
-
353
-
354
-
355
-
356
-
357
-
358
-
359
-
360
-
361
-
362
-
363
-
364
-
365
-
366
-
367
-
368
-
369
-
370
-
371
-
372
-
373
-
374
-
375
-
376
-
377
-
378
-
379
-
380
-
381
-
382
-
383
-
384
-
385
-
386
-
387
-
388
-
389
-
390
-
391
-
392
-
393
-
394
-
395
-
396
-
397
-
398
-
399
-
400
-
401
-
402
-
403
-
404
-
405
-
406
-
407
-
408
-
409
-
410
-
411
-
412
-
413
-
414
-
415
-
416
-
417
-
418
-
419
-
420
-
421
-
422
-
423
-
424
-
425
-
426
-
427
 |
 |
