Kyocera KM-C2230 Fiery X3e 22C-KM Configuration Guide for KM-C2230 - Page 55
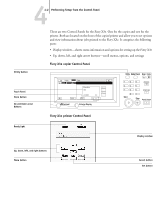
Functions menu. Choose Print s, and then choose Test Proceed to Fiery X3e Setup
 |
View all Kyocera KM-C2230 manuals
Add to My Manuals
Save this manual to your list of manuals |
Page 55 highlights
33-9 About Setup TO PREPARE FOR FIERY X3E CONFIGURATION 1. Print a copier/printer Test Page to verify the copier/printer is functioning normally. 2. Turn off the copier/printer and connect the interface cable from the copier/printer to the Fiery X3e. 3. To confirm this connection, turn on the copier/printer and the Fiery X3e, and print a Test Page from the Fiery X3e Control Panel. To print a Test Page, press the Menu button on the Control Panel to display the Functions menu. Choose Print Pages, and then choose Test Page. 4. With both the Fiery X3e and the copier turned off, connect the network cable to the Fiery X3e, as described in Chapter 1. The network should already be installed and operational. 5. Turn on the copier/printer and then the Fiery X3e. Verify that the scanner cable is securely connected to the copier before you turn on the Fiery X3e. Proceed to Fiery X3e Setup, described in Chapter 4.
-
 1
1 -
2
-
3
-
4
-
5
-
6
-
7
-
8
-
9
-
10
-
11
-
12
-
13
-
14
-
15
-
16
-
17
-
18
-
19
-
20
-
21
-
22
-
23
-
24
-
25
-
26
-
27
-
28
-
29
-
30
-
31
-
32
-
33
-
34
-
35
-
36
-
37
-
38
-
39
-
40
-
41
-
42
-
43
-
44
-
45
-
46
-
47
-
48
-
49
-
 50
50 -
 51
51 -
 52
52 -
 53
53 -
 54
54 -
 55
55 -
 56
56 -
 57
57 -
 58
58 -
 59
59 -
 60
60 -
61
-
62
-
63
-
64
-
65
-
66
-
67
-
68
-
69
-
70
-
71
-
72
-
73
-
74
-
75
-
76
-
77
-
78
-
79
-
80
-
81
-
82
-
83
-
84
-
85
-
86
-
87
-
88
-
89
-
90
-
91
-
92
-
93
-
94
-
95
-
96
-
97
-
98
-
99
-
100
-
101
-
102
-
103
-
104
-
105
-
106
-
107
-
108
-
109
-
110
-
111
-
112
-
113
-
114
-
115
-
116
-
117
-
118
-
119
-
120
-
121
-
122
-
123
-
124
-
125
-
126
-
127
-
128
-
129
-
130
-
131
-
132
-
133
-
134
-
135
-
136
-
137
-
138
-
139
-
140
-
141
-
142
-
143
-
144
-
145
-
146
-
147
-
148
-
149
-
150
-
151
-
152
-
153
-
154
-
155
-
156
-
157
-
158
-
159
-
160
-
161
-
162
-
163
-
164
-
165
-
166
-
167
-
168
-
169
-
170
-
171
-
172
-
173
-
174
-
175
-
176
-
177
-
178
-
179
-
180
-
181
-
182
-
183
-
184
-
185
-
186
-
187
-
188
-
189
-
190
 |
 |
