Kyocera KM-C2230 Fiery X3e 22C-KM Configuration Guide for KM-C2230 - Page 97
selected Yes to Enable Proxy Setup.
 |
View all Kyocera KM-C2230 manuals
Add to My Manuals
Save this manual to your list of manuals |
Page 97 highlights
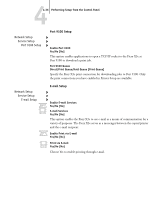
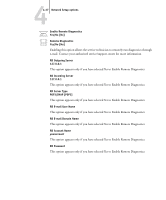
44-41 Network Setup options Enable Proxy Setup No/Yes [No] Select Yes to enable the following proxy server setup options for security purposes when scanning to an FTP site. Selecting No returns you to the main Network Setup menu. Proxy Server IP Address 127.0.0.1 Enter the IP address of the proxy server on your network. This option appears only if you have selected Yes to Enable Proxy Setup. Proxy Server Port Number 0-9999 [0] Enter the port number of the proxy server on your network. This option appears only if you have selected Yes to Enable Proxy Setup. This port number must be entered at the Fiery X3e when scanning jobs to a secure FTP site. Proxy Server Timeout (sec) 0-999 [0] Enter the length of time, in seconds, that the Fiery X3e should try to connect to each proxy server before determining that the connection is unsuccessful. This option appears only if you have selected Yes to Enable Proxy Setup. Proxy Server User Name Enter the user name for the proxy server. This option appears only if you have selected Yes to Enable Proxy Setup. Proxy Server User Password Enter the user password for the proxy server. This option appears only if you have selected Yes to Enable Proxy Setup.
-
 1
1 -
2
-
3
-
4
-
5
-
6
-
7
-
8
-
9
-
10
-
11
-
12
-
13
-
14
-
15
-
16
-
17
-
18
-
19
-
20
-
21
-
22
-
23
-
24
-
25
-
26
-
27
-
28
-
29
-
30
-
31
-
32
-
33
-
34
-
35
-
36
-
37
-
38
-
39
-
40
-
41
-
42
-
43
-
44
-
45
-
46
-
47
-
48
-
49
-
50
-
51
-
52
-
53
-
54
-
55
-
56
-
57
-
58
-
59
-
60
-
61
-
62
-
63
-
64
-
65
-
66
-
67
-
68
-
69
-
70
-
71
-
72
-
73
-
74
-
75
-
76
-
77
-
78
-
79
-
80
-
81
-
82
-
83
-
84
-
85
-
86
-
87
-
88
-
89
-
90
-
91
-
 92
92 -
 93
93 -
 94
94 -
 95
95 -
 96
96 -
 97
97 -
 98
98 -
 99
99 -
 100
100 -
 101
101 -
 102
102 -
103
-
104
-
105
-
106
-
107
-
108
-
109
-
110
-
111
-
112
-
113
-
114
-
115
-
116
-
117
-
118
-
119
-
120
-
121
-
122
-
123
-
124
-
125
-
126
-
127
-
128
-
129
-
130
-
131
-
132
-
133
-
134
-
135
-
136
-
137
-
138
-
139
-
140
-
141
-
142
-
143
-
144
-
145
-
146
-
147
-
148
-
149
-
150
-
151
-
152
-
153
-
154
-
155
-
156
-
157
-
158
-
159
-
160
-
161
-
162
-
163
-
164
-
165
-
166
-
167
-
168
-
169
-
170
-
171
-
172
-
173
-
174
-
175
-
176
-
177
-
178
-
179
-
180
-
181
-
182
-
183
-
184
-
185
-
186
-
187
-
188
-
189
-
190
 |
 |
