Kyocera KM-C2230 Fiery X3e 22C-KM Configuration Guide for KM-C2230 - Page 70
TCP/IP Setup with Ethernet, Ethernet Setup, Network Setup, Protocol Setup, TCP/IP Setup
 |
View all Kyocera KM-C2230 manuals
Add to My Manuals
Save this manual to your list of manuals |
Page 70 highlights
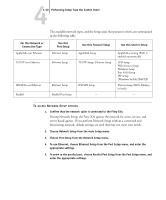
44-14 Performing Setup from the Control Panel Network Setup Protocol Setup TCP/IP Setup TCP/IP Setup with Ethernet Ethernet Setup Enable TCP/IP for Ethernet Yes/No [Yes] TCP/IP - Ethernet Yes/No [Yes] Select Yes if you have a TCP/IP network connected to the Fiery X3e over Ethernet cabling. NOTE: If you are using TCP/IP for printing from Windows computers, enabling TCP/IP here also enables you to use Fiery utilities from Windows computers using TCP/IP protocols. Enable Auto IP Configuration Yes/No [Yes] Enable Auto IP Config Yes/No [Yes] Select Yes to allow the Fiery X3e to obtain its Ethernet IP address by searching the network. Depending on your network and the protocol you select in the following option (DHCP or BOOTP), the IP address can change. Select No to assign the Fiery X3e a static IP address. If you select No, you proceed to the IP Address option, where you manually set the IP address. Select protocol DHCP/BOOTP [DHCP] This option appears only if you answered Yes to Enable Auto IP Configuration. Select the protocol over which the Fiery X3e should search for its IP address. Both DHCP and BOOTP allow the Fiery X3e to obtain the Ethernet IP address and Subnet Mask automatically. Depending on your network, the Fiery X3e might be assigned a different address after you restart the Fiery X3e. With the DHCP setting, the Fiery X3e can be assigned a different address even if it is not restarted. Make sure the network is already configured properly for the protocol you select.
-
 1
1 -
2
-
3
-
4
-
5
-
6
-
7
-
8
-
9
-
10
-
11
-
12
-
13
-
14
-
15
-
16
-
17
-
18
-
19
-
20
-
21
-
22
-
23
-
24
-
25
-
26
-
27
-
28
-
29
-
30
-
31
-
32
-
33
-
34
-
35
-
36
-
37
-
38
-
39
-
40
-
41
-
42
-
43
-
44
-
45
-
46
-
47
-
48
-
49
-
50
-
51
-
52
-
53
-
54
-
55
-
56
-
57
-
58
-
59
-
60
-
61
-
62
-
63
-
64
-
 65
65 -
 66
66 -
 67
67 -
 68
68 -
 69
69 -
 70
70 -
 71
71 -
 72
72 -
 73
73 -
 74
74 -
 75
75 -
76
-
77
-
78
-
79
-
80
-
81
-
82
-
83
-
84
-
85
-
86
-
87
-
88
-
89
-
90
-
91
-
92
-
93
-
94
-
95
-
96
-
97
-
98
-
99
-
100
-
101
-
102
-
103
-
104
-
105
-
106
-
107
-
108
-
109
-
110
-
111
-
112
-
113
-
114
-
115
-
116
-
117
-
118
-
119
-
120
-
121
-
122
-
123
-
124
-
125
-
126
-
127
-
128
-
129
-
130
-
131
-
132
-
133
-
134
-
135
-
136
-
137
-
138
-
139
-
140
-
141
-
142
-
143
-
144
-
145
-
146
-
147
-
148
-
149
-
150
-
151
-
152
-
153
-
154
-
155
-
156
-
157
-
158
-
159
-
160
-
161
-
162
-
163
-
164
-
165
-
166
-
167
-
168
-
169
-
170
-
171
-
172
-
173
-
174
-
175
-
176
-
177
-
178
-
179
-
180
-
181
-
182
-
183
-
184
-
185
-
186
-
187
-
188
-
189
-
190
 |
 |
