Kyocera KM-C2230 KM-C2230 Standard PCL Print Controller Users Guide - Page 75
For NetWare 5.x/6 Novell Distributed Print Services
 |
View all Kyocera KM-C2230 manuals
Add to My Manuals
Save this manual to your list of manuals |
Page 75 highlights
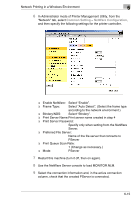
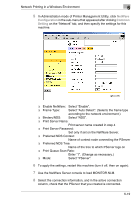
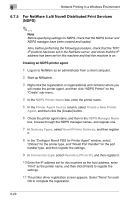
6 Network Printing in a Windows Environment 6.7.5 For NetWare 5.x/6 Novell Distributed Print Services (NDPS) ✎ Note Before specifying settings for NDPS, check that the NDPS broker and NDPS manager have been created and loaded. Also, before performing the following procedure, check that the TCP/ IP protocol has been set in the NetWare server, and check that the IP address has been set for this machine and that this machine is on. Creating an NDPS printer agent 1 Log on to NetWare as an administrator from a client computer. 2 Start up NWadmin. 3 Right-click the organization or organizational unit container where you will create the printer agent, and then click "NDPS Printer" on the "Create" sub-menu. 4 In the NDPS Printer Name box, enter the printer name. 5 In the Printer Agent Source column, select Create a New Printer Agent, and then click the [Create] button. 6 Check the printer agent name, and then in the NDPS Manager Name box, browse through the NDPS manager names, and register one. 7 In Gateway Types, select Novell Printer Gateway, and then register it. 8 In the "Configure Novell PDS for Printer Agent" window, select "(None)" for the printer type, and "Novell Port Handler" for the port handler type, and then register the settings. 9 In Connection type, select Remote (LPR on IP), and then register it. 10 Enter the IP address set for this machine as the host address, enter "Print" as the printer name, and then click [Finish] to register the settings. 11 The printer driver registration screen appears. Select "None" for each OS to complete the registration. 6-20
-
 1
1 -
2
-
3
-
4
-
5
-
6
-
7
-
8
-
9
-
10
-
11
-
12
-
13
-
14
-
15
-
16
-
17
-
18
-
19
-
20
-
21
-
22
-
23
-
24
-
25
-
26
-
27
-
28
-
29
-
30
-
31
-
32
-
33
-
34
-
35
-
36
-
37
-
38
-
39
-
40
-
41
-
42
-
43
-
44
-
45
-
46
-
47
-
48
-
49
-
50
-
51
-
52
-
53
-
54
-
55
-
56
-
57
-
58
-
59
-
60
-
61
-
62
-
63
-
64
-
65
-
66
-
67
-
68
-
69
-
 70
70 -
 71
71 -
 72
72 -
 73
73 -
 74
74 -
 75
75 -
 76
76 -
 77
77 -
 78
78 -
 79
79 -
 80
80 -
81
-
82
-
83
-
84
-
85
-
86
-
87
-
88
-
89
-
90
-
91
-
92
-
93
-
94
-
95
-
96
-
97
-
98
-
99
-
100
-
101
-
102
-
103
-
104
-
105
-
106
-
107
-
108
-
109
-
110
-
111
-
112
-
113
-
114
-
115
-
116
-
117
-
118
-
119
-
120
-
121
-
122
-
123
-
124
-
125
-
126
-
127
-
128
-
129
-
130
-
131
-
132
-
133
-
134
-
135
-
136
-
137
-
138
-
139
-
140
-
141
-
142
-
143
-
144
-
145
-
146
-
147
-
148
-
149
-
150
-
151
-
152
-
153
-
154
-
155
-
156
-
157
-
158
-
159
-
160
-
161
-
162
-
163
-
164
-
165
-
166
-
167
-
168
-
169
-
170
-
171
-
172
-
173
-
174
-
175
-
176
-
177
-
178
-
179
-
180
-
181
-
182
-
183
-
184
-
185
-
186
-
187
-
188
-
189
-
190
-
191
-
192
-
193
-
194
-
195
-
196
-
197
-
198
-
199
-
200
-
201
-
202
-
203
-
204
-
205
-
206
-
207
-
208
-
209
-
210
-
211
-
212
-
213
-
214
-
215
-
216
-
217
-
218
-
219
-
220
-
221
-
222
-
223
-
224
-
225
-
226
-
227
-
228
-
229
-
230
-
231
-
232
-
233
-
234
-
235
-
236
-
237
-
238
-
239
-
240
-
241
-
242
-
243
-
244
-
245
-
246
-
247
-
248
-
249
-
250
-
251
-
252
-
253
-
254
-
255
-
256
-
257
-
258
-
259
-
260
-
261
-
262
-
263
-
264
-
265
-
266
-
267
-
268
-
269
-
270
-
271
-
272
-
273
-
274
-
275
-
276
-
277
-
278
-
279
-
280
-
281
-
282
-
283
-
284
-
285
-
286
-
287
-
288
-
289
-
290
-
291
-
292
-
293
-
294
-
295
-
296
-
297
-
298
-
299
-
300
-
301
-
302
-
303
-
304
-
305
-
306
-
307
-
308
-
309
-
310
 |
 |
