LG KF700 User Guide - Page 25
Contacts
 |
View all LG KF700 manuals
Add to My Manuals
Save this manual to your list of manuals |
Page 25 highlights
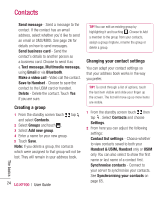
Contacts Searching for a contact There are two ways to search for a contact: From the standby screen From the standby screen touch the address book. to open From the main menu 1 Touch and tap and select Contacts. Then touch Search. 2 From the list, touch the contact you'd like to call and select the number to use if you have more than one saved. 3 You can use the keypad to enter the first letter of the contact you want to call to jump to that section. 4 Touch Call or press the hard key to initiate the call. Adding a new contact 1 Touch and tap and select Contacts. 2 Touch Add new. 3 Choose whether to save the contact to your Handset or USIM. 4 Enter the first and last name of your new contact. You do not have to enter both, but you must enter one or the other. 5 Input the number and touch and you can input more numbers. For example, you can input a different number for their Mobile, Home, Office, Pager and Fax. Touch Save after each one you enter. 01 6 You can then add up to two email addresses. 02 7 Assign the contact to a group. Choose from No group, Family, Friends, 03 Colleagues, School or VIP. 8 You can also add an Image, Ringtone, 04 Homepage, Home address, Company 05 name, Job title, Company address and a Memo. 06 9 Touch Save to save the contact. 07 TIP! You can create customised groups for your contacts, see Creating a group on 08 page 24. TIP! When the slide is closed, touch and key in the contact's number. Touch and choose Save number then New contact. Contact options There are many things you can do when viewing a contact. Here's how to access and use the options menu: 1 Open the contact you'd like to use. See Searching for a contact on page 23. 2 Press to open the list of options. From here you can: Edit - Change any of the contact's details. 23 The basics
-
 1
1 -
2
-
3
-
4
-
5
-
6
-
7
-
8
-
9
-
10
-
11
-
12
-
13
-
14
-
15
-
16
-
17
-
18
-
19
-
 20
20 -
 21
21 -
 22
22 -
 23
23 -
 24
24 -
 25
25 -
 26
26 -
 27
27 -
 28
28 -
 29
29 -
 30
30 -
31
-
32
-
33
-
34
-
35
-
36
-
37
-
38
-
39
-
40
-
41
-
42
-
43
-
44
-
45
-
46
-
47
-
48
-
49
-
50
-
51
-
52
-
53
-
54
-
55
-
56
-
57
-
58
-
59
-
60
-
61
-
62
-
63
-
64
-
65
-
66
-
67
-
68
-
69
-
70
-
71
-
72
-
73
-
74
-
75
-
76
-
77
-
78
-
79
-
80
-
81
-
82
 |
 |
