Lantronix XPort XChip - User Guide - Page 35
Message Properties, Configurable Pin Settings
 |
View all Lantronix XPort manuals
Add to My Manuals
Save this manual to your list of manuals |
Page 35 highlights
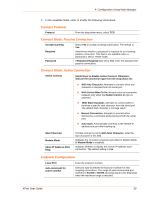
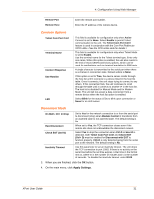
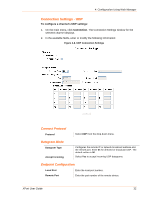
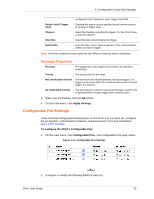
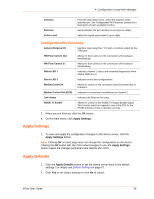
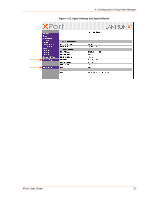
4: Configuration Using Web Manager configurable pins. Repeat for each Trigger Input field. Enable Serial Trigger Input Channel Data Size Match Data Enabling this option causes specified serial communications to count as a trigger input. Select the channel prompting the trigger. For the XPort, there is only one channel. Select the data size prompting the trigger. Enter the data, which, when it appears in the communication stream, prompts a trigger. Note: All of the conditions must match for the XPort to send an email notification. Message Properties Message The subject line of the trigger event email to the specified recipient(s). Priority The priority level for the email. Min. Notification Interval The minimum time allowed between individual triggers. If a trigger event occurs within the minimum interval since the last trigger, it is ignored. Re-notification Interval The time interval in which a new email message is sent to the recipient(s) when a single trigger event remains active. 3. When you are finished, click the OK button. 4. On the main menu, click Apply Settings. Configurable Pin Settings There are three configurable hardware pins on the XPort unit. For each pin, configure the pin function, communication direction, and activity level. For more information, see 9 GPIO Interface. To configure the XPort's Configurable Pins: 1. On the main menu, click Configurable Pins. The Configurable Pins page opens. Figure 4-11. Configurable Pins Settings 2. Configure or modify the following fields for each pin: XPort User Guide 35
-
 1
1 -
2
-
3
-
4
-
5
-
6
-
7
-
8
-
9
-
10
-
11
-
12
-
13
-
14
-
15
-
16
-
17
-
18
-
19
-
20
-
21
-
22
-
23
-
24
-
25
-
26
-
27
-
28
-
29
-
 30
30 -
 31
31 -
 32
32 -
 33
33 -
 34
34 -
 35
35 -
 36
36 -
 37
37 -
 38
38 -
 39
39 -
 40
40 -
41
-
42
-
43
-
44
-
45
-
46
-
47
-
48
-
49
-
50
-
51
-
52
-
53
-
54
-
55
-
56
-
57
-
58
-
59
-
60
-
61
-
62
-
63
-
64
-
65
-
66
-
67
-
68
-
69
-
70
-
71
-
72
-
73
-
74
-
75
-
76
-
77
-
78
-
79
-
80
-
81
-
82
-
83
-
84
-
85
-
86
-
87
 |
 |
