Lenovo M495 (English) System Update 5.0 Deployment Guide - Page 29
Create Basic Task Wizard is displayed.
 |
View all Lenovo M495 manuals
Add to My Manuals
Save this manual to your list of manuals |
Page 29 highlights
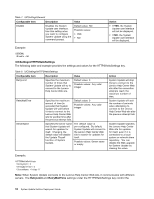
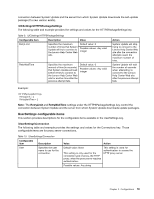
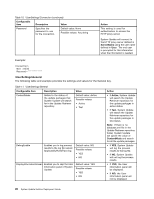
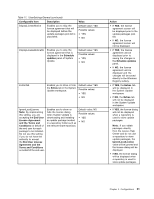
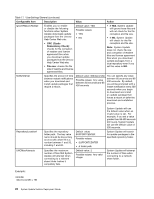
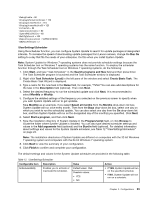
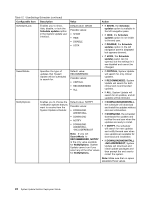
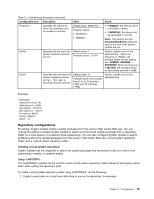
\DebugEnable = NO \DisplayInformationScreen = YES \DisplayLicenseNotice = YES \DisplayLicenseNoticeSU = YES \ExtrasTab = NO \IgnoreLocalLicense = NO \IgnoreRMLicCRCSize = NO \NotifyInterval = 300 \RepositoryLocation1 = SUPPORTCENTER \UNCMaxAttempts = 2 \UserSettings\Scheduler Using the scheduler function, you can configure System Update to search for update packages at designated intervals. To increase the speed of downloading update packages from Lenovo servers, change the Run On setting to a day that fits the needs of your enterprise. Do this when you install System Update. Note: System Update for Windows 7 operating systems does not provide scheduler settings because the Task Scheduler tool on Windows 7 operating systems has the same function. To employ the scheduler function through the Task Scheduler tool on Windows 7 operating systems, do the following: 1. Click Start, and type "Task Scheduler" in the Search programs and files field and then press Enter. The Task Scheduler program is launched and the Task Scheduler window is displayed. 2. Right-click Task Scheduler (Local) in the left pane of the window and select Create Basic Task. The Create Basic Task Wizard is displayed. 3. Type a name for the new task in the Name field, for example, "TVSU."You can also add descriptions for the task in the Description field (optional). Then click Next. 4. Select the desired frequency to run the scheduled update and click Next. It is recommended to select Monthly or Weekly. 5. Configure the detailed settings of the frequency you selected on the previous screen to specify when you wish System Update will run to get updates. Take Monthly as an example, if you select Select all months from the Months drop-down list box, System Update will run once every month. Then from the Days drop-down list box, select one day on which you wish to run the scheduled update. You can also select one day from the On drop-down list box, and then System Update will run on the designated day of the month(s) you specified. Click Next. 6. Select Start a program, and then click Next. 7. Type the installation directory of System Update in the Program/script field, or click Browse to locate the folder where System Update is installed. You can also type desired scheduler settings and values in the Add arguments field (optional) and the Start in field (optional). For detailed information about settings and values for the System Update scheduler, see Table 12 "\UserSettings\Scheduler" on page 23. Note: The installation directories of System Update are different on computers with the 32-bit Windows 7 operating system and computers with the 64-bit Windows 7 operating system. 8. Click Next to view the summary of your configuration. 9. Click Finish to confirm and complete your configuration. The default settings and values for the System Update scheduler are provided in the following table. Table 12. \UserSettings\Scheduler Configurable item Description SchedulerAbility Enables you to activate or inactivate the scheduler. Value Default value: YES Possible values: • YES • NO Action • If YES, System Update will run on the specified schedule. • If NO, System Update will not run on a schedule. Chapter 3. Configurations 23
-
 1
1 -
2
-
3
-
4
-
5
-
6
-
7
-
8
-
9
-
10
-
11
-
12
-
13
-
14
-
15
-
16
-
17
-
18
-
19
-
20
-
21
-
22
-
23
-
 24
24 -
 25
25 -
 26
26 -
 27
27 -
 28
28 -
 29
29 -
 30
30 -
 31
31 -
 32
32 -
 33
33 -
 34
34 -
35
-
36
-
37
-
38
-
39
-
40
-
41
-
42
-
43
-
44
-
45
-
46
-
47
-
48
-
49
-
50
-
51
-
52
-
53
-
54
-
55
-
56
-
57
-
58
-
59
-
60
-
61
-
62
-
63
-
64
-
65
-
66
-
67
-
68
-
69
-
70
-
71
-
72
-
73
-
74
-
75
-
76
-
77
-
78
-
79
-
80
-
81
-
82
-
83
-
84
-
85
-
86
-
87
-
88
-
89
-
90
-
91
-
92
-
93
-
94
 |
 |