Lexmark Z82 Color Jetprinter User's Guide (3.6 MB) - Page 28
Installing the Print Cartridges
 |
View all Lexmark Z82 Color Jetprinter manuals
Add to My Manuals
Save this manual to your list of manuals |
Page 28 highlights
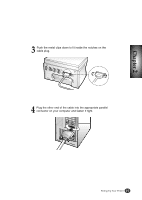
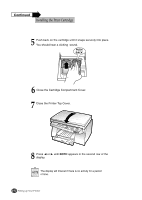
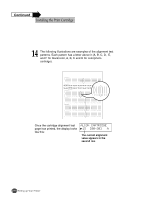
Chapter 2 Installing the Print Cartridges When you unpack the printer, the Print Cartridge Carrier is hidden on the right side of the printer. The carrier slides horizontally across a track inside the printer. It must move into the installation position on the far left side of the printer to install the print cartridges. Do not pull the Print Cartridge Carrier by hand. Doing so may damage the printer. 1 Remove the sticker and the transparent tape covering the copper contact area on one of the cartridges. Do not touch the copper contact area. Copper Contact Area 2 Lift the Scanner Bed (➀), and support it with the Cartridge Compartment Cover (➁). 2-10 Setting Up Your Printer
-
 1
1 -
2
-
3
-
4
-
5
-
6
-
7
-
8
-
9
-
10
-
11
-
12
-
13
-
14
-
15
-
16
-
17
-
18
-
19
-
20
-
21
-
22
-
 23
23 -
 24
24 -
 25
25 -
 26
26 -
 27
27 -
 28
28 -
 29
29 -
 30
30 -
 31
31 -
 32
32 -
 33
33 -
34
-
35
-
36
-
37
-
38
-
39
-
40
-
41
-
42
-
43
-
44
-
45
-
46
-
47
-
48
-
49
-
50
-
51
-
52
-
53
-
54
-
55
-
56
-
57
-
58
-
59
-
60
-
61
-
62
-
63
-
64
-
65
-
66
-
67
-
68
-
69
-
70
-
71
-
72
-
73
-
74
-
75
-
76
-
77
-
78
-
79
-
80
-
81
-
82
-
83
-
84
-
85
-
86
-
87
-
88
-
89
-
90
-
91
-
92
-
93
-
94
-
95
-
96
-
97
-
98
-
99
-
100
-
101
-
102
-
103
-
104
-
105
 |
 |

Setting Up Your Printer
2-10
When you unpack the printer, the Print Cartridge Carrier is hidden on the
right side of the printer. The carrier slides horizontally across a track inside
the printer.
It must move into the installation position on the far left side of the printer
to install the print cartridges.
Do not pull the Print Cartridge Carrier by hand. Doing so
may damage the printer.
2
Lift the Scanner Bed (
➀
), and support it with the Cartridge
Compartment Cover (
➁
).
Do not touch the
copper contact area.
Copper Contact Area
1
Remove the sticker and the transparent tape covering the
copper contact area on one of the cartridges.
I
nstalling the Print Cartridges
Chapter 2