Lexmark Z82 Color Jetprinter User's Guide (3.6 MB) - Page 78
Replacing the Print Cartridges
 |
View all Lexmark Z82 Color Jetprinter manuals
Add to My Manuals
Save this manual to your list of manuals |
Page 78 highlights
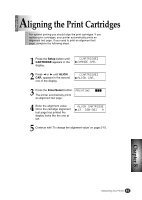
Chapter 8 Replacing the Print Cartridges The following sections take you through the process of replacing the print cartridges. To remove the print cartridge 1) Lift the Scanner Bed and support it with the Cartridge Compartment Cover. 2) Complete the following steps to move the Print Cartridge Carrier into the installation position. a) Press Setup repeatedly until CARTRIDGE appears in the display. b) Press ➛¤or ❿¤until CHANGE CAR. appears in the second row of the display. c) Press Enter/Select. The print cartridge carrier moves to the far left side of the printer. Do not pull the Print Cartridge Carrier by hand. 3) Pull forward on the print cartridge until it releases from the Print Cartridge Carrier. 4) Pull up the print cartridge to remove it. To install the print cartridge Continue from step 4 of 'Installing the Print Cartridges' on page 2-10 . 8-2 Maintaining Your Printer
-
 1
1 -
2
-
3
-
4
-
5
-
6
-
7
-
8
-
9
-
10
-
11
-
12
-
13
-
14
-
15
-
16
-
17
-
18
-
19
-
20
-
21
-
22
-
23
-
24
-
25
-
26
-
27
-
28
-
29
-
30
-
31
-
32
-
33
-
34
-
35
-
36
-
37
-
38
-
39
-
40
-
41
-
42
-
43
-
44
-
45
-
46
-
47
-
48
-
49
-
50
-
51
-
52
-
53
-
54
-
55
-
56
-
57
-
58
-
59
-
60
-
61
-
62
-
63
-
64
-
65
-
66
-
67
-
68
-
69
-
70
-
71
-
72
-
 73
73 -
 74
74 -
 75
75 -
 76
76 -
 77
77 -
 78
78 -
 79
79 -
 80
80 -
 81
81 -
 82
82 -
 83
83 -
84
-
85
-
86
-
87
-
88
-
89
-
90
-
91
-
92
-
93
-
94
-
95
-
96
-
97
-
98
-
99
-
100
-
101
-
102
-
103
-
104
-
105
 |
 |
