NEC NP-M300X M260W : user's manual - Page 15
Rear, Security System.
 |
UPC - 805736035629
View all NEC NP-M300X manuals
Add to My Manuals
Save this manual to your list of manuals |
Page 15 highlights
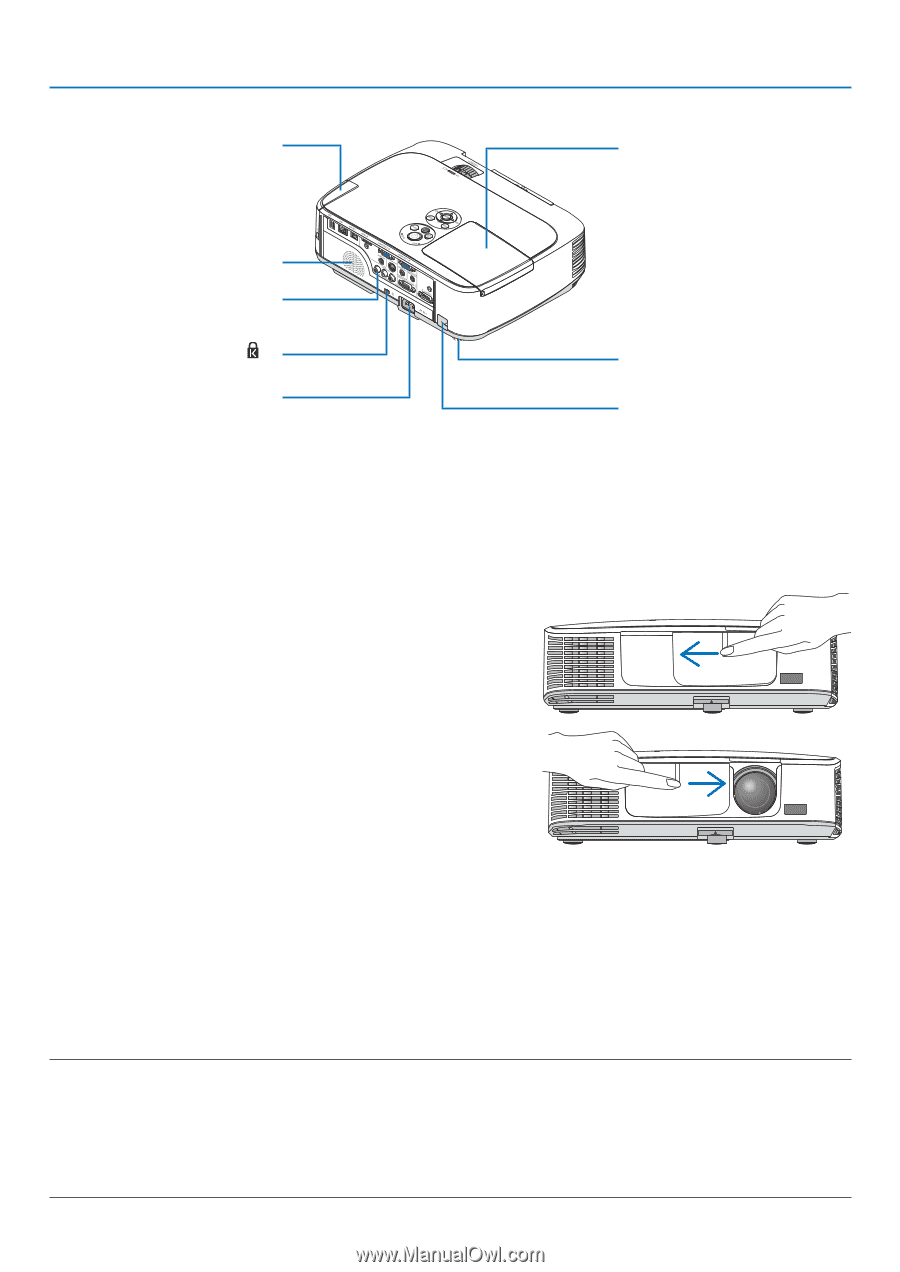
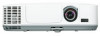
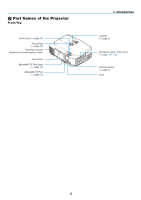
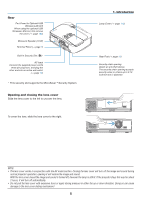
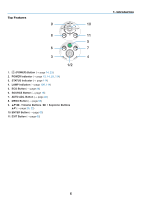
Rear Port Cover for Optional USB Wireless LAN Unit When using the optional USB Wireless LAN Unit, first remove the cover. (→ page 103) Monaural Speaker (10 W) Terminal Panel (→ page 7) Built-in Security Slot ( )* AC Input Connect the supplied power cord's three-pin plug here, and plug the other end into an active wall outlet. (→ page 13) * This security slot supports the MicroSaver ® Security System. Opening and closing the lens cover Slide the lens cover to the left to uncover the lens. To cover the lens, slide the lens cover to the right. 1. Introduction Lamp Cover (→ page 110) Rear Foot (→ page 18) Security chain opening Attach an anti-theft device. The security chain opening accepts security wires or chains up to 0.18 inch/4.6 mm in diameter. NOTE: • The lens cover works in conjunction with the AV mute function. Closing the lens cover will turn off the image and sound during normal projector operation; opening it will restore the image and sound. With the lens cover closed the image and sound is turned off, however the lamp is still lit. If the projector stays this way for about 2 hours, it will turn off automatically. • Do not pull the lens cover with excessive force or apply strong pressure in either the up or down direction. Doing so can cause damage to the lens cover sliding mechanism! 5
-
 1
1 -
2
-
3
-
4
-
5
-
6
-
7
-
8
-
9
-
 10
10 -
 11
11 -
 12
12 -
 13
13 -
 14
14 -
 15
15 -
 16
16 -
 17
17 -
 18
18 -
 19
19 -
 20
20 -
21
-
22
-
23
-
24
-
25
-
26
-
27
-
28
-
29
-
30
-
31
-
32
-
33
-
34
-
35
-
36
-
37
-
38
-
39
-
40
-
41
-
42
-
43
-
44
-
45
-
46
-
47
-
48
-
49
-
50
-
51
-
52
-
53
-
54
-
55
-
56
-
57
-
58
-
59
-
60
-
61
-
62
-
63
-
64
-
65
-
66
-
67
-
68
-
69
-
70
-
71
-
72
-
73
-
74
-
75
-
76
-
77
-
78
-
79
-
80
-
81
-
82
-
83
-
84
-
85
-
86
-
87
-
88
-
89
-
90
-
91
-
92
-
93
-
94
-
95
-
96
-
97
-
98
-
99
-
100
-
101
-
102
-
103
-
104
-
105
-
106
-
107
-
108
-
109
-
110
-
111
-
112
-
113
-
114
-
115
-
116
-
117
-
118
-
119
-
120
-
121
-
122
-
123
-
124
-
125
-
126
-
127
-
128
-
129
-
130
-
131
-
132
-
133
-
134
-
135
-
136
 |
 |