NEC NP-M300X M260W : user's manual - Page 41
(6) Using the Computer Cable (VGA) to Operate the Projector (Virtual Remote Tool) - specifications
 |
UPC - 805736035629
View all NEC NP-M300X manuals
Add to My Manuals
Save this manual to your list of manuals |
Page 41 highlights
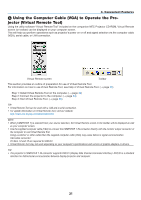
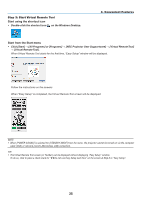
3. Convenient Features Using the Computer Cable (VGA) to Operate the Projector (Virtual Remote Tool) Using the utility software "Virtual Remote Tool" included on the companion NEC Projector CD-ROM, Virtual Remote screen (or toolbar) can be displayed on your computer screen. This will help you perform operations such as projector's power on or off and signal selection via the computer cable (VGA), serial cable, or LAN connection. Virtual Remote screen Toolbar This section provides an outline of preparation for use of Virtual Remote Tool. For information on how to use Virtual Remote Tool, see Help of Virtual Remote Tool. (→ page 36) Step 1: Install Virtual Remote Tool on the computer. (→ page 32) Step 2: Connect the projector to the computer. (→ page 34) Step 3: Start Virtual Remote Tool. (→ page 35) TIP: • Virtual Remote Tool can be used with a LAN and a serial connection. • For update information on Virtual Remote Tool, visit our website: http://www.nec-display.com/dl/en/index.html NOTE: • When [COMPUTER 1] is selected from your source selection, the Virtual Remote screen or the toolbar will be displayed as well as your computer screen. • Use the supplied computer cable (VGA) to connect the COMPUTER 1 IN connector directly with the monitor output connector of the computer to use Virtual Remote Tool. Using a switcher or other cables than the supplied computer cable (VGA) may cause failure in signal communication. VGA cable connector: Pin Nos. 12 and 15 are required for DDC/CI. • Virtual Remote Tool may not work depending on your computer's specifications and version of graphic adapters or drivers. TIP: • The projector's COMPUTER 1 IN connector supports DDC/CI (Display Data Channel Command Interface). DDC/CI is a standard interface for bidirectional communication between display/projector and computer. 31
-
 1
1 -
2
-
3
-
4
-
5
-
6
-
7
-
8
-
9
-
10
-
11
-
12
-
13
-
14
-
15
-
16
-
17
-
18
-
19
-
20
-
21
-
22
-
23
-
24
-
25
-
26
-
27
-
28
-
29
-
30
-
31
-
32
-
33
-
34
-
35
-
 36
36 -
 37
37 -
 38
38 -
 39
39 -
 40
40 -
 41
41 -
 42
42 -
 43
43 -
 44
44 -
 45
45 -
 46
46 -
47
-
48
-
49
-
50
-
51
-
52
-
53
-
54
-
55
-
56
-
57
-
58
-
59
-
60
-
61
-
62
-
63
-
64
-
65
-
66
-
67
-
68
-
69
-
70
-
71
-
72
-
73
-
74
-
75
-
76
-
77
-
78
-
79
-
80
-
81
-
82
-
83
-
84
-
85
-
86
-
87
-
88
-
89
-
90
-
91
-
92
-
93
-
94
-
95
-
96
-
97
-
98
-
99
-
100
-
101
-
102
-
103
-
104
-
105
-
106
-
107
-
108
-
109
-
110
-
111
-
112
-
113
-
114
-
115
-
116
-
117
-
118
-
119
-
120
-
121
-
122
-
123
-
124
-
125
-
126
-
127
-
128
-
129
-
130
-
131
-
132
-
133
-
134
-
135
-
136
 |
 |
