NEC NP-M300X M260W : user's manual - Page 70
(3) Converting PowerPoint files to Slides (Viewer PPT Converter 3.0), Using the Viewer
 |
UPC - 805736035629
View all NEC NP-M300X manuals
Add to My Manuals
Save this manual to your list of manuals |
Page 70 highlights
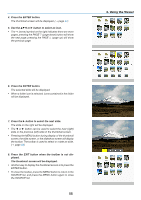
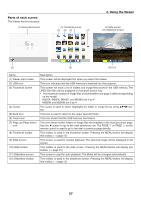
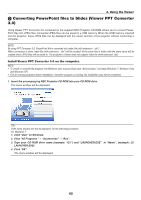
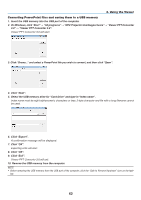
4. Using the Viewer 3 Converting PowerPoint files to Slides (Viewer PPT Converter 3.0) Using Viewer PPT Converter 3.0 contained on the supplied NEC Projector CD-ROM allows you to convert PowerPoint files into JPEG files. Converted JPEG files can be saved to a USB memory. When the USB memory inserted into the projector, these JPEG files can be displayed with the viewer function of the projector without connecting a computer. NOTE: By using PPT Converter 3.0, PowerPoint file is converted into index file (with extension ".idx") When conversion is done, index file (with extension ".idx") will be created. At the same time a folder with the same name will be created where JPEG files will be saved to. The projector's Viewer does not support index file (with extension .idx). Install Viewer PPT Converter 3.0 on the computer. NOTE: • To install or uninstall the program, the Windows user account must have "Administrator" privilege (Windows 7, Windows Vista and Windows XP). • Exit all running programs before installation. If another program is running, the installation may not be completed. 1. Insert the accompanying NEC Projector CD-ROM into your CD-ROM drive. The menu window will be displayed. TIP: If the menu window will not be displayed, try the following procedure. For Windows 7: 1. Click "start" on Windows. 2. Click "All Programs" → "Accessories" → "Run". 3. Type your CD-ROM drive name (example: "Q:\") and "LAUNCHER.EXE" in "Name". (example: Q:\ LAUNCHER.EXE) 4 Click "OK". The menu window will be displayed. 60
-
 1
1 -
2
-
3
-
4
-
5
-
6
-
7
-
8
-
9
-
10
-
11
-
12
-
13
-
14
-
15
-
16
-
17
-
18
-
19
-
20
-
21
-
22
-
23
-
24
-
25
-
26
-
27
-
28
-
29
-
30
-
31
-
32
-
33
-
34
-
35
-
36
-
37
-
38
-
39
-
40
-
41
-
42
-
43
-
44
-
45
-
46
-
47
-
48
-
49
-
50
-
51
-
52
-
53
-
54
-
55
-
56
-
57
-
58
-
59
-
60
-
61
-
62
-
63
-
64
-
 65
65 -
 66
66 -
 67
67 -
 68
68 -
 69
69 -
 70
70 -
 71
71 -
 72
72 -
 73
73 -
 74
74 -
 75
75 -
76
-
77
-
78
-
79
-
80
-
81
-
82
-
83
-
84
-
85
-
86
-
87
-
88
-
89
-
90
-
91
-
92
-
93
-
94
-
95
-
96
-
97
-
98
-
99
-
100
-
101
-
102
-
103
-
104
-
105
-
106
-
107
-
108
-
109
-
110
-
111
-
112
-
113
-
114
-
115
-
116
-
117
-
118
-
119
-
120
-
121
-
122
-
123
-
124
-
125
-
126
-
127
-
128
-
129
-
130
-
131
-
132
-
133
-
134
-
135
-
136
 |
 |