NEC NP-M300X M260W : user's manual - Page 50

(9) Controlling the Projector by Using an HTTP Browser

Page 50 highlights

3. Convenient Features  Controlling the Projector by Using an HTTP Browser Overview The HTTP Server function provides settings and operations for: 1. Setting for wired/wireless network (NETWORK SETTINGS) To use wireless LAN connection, the optional USB Wireless LAN Unit is required. (→ page 103) To use wired/wireless LAN connection, connect the projector to the computer with a commercially available LAN cable. (→ page 102) 2. Setting Alert Mail (ALERT MAIL) When the projector is connected to a wired/wireless network, lamp replace time or error messages will be sent via e-mail. 3. Operating the projector Power on/off, selecting input, volume control and picture adjustments are possible. 4. Setting PJLink PASSWORD and AMX BEACON This device uses "JavaScript" and "Cookies" and the browser should be set to accept these functions. The setting method will vary depending on the version of browser. Please refer to the help files and the other information provided in your software. Two ways of access to the HTTP server function are available: • Start the Web browser on the computer via the network connected to the projector and enter the following URL : http://

  • 1
  • 2
  • 3
  • 4
  • 5
  • 6
  • 7
  • 8
  • 9
  • 10
  • 11
  • 12
  • 13
  • 14
  • 15
  • 16
  • 17
  • 18
  • 19
  • 20
  • 21
  • 22
  • 23
  • 24
  • 25
  • 26
  • 27
  • 28
  • 29
  • 30
  • 31
  • 32
  • 33
  • 34
  • 35
  • 36
  • 37
  • 38
  • 39
  • 40
  • 41
  • 42
  • 43
  • 44
  • 45
  • 46
  • 47
  • 48
  • 49
  • 50
  • 51
  • 52
  • 53
  • 54
  • 55
  • 56
  • 57
  • 58
  • 59
  • 60
  • 61
  • 62
  • 63
  • 64
  • 65
  • 66
  • 67
  • 68
  • 69
  • 70
  • 71
  • 72
  • 73
  • 74
  • 75
  • 76
  • 77
  • 78
  • 79
  • 80
  • 81
  • 82
  • 83
  • 84
  • 85
  • 86
  • 87
  • 88
  • 89
  • 90
  • 91
  • 92
  • 93
  • 94
  • 95
  • 96
  • 97
  • 98
  • 99
  • 100
  • 101
  • 102
  • 103
  • 104
  • 105
  • 106
  • 107
  • 108
  • 109
  • 110
  • 111
  • 112
  • 113
  • 114
  • 115
  • 116
  • 117
  • 118
  • 119
  • 120
  • 121
  • 122
  • 123
  • 124
  • 125
  • 126
  • 127
  • 128
  • 129
  • 130
  • 131
  • 132
  • 133
  • 134
  • 135
  • 136

40
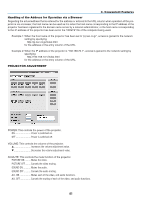
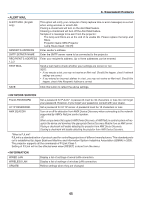
3. Convenient Features
Controlling the Projector by Using an HTTP Browser
Overview
The HTTP Server function provides settings and operations for:
1. Setting for wired/wireless network (NETWORK SETTINGS)
To use wireless LAN connection, the optional USB Wireless LAN Unit is required. (
page
103
)
To use wired/wireless LAN connection, connect the projector to the computer with a commercially available LAN
cable. (
page
102
)
2. Setting Alert Mail (ALERT MAIL)
When the projector is connected to a wired/wireless network, lamp replace time or error messages will be sent via
e-mail.
3. Operating the projector
Power on/off, selecting input, volume control and picture adjustments are possible.
4. Setting PJLink PASSWORD and AMX BEACON
This device uses “JavaScript” and “Cookies” and the browser should be set to accept these functions. The setting
method will vary depending on the version of browser. Please refer to the help files and the other information provided
in your software.
Two ways of access to the HTTP server function are available:
Start theWeb browser on the computer via the network connected to the projector and enter the following
URL :
http://<the projector’s IP address> /index.html
Use Image Express Utility Lite contained on the supplied NEC Projector CD-ROM.
TIP: The factory setting IP address is [DHCP ON].
NOTE:
• To use the projector in a network, consult with your network administrator about network settings.
• The display’s or button’s response can be slowed down or operation may not be accepted depending the settings of your net-
work.
Should this happen, consult your network administrator. The projector may not respond if its buttons are repeatedly pressed in
rapid intervals. Should this happen, wait a moment and repeat. If you still can’t get any response, turn off and back on the projec-
tor.
• If the PROJECTOR NETWORK SETTINGS screen does not appear in the web browser, press the Ctrl+F5 keys to refresh your web
browser (or clear the cache).
Preparation before Use
Connect the projector to a commercially available LAN cable before engaging in browser operations. (
page
102
)
Operation with a browser that uses a proxy server may not be possible depending on the type of proxy server and the
setting method.Although the type of proxy server will be a factor, it is possible that items that have actually been set
will not be displayed depending on the effectiveness of the cache, and the contents set from the browser may not be
reflected in operation. It is recommended that a proxy server not be used unless it is unavoidable.