NEC NP-M300X M260W : user's manual - Page 44
Uninstalling Virtual Remote Tool, Select Virtual Remote Tool and click it.
 |
UPC - 805736035629
View all NEC NP-M300X manuals
Add to My Manuals
Save this manual to your list of manuals |
Page 44 highlights
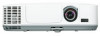
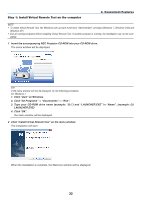
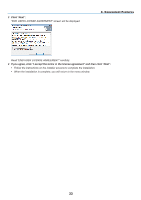
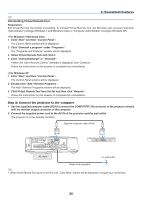
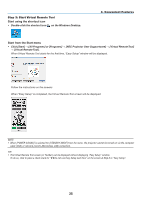
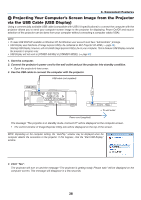
3. Convenient Features TIP: Uninstalling Virtual Remote Tool Preparation: Exit Virtual Remote Tool before uninstalling. To uninstall Virtual Remote Tool, the Windows user account must have "Administrator" privilege (Windows 7 and Windows Vista) or "Computer Administrator" privilege (Windows XP). • For Windows 7/Windows Vista 1 Click "Start" and then "Control Panel". The Control Panel window will be displayed. 2 Click "Uninstall a program" under "Programs" The "Programs and Features" window will be displayed. 3 Select Virtual Remote Tool and click it. 4 Click "Uninstall/Change" or "Uninstall". • When the "User Account Control" windows is displayed, click "Continue". Follow the instructions on the screens to complete the uninstallation. • For Windows XP 1 Click "Start" and then "Control Panel". The Control Panel window will be displayed. 2 Double-click "Add / Remove Programs". The Add / Remove Programs window will be displayed. 3 Click Virtual Remote Tool from the list and then click "Remove". Follow the instructions on the screens to complete the uninstallation. Step 2: Connect the projector to the computer 1 Use the supplied computer cable (VGA) to connect the COMPUTER 1 IN connector of the projector directly with the monitor output connector of the computer. 2 Connect the supplied power cord to the AC IN of the projector and the wall outlet. The projector is in the standby condition. Supplied computer cable (VGA) COMPUTER 1 IN AC Input → To wall outlet Power cord (supplied) TIP: • When Virtual Remote Tool starts for the first time, "Easy Setup" window will be displayed to navigate your connections. 34
-
 1
1 -
2
-
3
-
4
-
5
-
6
-
7
-
8
-
9
-
10
-
11
-
12
-
13
-
14
-
15
-
16
-
17
-
18
-
19
-
20
-
21
-
22
-
23
-
24
-
25
-
26
-
27
-
28
-
29
-
30
-
31
-
32
-
33
-
34
-
35
-
36
-
37
-
38
-
 39
39 -
 40
40 -
 41
41 -
 42
42 -
 43
43 -
 44
44 -
 45
45 -
 46
46 -
 47
47 -
 48
48 -
 49
49 -
50
-
51
-
52
-
53
-
54
-
55
-
56
-
57
-
58
-
59
-
60
-
61
-
62
-
63
-
64
-
65
-
66
-
67
-
68
-
69
-
70
-
71
-
72
-
73
-
74
-
75
-
76
-
77
-
78
-
79
-
80
-
81
-
82
-
83
-
84
-
85
-
86
-
87
-
88
-
89
-
90
-
91
-
92
-
93
-
94
-
95
-
96
-
97
-
98
-
99
-
100
-
101
-
102
-
103
-
104
-
105
-
106
-
107
-
108
-
109
-
110
-
111
-
112
-
113
-
114
-
115
-
116
-
117
-
118
-
119
-
120
-
121
-
122
-
123
-
124
-
125
-
126
-
127
-
128
-
129
-
130
-
131
-
132
-
133
-
134
-
135
-
136
 |
 |