NEC NP-M300X M260W : user's manual - Page 59
(11) Projecting Your Computer’s Screen Image from the Projector over a LAN (Image Express Utility Lite)
 |
UPC - 805736035629
View all NEC NP-M300X manuals
Add to My Manuals
Save this manual to your list of manuals |
Page 59 highlights
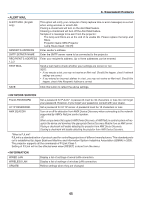
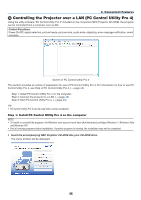
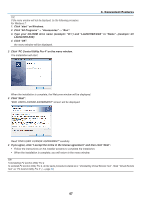
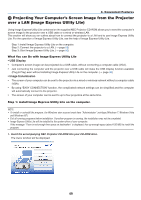
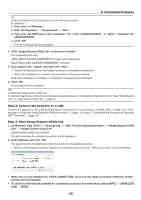
3. Convenient Features Projecting Your Computer's Screen Image from the Projector over a LAN (Image Express Utility Lite) Using Image Express Utility Lite contained on the supplied NEC Projector CD-ROM allows you to send the computer's screen image to the projector over a USB cable or a wired or wireless LAN. This section will show you an outline about how to connect the projector to a LAN and to use Image Express Utility Lite. For the operation of Image Express Utility Lite, see the help of Image Express Utility Lite. Step 1: install Image Express Utility Lite on the computer. Step 2: Connect the projector to a LAN. (→ page 50) Step 3: Start Image Express Utility Lite. (→ page 50) What You can Do with Image Express Utility Lite • USB Display • Computer's screen image can be projected via a USB cable, without connecting a computer cable (VGA). • Just connecting the computer and the projector over a USB cable will make the USB Display function available (Plug & Play) even without installing Image Express Utility Lite on the computer. (→ page 38) • Image transmission • The screen of your computer can be sent to the projector via a wired or wireless network without a computer cable (VGA). • By using "EASY CONNECTION" function, the complicated network settings can be simplified and the computer will automatically connect to the projector. • The screen of your computer can be sent to up to four projectors at the same time. Step 1: install Image Express Utility Lite on the computer. NOTE: • To install or uninstall the program, the Windows user account must have "Administrator" privilege (Windows 7, Windows Vista and Windows XP). • Exit all running programs before installation. If another program is running, the installation may not be completed. • Image Express Utility Lite will be installed to the system drive of your computer. If the message "There is not enough free space on destination" is displayed, free up enough space (about 100 MB) to install the program. 1. Insert the accompanying NEC Projector CD-ROM into your CD-ROM drive. The menu window will be displayed. 49
-
 1
1 -
2
-
3
-
4
-
5
-
6
-
7
-
8
-
9
-
10
-
11
-
12
-
13
-
14
-
15
-
16
-
17
-
18
-
19
-
20
-
21
-
22
-
23
-
24
-
25
-
26
-
27
-
28
-
29
-
30
-
31
-
32
-
33
-
34
-
35
-
36
-
37
-
38
-
39
-
40
-
41
-
42
-
43
-
44
-
45
-
46
-
47
-
48
-
49
-
50
-
51
-
52
-
53
-
 54
54 -
 55
55 -
 56
56 -
 57
57 -
 58
58 -
 59
59 -
 60
60 -
 61
61 -
 62
62 -
 63
63 -
 64
64 -
65
-
66
-
67
-
68
-
69
-
70
-
71
-
72
-
73
-
74
-
75
-
76
-
77
-
78
-
79
-
80
-
81
-
82
-
83
-
84
-
85
-
86
-
87
-
88
-
89
-
90
-
91
-
92
-
93
-
94
-
95
-
96
-
97
-
98
-
99
-
100
-
101
-
102
-
103
-
104
-
105
-
106
-
107
-
108
-
109
-
110
-
111
-
112
-
113
-
114
-
115
-
116
-
117
-
118
-
119
-
120
-
121
-
122
-
123
-
124
-
125
-
126
-
127
-
128
-
129
-
130
-
131
-
132
-
133
-
134
-
135
-
136
 |
 |