Netgear D7800 Genie Apps User Manual - Page 20
Use Desktop genie to Manage WiFi Connections
 |
View all Netgear D7800 manuals
Add to My Manuals
Save this manual to your list of manuals |
Page 20 highlights
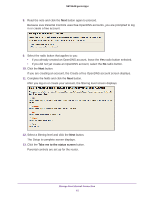
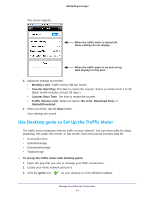
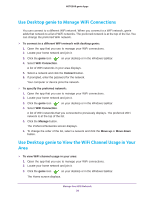
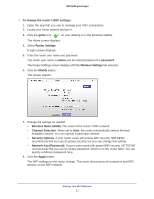
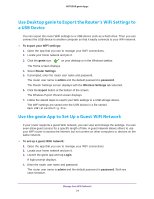
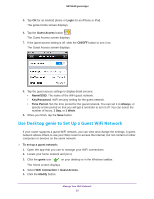
NETGEAR genie Apps Use Desktop genie to Manage WiFi Connections You can connect to a different WiFi network. When you connect to a WiFi network, genie adds that network to a list of WiFi networks. The preferred network is at the top of the list. You can change the preferred WiFi network. To connect to a different WiFi network with desktop genie: 1. Open the app that you use to manage your WiFi connections. 2. Locate your home network and join it. 3. Click the genie icon on your desktop or in the Windows taskbar. 4. Select WiFi Connection. A list of WiFi networks in your area displays. 5. Select a network and click the Connect button. 6. If prompted, enter the password for the network. Your computer or device joins the network. To specify the preferred network: 1. Open the app that you use to manage your WiFi connections. 2. Locate your home network and join it. 3. Click the genie icon on your desktop or in the Windows taskbar. 4. Select WiFi Connection. A list of WiFi networks that you connected to previously displays. The preferred WiFi network is at the top of the list. 5. Click the Manage button. The Preferred Networks screen displays. 6. To change the order of the list, select a network and click the Move up or Move down button. Use Desktop genie to View the WiFi Channel Usage in Your Area To view WiFi channel usage in your area: 1. Open the app that you use to manage your WiFi connections. 2. Locate your home network and join it. 3. Click the genie icon on your desktop or in the Windows taskbar. The Home screen displays. Manage Your WiFi Network 20
-
 1
1 -
2
-
3
-
4
-
5
-
6
-
7
-
8
-
9
-
10
-
11
-
12
-
13
-
14
-
 15
15 -
 16
16 -
 17
17 -
 18
18 -
 19
19 -
 20
20 -
 21
21 -
 22
22 -
 23
23 -
 24
24 -
 25
25 -
26
-
27
-
28
-
29
-
30
-
31
-
32
-
33
-
34
-
35
-
36
-
37
-
38
-
39
-
40
-
41
-
42
-
43
-
44
-
45
-
46
-
47
-
48
-
49
-
50
-
51
-
52
-
53
-
54
-
55
-
56
-
57
 |
 |