Netgear WAC730-Business User Manual - Page 134
Radio, 4 GHz, Apply, Remote MAC Address, The Edit Security Profile displays.
 |
View all Netgear WAC730-Business manuals
Add to My Manuals
Save this manual to your list of manuals |
Page 134 highlights
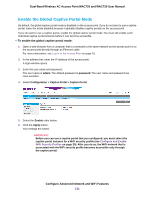
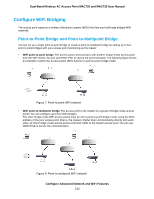
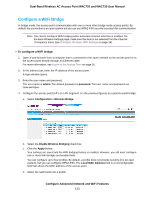
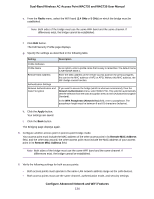
Dual-Band Wireless AC Access Point WAC720 and WAC730 User Manual e. From the Radio menu, select the WiFi band (2.4 GHz or 5 GHz) on which the bridge must be established. Note Both sides of the bridge must use the same WiFi band and the same channel. If differences exist, the bridge cannot be established. f. Click Edit button. The Edit Security Profile page displays. g. Specify the settings as described in the following table. Setting Description Profile Definition Profile Name Remote MAC Address Authentication Settings Network Authentication and Data Encryption As an option, enter a profile name that is easy to remember. The default name is NETGEAR-WDS-1. Enter the MAC address of the remote access point (in the previous figures, this can be the MAC address of AP2 or AP3). Without this MAC address, the WiFi bridge cannot function. If you want to secure the bridge (which is what we recommend), from the Network Authentication menu, select WPA2-PSK, This selection automatically sets the selection from the Data Encryption menu to AES (Advanced Encryption Standard). In the WPA Passphrase (Network Key) field, enter a passphrase. The passphrase length must be between 8 and 63 characters (inclusive). h. Click the Apply button. Your settings are saved. i. Click the Back button. The Bridging page displays again. 5. Configure another access point in point-to-point bridge mode. Your access point must include the MAC address of the other access point in its Remote MAC Address field, and the other way around, the other access point must include the MAC address of your access point in its Remote MAC Address field. Note Both sides of the bridge must use the same WiFi band and the same channel. If differences exist, the bridge cannot be established. 6. Verify the following settings for both access points: • Both access points must operate in the same LAN network address range as the LAN devices. • Both access points must use the same channel, authentication mode, and security settings. Configure Advanced Network and WiFi Features 134
-
 1
1 -
2
-
3
-
4
-
5
-
6
-
7
-
8
-
9
-
10
-
11
-
12
-
13
-
14
-
15
-
16
-
17
-
18
-
19
-
20
-
21
-
22
-
23
-
24
-
25
-
26
-
27
-
28
-
29
-
30
-
31
-
32
-
33
-
34
-
35
-
36
-
37
-
38
-
39
-
40
-
41
-
42
-
43
-
44
-
45
-
46
-
47
-
48
-
49
-
50
-
51
-
52
-
53
-
54
-
55
-
56
-
57
-
58
-
59
-
60
-
61
-
62
-
63
-
64
-
65
-
66
-
67
-
68
-
69
-
70
-
71
-
72
-
73
-
74
-
75
-
76
-
77
-
78
-
79
-
80
-
81
-
82
-
83
-
84
-
85
-
86
-
87
-
88
-
89
-
90
-
91
-
92
-
93
-
94
-
95
-
96
-
97
-
98
-
99
-
100
-
101
-
102
-
103
-
104
-
105
-
106
-
107
-
108
-
109
-
110
-
111
-
112
-
113
-
114
-
115
-
116
-
117
-
118
-
119
-
120
-
121
-
122
-
123
-
124
-
125
-
126
-
127
-
128
-
 129
129 -
 130
130 -
 131
131 -
 132
132 -
 133
133 -
 134
134 -
 135
135 -
 136
136 -
 137
137 -
 138
138 -
 139
139 -
140
-
141
-
142
-
143
-
144
-
145
-
146
-
147
-
148
-
149
-
150
-
151
-
152
-
153
-
154
-
155
-
156
-
157
-
158
-
159
-
160
-
161
-
162
-
163
 |
 |
