Netgear WNR3500Lv2 User Manual - Page 22
Wireless Placement and Range Guidelines, Wi-Fi, certified and WPA or WPA 2 capable - access point
 |
View all Netgear WNR3500Lv2 manuals
Add to My Manuals
Save this manual to your list of manuals |
Page 22 highlights
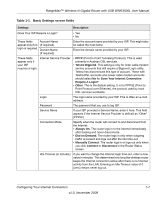
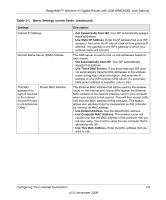
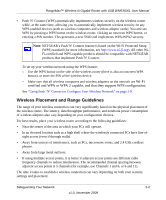
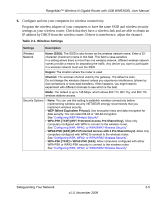
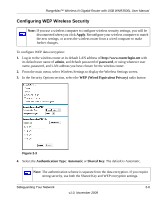
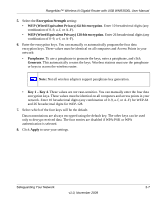
RangeMax™ Wireless-N Gigabit Router with USB WNR3500L User Manual • Push 'N' Connect (WPS) automatically implements wireless security on the wireless router while, at the same time, allowing you to automatically implement wireless security on any WPS-enabled devices (such as wireless computers and wireless adapter cards). You activate WPS by pressing a WPS button on the wireless router, clicking an onscreen WPS button, or entering a PIN number. This generates a new SSID and implements WPA/WPA2 security. Note: NETGEAR's Push 'N' Connect feature is based on the Wi-Fi Protected Setup (WPS) standard (for more information, see http://www.wi-fi.org). All other WiFi-certified and WPS-capable products should be compatible with NETGEAR products that implement Push 'N' Connect. To set up your wireless network using the WPS feature: - Use the WPS button on the side of the wireless router (there is also an onscreen WPS button), or enter the PIN of the wireless device. - Make sure that all wireless computers and wireless adapters on the network are Wi-Fi certified and WPA or WPA 2 capable, and that they support WPS configuration. See "Using Push 'N' Connect to Configure Your Wireless Network" on page 2-9. Wireless Placement and Range Guidelines The range of your wireless connection can vary significantly based on the physical placement of the wireless router. The latency, data throughput performance, and notebook power consumption of wireless adapters also vary depending on your configuration choices. For best results, place your wireless router according to the following guidelines: • Near the center of the area in which your PCs will operate. • In an elevated location such as a high shelf where the wirelessly connected PCs have line-ofsight access (even if through walls). • Away from sources of interference, such as PCs, microwave ovens, and 2.4 GHz cordless phones. • Away from large metal surfaces. • If using multiple access points, it is better if adjacent access points use different radio frequency channels to reduce interference. The recommended channel spacing between adjacent access points is 5 channels (for example, use Channels 1 and 6, or 6 and 11). The time it takes to establish a wireless connection can vary depending on both your security settings and placement. Safeguarding Your Network 2-2 v1.0, November 2009
-
 1
1 -
2
-
3
-
4
-
5
-
6
-
7
-
8
-
9
-
10
-
11
-
12
-
13
-
14
-
15
-
16
-
 17
17 -
 18
18 -
 19
19 -
 20
20 -
 21
21 -
 22
22 -
 23
23 -
 24
24 -
 25
25 -
 26
26 -
 27
27 -
28
-
29
-
30
-
31
-
32
-
33
-
34
-
35
-
36
-
37
-
38
-
39
-
40
-
41
-
42
-
43
-
44
-
45
-
46
-
47
-
48
-
49
-
50
-
51
-
52
-
53
-
54
-
55
-
56
-
57
-
58
-
59
-
60
-
61
-
62
-
63
-
64
-
65
-
66
-
67
-
68
-
69
-
70
-
71
-
72
-
73
-
74
-
75
-
76
-
77
-
78
-
79
-
80
-
81
-
82
-
83
-
84
-
85
-
86
-
87
-
88
-
89
-
90
-
91
-
92
-
93
-
94
-
95
-
96
-
97
-
98
-
99
-
100
-
101
-
102
-
103
-
104
-
105
-
106
-
107
-
108
-
109
-
110
-
111
-
112
-
113
-
114
-
115
-
116
-
117
-
118
-
119
-
120
-
121
-
122
-
123
-
124
-
125
-
126
-
127
-
128
-
129
-
130
-
131
-
132
-
133
 |
 |